跳转到主内容

当前版本的文档还未经巡查,您可以查看最新的已查核版本

你所需要的

  1. , 面板: 步骤 1 中的图像 1,2 , 面板: 步骤 1 中的图像 2,2
    • 用一个金属小铲子(小撬棍应该也可以)来拆开主机上的螺丝保护盖

  2. : 步骤 2 中的图像 1,1
    • 拆掉这两颗8.3毫米的三角螺丝(注:如果你不明白三角螺丝的含义,你可以参考奔驰车标的样子),它们藏在你刚刚拆下的盖子下面

  3. : 步骤 3 中的图像 1,1
    • 拆下靠近手柄连接端口附近的一颗5.9毫米的十字螺丝

  4. : 步骤 4 中的图像 1,1
    • 用刚才的小铲子移除光驱开口的橡胶垫片(注:在Wii的商标下面)

  5. : 步骤 5 中的图像 1,1
    • 拆掉一颗5.9毫米的十字螺丝,它在你刚刚拆掉的橡胶垫下面

  6. : 步骤 6 中的图像 1,2 : 步骤 6 中的图像 2,2
    • 小心的把Wii的面板拉开

    • 用镊子把LED的排线从主板拔出

    • 移开面板

  7. , 外壳: 步骤 7 中的图像 1,3 , 外壳: 步骤 7 中的图像 2,3 , 外壳: 步骤 7 中的图像 3,3
    • 打开手柄连接口保护盖,直到它与本体垂直

    • 把盖子直接向上拉,这样就可以拆下盖子

    • 内存卡保护盖也是这么拆

  8. : 步骤 8 中的图像 1,2 : 步骤 8 中的图像 2,2
    • 拆掉手柄连接口边沿剩下的两颗4.1毫米十字螺丝

    • 在四个角用手拉保护板,即可拆下

  9. : 步骤 9 中的图像 1,1
    • 拆掉两颗在手柄接口上5毫米十字螺丝

  10. : 步骤 10 中的图像 1,1
    • 用一个金属小铲子移开三个螺丝保护盖(图上高亮部分)

  11. : 步骤 11 中的图像 1,1
    • 移开下列螺丝

    • 两颗5毫米十字螺丝(红圈)

    • 一颗8.2毫米三角螺丝(橙圈)

  12. : 步骤 12 中的图像 1,1
    • 用祖传金属小铲子移开在主机下面的橡胶垫

  13. : 步骤 13 中的图像 1,1
    • 移开两颗8.2毫米三角螺丝,它们在你拆下的橡胶垫下面

  14. : 步骤 14 中的图像 1,1
    • 把壳子直接拉开就好啦~~

  15. , DVD光驱: 步骤 15 中的图像 1,2 , DVD光驱: 步骤 15 中的图像 2,2
    • 移开位于电池舱门上的十字螺丝

    • 这颗螺丝承载着电池舱门

    • 把电池舱门移开

    • 这是一个更换CR2032纽扣电池的好时机

  16. : 步骤 16 中的图像 1,1
    • 拆开在电池舱左边的8.2毫米三角螺丝

  17. : 步骤 17 中的图像 1,1
    • 拆开两颗光驱和手柄接口屏蔽罩的8.2毫米三角螺丝

  18. : 步骤 18 中的图像 1,1
    • 现在可用直接移开屏蔽罩啦~~~

  19. : 步骤 19 中的图像 1,1
    • 移开这四颗位于底部固定光驱的9毫米十字螺丝

  20. : 步骤 20 中的图像 1,1
    • 抬起光驱和手柄接口的一部分,这样就可以拿起底部的线缆

    • 超级超级小心的把光驱电源线从塑料屏蔽罩和散热器边上拔开

  21. : 步骤 21 中的图像 1,1
    • 从光驱本体上拔下电源线

  22. : 步骤 22 中的图像 1,2 : 步骤 22 中的图像 2,2
    • 用指甲(强烈推荐翘棒qwq)把光驱信号排线卡扣翻开

    • 确认你开的是卡扣,不是排线座(真要是排线座被你搞下来那你玩的太大了)

    • 把排线拔下来

    • 移开主机的光驱

  23. 这个步骤还没有翻译 帮忙翻译一下

    : 步骤 23 中的图像 1,1
    • Pull the disc detector ribbon cable straight out of its connector with a pair of tweezers.

  24. 这个步骤还没有翻译 帮忙翻译一下

    : 步骤 24 中的图像 1,3 : 步骤 24 中的图像 2,3 : 步骤 24 中的图像 3,3
    • Use the tip of a spudger to push the sides of the ZIF connector fastener securing the spindle motor ribbon cable directly away from the connector.

    • Disconnect the spindle motor ribbon cable by pulling it straight out of its connector with a pair of tweezers.

  25. 这个步骤还没有翻译 帮忙翻译一下

    : 步骤 25 中的图像 1,2 : 步骤 25 中的图像 2,2
    • Remove the piece of black cloth tape that covers a portion of the lens ribbon cable.

  26. 这个步骤还没有翻译 帮忙翻译一下

    : 步骤 26 中的图像 1,3 : 步骤 26 中的图像 2,3 : 步骤 26 中的图像 3,3
    • Disconnect the lens ribbon cable by first pushing the two locking tabs of the ZIF connector towards the ribbon cable with the tip of a spudger.

    • Use a pair of tweezers to pull the lens ribbon cable straight out of its connector.

  27. 这个步骤还没有翻译 帮忙翻译一下

    : 步骤 27 中的图像 1,1
    • Remove the two 5.0 mm Phillips screws securing the DVD drive board to the drive housing.

  28. 这个步骤还没有翻译 帮忙翻译一下

    : 步骤 28 中的图像 1,3 : 步骤 28 中的图像 2,3 : 步骤 28 中的图像 3,3
    • Lift the DVD drive board off the drive housing by first lifting the side with the lens ribbon cable connector.

    • Pull the opposite side of the DVD drive board straight out while lifting the entire board straight up to free it from the small black plastic tabs holding it in place.

  29. 这个步骤还没有翻译 帮忙翻译一下

    : 步骤 29 中的图像 1,1
    • De-route the cables that are soldered to the DVD drive board from underneath their black plastic tabs with the tip of a spudger.

  30. 这个步骤还没有翻译 帮忙翻译一下

    : 步骤 30 中的图像 1,1
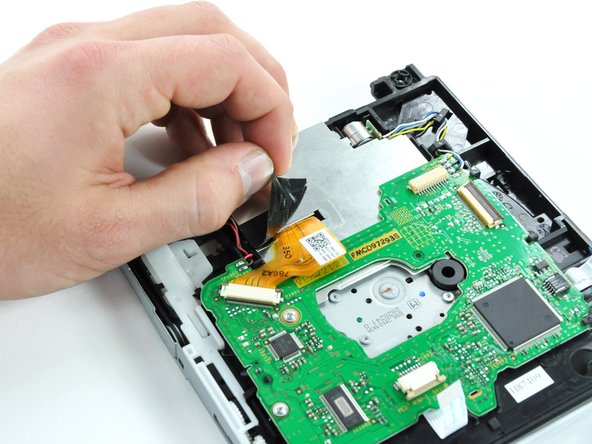
    • Lay the DVD drive board next to the DVD drive in such a manner that the cables soldered to the DVD drive board are out of the way (as shown in the picture)

    • Remove the single 5.0 mm Phillips screw from the DVD lens EMI shield.

  31. 这个步骤还没有翻译 帮忙翻译一下

    : 步骤 31 中的图像 1,3 : 步骤 31 中的图像 2,3 : 步骤 31 中的图像 3,3
    • The side of the EMI shield with the slot for the DVD lens ribbon cable has two small metal clips that fasten to black plastic tabs on the DVD drive housing.

    • Use the tip of a spudger to bend the two metal clips up enough so that they are no longer fastened to their respective plastic tabs.

    • The EMI shield is made of a soft, malleable metal. It can be easily be bent out and back into shape, but excessive fatigue may cause the clips to break.

    • Make sure both clips are pushed back down into their original positions at reassembly.

  32. 这个步骤还没有翻译 帮忙翻译一下

    : 步骤 32 中的图像 1,2 : 步骤 32 中的图像 2,2
    • Small tabs on the EMI shield sit in two holes on the outside edge of the DVD drive housing.

    • Insert the tip of a spudger into the hole that is closer to the red and pink wires that connect to the DVD drive board.

    • Rotate the spudger to pry the first tab out of its hole on the DVD drive housing.

  33. 这个步骤还没有翻译 帮忙翻译一下

    : 步骤 33 中的图像 1,2 : 步骤 33 中的图像 2,2
    • Repeat the action in the previous step to pry the second tab on the EMI shield out of its hole on the DVD drive housing.

    • It may be necessary to hold the opposite edge of the EMI shield to keep any of the clips or tabs from reseating.

  34. 这个步骤还没有翻译 帮忙翻译一下

    : 步骤 34 中的图像 1,2 : 步骤 34 中的图像 2,2
    • Grasp the EMI shield by the two edges that are free and rotate the entire piece slightly towards the edge that is still held down until the final two remaining clips are free.

    • Lift the EMI shield straight off the DVD drive.

  35. 这个步骤还没有翻译 帮忙翻译一下

    : 步骤 35 中的图像 1,1
    • Remove the 5.0 mm Phillips screw that is closer to the yellow, blue, white, and grey wires.

  36. 这个步骤还没有翻译 帮忙翻译一下

    : 步骤 36 中的图像 1,3 : 步骤 36 中的图像 2,3 : 步骤 36 中的图像 3,3
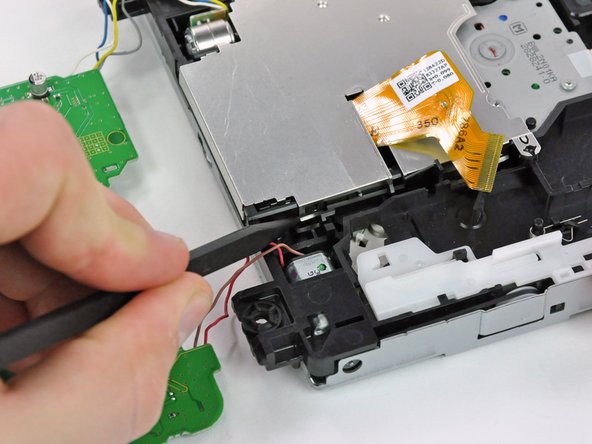
    • While holding the DVD drive with one hand, grasp the DVD drive lens retaining pin (closest to the screw that was just removed) with a pair of needle nose pliers.

    • Slide the retaining pin out towards the edge of the DVD drive housing.

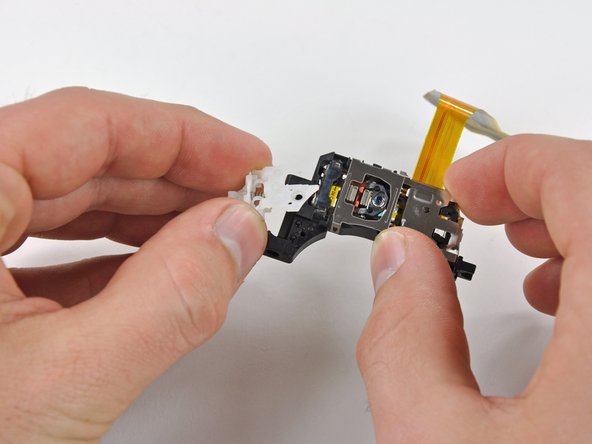
    • Freeing the pin will require some force, and will then become very easy.

    • Once the pin moves easily, grab it with your fingers and pull it out of the DVD drive housing completely.

  37. 这个步骤还没有翻译 帮忙翻译一下

    : 步骤 37 中的图像 1,2 : 步骤 37 中的图像 2,2
    • Grab the DVD drive lens assembly by the side that the retaining pin was just removed from.

    • Remove the lens assembly from the DVD drive housing.

  38. 这个步骤还没有翻译 帮忙翻译一下

    : 步骤 38 中的图像 1,2 : 步骤 38 中的图像 2,2
    • Remove the 4.2 mm Phillips screw that secures the white plastic bracket to the lens assembly.

    • Lift the bracket off the lens assembly.

    • If you are going to install a new lens, make sure to transfer the white plastic bracket and screw to the new laser lens before installation.

终点

137等其他人完成本指南。

David Hodson

于04/13/10注册

150,529 声望

创作了127篇指南

25条评论

Many thanks for the excellent guide - my wii is working again!

Niel Viljoen - 回复

WOW! I have seen a lot of repair manuals and guides, and this has to be one of the best!

Appreciate the care and craftsmanship it took to put this together.

One suggestion: Please add pics of the screws with specs to compare the sizes.

Terry - 回复

very informative...if the laser is dirty or the lens is broken....will the tray from the drive come out and go inside...as normal ....please assist...

Techy - 回复

All went well. The main problem I had was tweezers of low quality. Also, during assembly, some screws was to tricky, so I needed to magnetize screwdriver and for that purpose I used - a speaker :)

Great tutorial, in deed. David just saved Christmas for me and my family.

Dragan - 回复

This is one of the best set of instructions I have ever used. Easy to follow steps with accurate illustrations. Very well done, I don't know how you could make it any better! A++,

camoore4800 - 回复

添加评论

浏览统计数据:

过去 24 小时: 39

过去 7 天: 311

过去 30 天: 1,174

总计 186,238