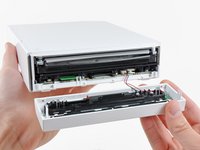
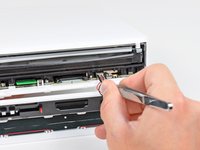
跳转到主内容

Nintendo Wii 前面板更换

你所需要的

  1. Nintendo Wii 前面板更换, 前面板: 步骤 1 中的图像 1,2 Nintendo Wii 前面板更换, 前面板: 步骤 1 中的图像 2,2
    • 用一个金属小铲子(小撬棍应该也可以)来拆开主机上的螺丝保护盖

  2. Nintendo Wii 前面板更换: 步骤 2 中的图像 1,1
    • 拆掉这两颗8.3毫米的三角螺丝(注:如果你不明白三角螺丝的含义,你可以参考奔驰车标的样子),它们藏在你刚刚拆下的盖子下面。

  3. Nintendo Wii 前面板更换: 步骤 3 中的图像 1,1
    • 拆下靠近手柄连接端口附近的一颗5.9毫米的十字螺丝

  4. Nintendo Wii 前面板更换: 步骤 4 中的图像 1,1
    • 用刚才的小铲子移除光驱开口的橡胶垫片(注:在Wii的商标下面)

  5. Nintendo Wii 前面板更换: 步骤 5 中的图像 1,1
    • 拆掉一颗5.9毫米的十字螺丝,它在你刚刚拆掉的橡胶垫下面

  6. Nintendo Wii 前面板更换: 步骤 6 中的图像 1,2 Nintendo Wii 前面板更换: 步骤 6 中的图像 2,2
    在这个步骤中使用的工具:
    Tweezers
    $4.99
    • 小心的把Wii的面板拉开

    • 镊子把LED的排线从主板拔出

    • 移开面板

结论

要装好你的设备,请反向操作以上步骤

24等其他人完成本指南。

由衷感谢以下译者:

en zh

100%

这些译者帮助我们修补全世界! 您也想加入吗?
开始翻译 ›

3条评论

Any more to do if pressing the on button does nothing, its still red power light?

Kyrre - 回复

Tanks for this guide Btw

Kyrre - 回复

Thanks for the guide, I just wish it continued with replacing the components within the faceplate, as I wanted to replace the white shell. Still helpful though!

Cynthia - 回复

添加评论

浏览统计数据:

过去 24 小时: 7

过去 7 天: 101

过去 30 天: 288

总计 56,930