跳转到主内容

Nest x Yale Lock Speaker Replacement

你所需要的

  1. Nest x Yale Lock Speaker Replacement, Speaker: 步骤 1 中的图像 1,3 Nest x Yale Lock Speaker Replacement, Speaker: 步骤 1 中的图像 2,3 Nest x Yale Lock Speaker Replacement, Speaker: 步骤 1 中的图像 3,3
    • Get the lock device and turn it around.

    • Take out the black cover by removing the screws as shown in picture #1 and pull it out gently just so.

    • All 3 screws are 0.25 inches high and are phillip screws.

    • Doing so gains access to the motherboard as shown in picture #3.

  2. Nest x Yale Lock Speaker Replacement: 步骤 2 中的图像 1,2 Nest x Yale Lock Speaker Replacement: 步骤 2 中的图像 2,2
    在这个步骤中使用的工具:
    Tweezers
    $4.99
    购买
    • On the white connector in picture #1, push down using a pointed tip object and then remove the connection using tweezers.

    • For the wider connection in picture #2, lift up the black switch and remove the connection using tweezers.

  3. Nest x Yale Lock Speaker Replacement: 步骤 3 中的图像 1,2 Nest x Yale Lock Speaker Replacement: 步骤 3 中的图像 2,2
    • Take out the motherboard by unscrewing the screws holding it shown in picture #1.

    • The screws are phillips and are 0.25 inches.

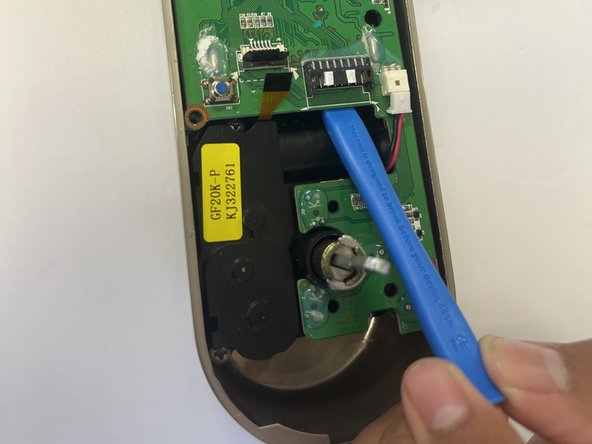
    • After removing the screw on the motherboard, pry the motherboard out using a prying tool shown in picture #2.

  4. Nest x Yale Lock Speaker Replacement: 步骤 4 中的图像 1,1
    • The small black part on the down right side of the motherboard is the audio.

结论

To reassemble your device, follow these instructions in reverse order.

Christopher Gonzalez

于09/26/22注册

313 声望

创作了3篇指南

团队

CSU Los Angeles, Team 5-3, Adachi Fall 2022 CSU Los Angeles, Team 5-3, Adachi Fall 2022 的会员

CSULA-ADACHI-F22S5G3

5 名成员

创作了5篇指南

0条评论

添加评论

浏览统计数据:

过去 24 小时: 4

过去 7 天: 8

过去 30 天: 18

总计 265