跳转到主内容

当前版本的文档还未经巡查,您可以查看最新的已查核版本

你所需要的

  1. 这个步骤还没有翻译 帮忙翻译一下

    : 步骤 1 中的图像 1,3 : 步骤 1 中的图像 2,3 : 步骤 1 中的图像 3,3
    • Insert the SIM card eject tool into the hole in the side of the SIM card tray and push to eject the tray.

    • Remove the SIM card tray.

    • If the SIM card does not fall free from the tray on its own, simply remove it with your fingers.

  2. 这个步骤还没有翻译 帮忙翻译一下

    : 步骤 2 中的图像 1,3 : 步骤 2 中的图像 2,3 : 步骤 2 中的图像 3,3
    • In the following steps you will be releasing the clips holding the phone's cases together. However, the back case is also secured with an adhesive pad. After separating the clips you will use an iOpener to allow the case to fully open. Do not attempt to fully open the phone before loosening the adhesive.

    • Insert a plastic opening tool into the seam between the front and rear covers near the SIM card slot.

    • Slide the plastic opening tool along the seam toward the upper corner.

  3. 这个步骤还没有翻译 帮忙翻译一下

    : 步骤 3 中的图像 1,2 : 步骤 3 中的图像 2,2
    • Carefully slide the plastic opening tool around the corner, freeing it from clips.

  4. 这个步骤还没有翻译 帮忙翻译一下

    : 步骤 4 中的图像 1,2 : 步骤 4 中的图像 2,2
    • Pry around the top right corner of the phone between the two covers.

  5. 这个步骤还没有翻译 帮忙翻译一下

    : 步骤 5 中的图像 1,3 : 步骤 5 中的图像 2,3 : 步骤 5 中的图像 3,3
    • Run the opening tool along the seam around all four sides, separating the remaining clips holding the cover on.

    • The plastic on the front cover is thinner near the buttons, and the buttons may move around. Go slowly to avoid damaging the buttons or the front cover.

    • Do not push the opening tool deep into phone, or you may damage internal components.

  6. 这个步骤还没有翻译 帮忙翻译一下

    : 步骤 6 中的图像 1,1
    • Heat an iOpener and lay it over the phone for approximately 90 seconds to loosen the adhesive securing the back cover.

  7. 这个步骤还没有翻译 帮忙翻译一下

    : 步骤 7 中的图像 1,3 : 步骤 7 中的图像 2,3 : 步骤 7 中的图像 3,3
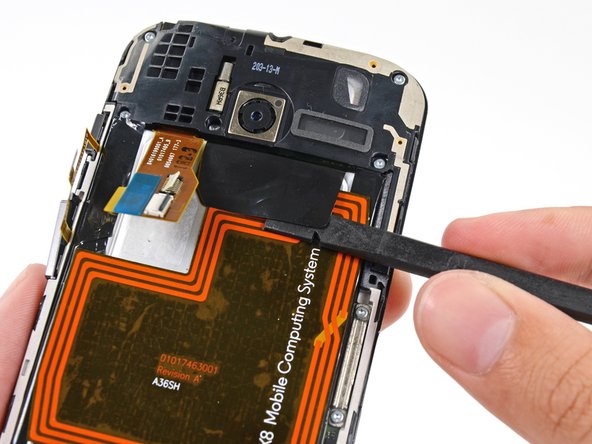
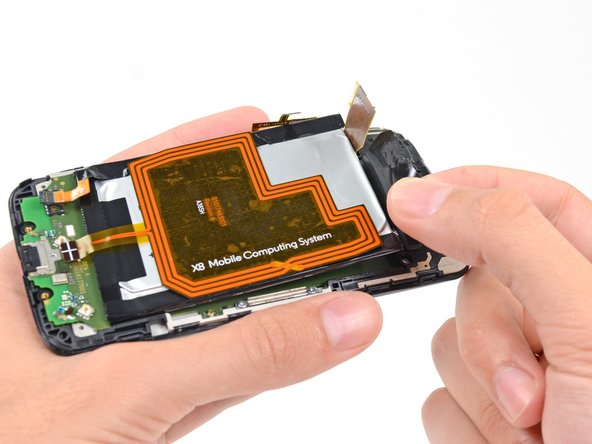
    • Starting from the SIM slot side, carefully peel the back cover off of the phone.

    • The back cover is very flexible, but you don't want to damage any internal components by being too hasty.

    • There is a chance that the NFC coil may remain stubbornly adhered to the back cover. If that's the case, stop peeling the cover and reapply a heated iOpener to the back cover.

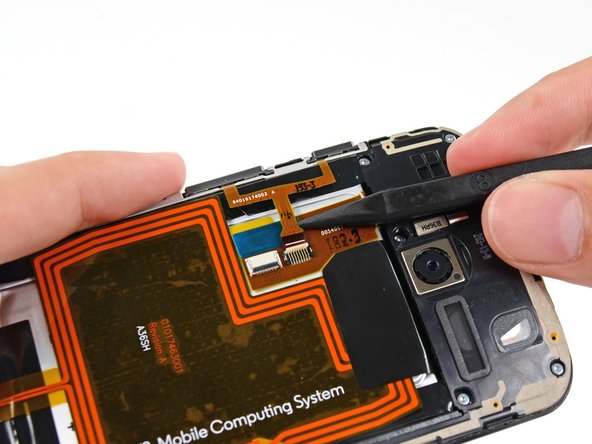
    • Do not separate the back cover entirely; it is still connected to the phone by the camera flash cable.

    • The flash cable is attached on the power/volume button side of the phone.

  8. 这个步骤还没有翻译 帮忙翻译一下

    : 步骤 8 中的图像 1,1
    • Gently set the back cover down in a way that exposes the camera flash cable connector, but does not put strain on it.

  9. 这个步骤还没有翻译 帮忙翻译一下

    : 步骤 9 中的图像 1,3 : 步骤 9 中的图像 2,3 : 步骤 9 中的图像 3,3
    • Use the tip of a spudger to flip up the retaining flap on the flash cable ZIF connector.

    • Be sure to pry only on the flap itself, not on the connector.

    • Pull the flash cable straight out of its socket.

  10. 这个步骤还没有翻译 帮忙翻译一下

    : 步骤 10 中的图像 1,1
    • Separate the back cover from the phone.

  11. 这个步骤还没有翻译 帮忙翻译一下

    : 步骤 11 中的图像 1,1
    • Remove the four 3 mm T3 Torx screws securing the lower antenna assembly to the phone.

  12. 这个步骤还没有翻译 帮忙翻译一下

    : 步骤 12 中的图像 1,3 : 步骤 12 中的图像 2,3 : 步骤 12 中的图像 3,3
    • Use the flat end of a spudger to pry up the lower antenna assembly and free it from the phone.

    • Remove the antenna assembly.

  13. 这个步骤还没有翻译 帮忙翻译一下

    : 步骤 13 中的图像 1,3 : 步骤 13 中的图像 2,3 : 步骤 13 中的图像 3,3
    • Insert the tip of a spudger under the battery cable near the connector to lift it straight up from its socket.

    • Use the flat end of a spudger to disconnect the NFC antenna cable connector.

  14. 这个步骤还没有翻译 帮忙翻译一下

    : 步骤 14 中的图像 1,3 : 步骤 14 中的图像 2,3 : 步骤 14 中的图像 3,3
    • Use the tip of a spudger to flip up the ZIF retaining flap from the button assembly cable connector.

    • Slide the tip of the spudger under the button assembly cable near the connector to pull the cable straight out of its socket.

  15. 这个步骤还没有翻译 帮忙翻译一下

    : 步骤 15 中的图像 1,2 : 步骤 15 中的图像 2,2
    • Insert the flat end of a spudger under the interconnect cable to free it from the adhesive holding it to the battery.

  16. 这个步骤还没有翻译 帮忙翻译一下

    : 步骤 16 中的图像 1,2 : 步骤 16 中的图像 2,2
    • Use the flat end of a spudger to peel the adhesive pull-tab off the top of battery.

  17. 这个步骤还没有翻译 帮忙翻译一下

    : 步骤 17 中的图像 1,3 : 步骤 17 中的图像 2,3 : 步骤 17 中的图像 3,3
    在这个步骤中使用的工具:
    Tesa 61395 Tape
    $5.99
    购买
    • Use the adhesive pull-tab to lift the battery from its recess.

    • The battery is secured to the motherboard with mild adhesive. Peel slowly, and be careful not to bend or puncture the battery.

    • Remove the battery from the phone.

    • When reassembling your phone secure the battery with double-sided tape or pre-cut adhesive strips.

  18. 这个步骤还没有翻译 帮忙翻译一下

    : 步骤 18 中的图像 1,1
    • Proceed only if you want to transfer the NFC antenna from the old battery to the new battery.

    • If you choose not to, or if you damage the coil, your phone will work without it, but lose its NFC capabilities.

    • Apply a heated iOpener to the NFC antenna for 90 seconds.

  19. 这个步骤还没有翻译 帮忙翻译一下

    : 步骤 19 中的图像 1,3 : 步骤 19 中的图像 2,3 : 步骤 19 中的图像 3,3
    • Insert an opening pick under one of the corners of the NFC antenna and slowly slide it along the edge to cut through the black adhesive.

    • While it is not imperative to keep the black adhesive layer intact, try to cut underneath it so that it comes off in one piece.

  20. 这个步骤还没有翻译 帮忙翻译一下

    : 步骤 20 中的图像 1,3 : 步骤 20 中的图像 2,3 : 步骤 20 中的图像 3,3
    • Continue using the opening pick to cut around the NFC antenna, loosening the remaining black adhesive.

    • The NFC antenna should still function normally as long as the plastic layer is not ripped.

  21. 这个步骤还没有翻译 帮忙翻译一下

    : 步骤 21 中的图像 1,2 : 步骤 21 中的图像 2,2
    在这个步骤中使用的工具:
    Tesa 61395 Tape
    $5.99
    购买
    • Remove the NFC antenna from the old battery.

    • Use pre-cut double sided tape or Tesa tape to reattach the NFC coil to the replacement battery.

    • Before installing the NFC antenna, install the replacement battery and plug in the NFC antenna, to make sure that the antenna is properly aligned.

终点

114等其他人完成本指南。

Sam Goldheart

于10/18/12注册

465,822 声望

创作了538篇指南

团队

iFixit iFixit 的会员

Staff

135 名成员

创作了17,146篇指南

35条评论

Cool but where to buy the spare battery?

Thanks

Roman Senkyr - 回复

Nice, detailed guide. In fact so detailed, I do not trust myself making this repair. Does anyone offer this as a service (for a fee)?

thenikonknight - 回复

OEM is the Motorola EX34, all over Ebay for $12-20

Jeff - 回复

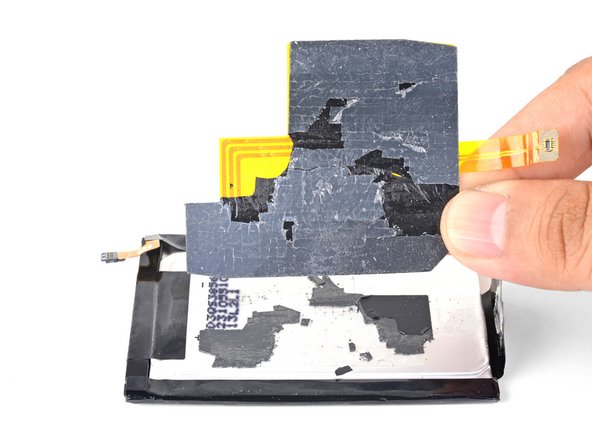
This doesn't address the antenna stuck on (but separate) from the battery. It's easy enough to see in the pictures, but it doesn't come off easily in one piece. I think mine still works, but definitely needs addressing.

Kim Schaffer - 回复

Yes - getting the antenna off is a bear. I - well, my cell-phone guy - didn't bother because I don't use NFC for anything, so I hope that was okay!

Jessica Montena - 回复

添加评论

浏览统计数据:

过去 24 小时: 8

过去 7 天: 27

过去 30 天: 137

总计 203,317