简介
警告:更换电池存在风险!遵循本指南操作时请务必小心!
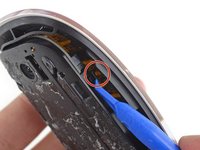
将电池放电至25%以下来降低锂电池热时控风险。
你所需要的


如要组装你的设备,按照本指南反向顺序操作。
将电子废物带至 R2 或 e-Stewards 认证回收点进行回收。
29等其他人完成本指南。


团队

16指南评论
I may be wrong because I don’t own this device, but from what I’ve read from other tutorials, it does not look like it’s necessary to do steps 1 and 2. The tutorials I’ve read just split the mouse in 2 without messing with the bottom of the mouse. Doing so means they don’t need to worry about damaging the bottom or working with the adhesive.
I have fixed it!
Thanks for the note!
you are right 1st and 2nd are unnecessary steps, but hats off to the creator for showing, grat job! thanks
Die Anleitung ist leider sehr unvollständig.
Nachdem das Maus Kabel und das Batterie Kabel entfernt wurde, ALLE Schrauben entfernen (4er und 5er Torx), die Platine, den Schalter und die Metall Spange demontieren. Den Ladestecker abschrauben, Achtung! darunter befindet sich eine Metallhülse / Führung für den Ladestecker, gleich mit entfernen.
Jetzt darf nur noch die Batterie zu sehen sein.... Ab in den Backofen und auf 50 Grad Celsius erwärmen, das reicht aus, um die Batterie ohne Schaden am Gehäuse zu entfernen. Die Klebestreifen befinden sich links und rechts auf den langen Seiten. Diese im warmen Zustand sofort ablösen und auf die neue Batterie kleben.
Beim Zusammenbau darauf achten, die etwas längeren Schrauben gehören zum Schalter! Die Stecker vorsichtig ohne Gewalt einstecken, wenn alles richtig ist, gehen sie ganz leicht herein.
So, ich hoffe das ich nichts vergessen habe, Viel Glück
Translation:
Unfortunately, the instructions are very incomplete.
After the mouse cable and the battery cable have been removed, remove ALL screws (4 and 5 Torx), dismantle the board, switch and metal clasps. Unscrew the charging plug, attention! Below it is a metal sleeve / guide for the charging plug, immediately remove it.
Now only the battery can be seen.... Put it in the oven and heat it up to 50 degrees Celsius, that's enough to remove the battery without damaging the housing. The adhesive strips are located on the left and right on the long sides. Remove them immediately when warm and stick them to the new battery.
When assembling, make sure that the slightly longer screws belong to the switch! Gently plug in the plugs without force, if everything is correct, they go in very easily.
So, I hope I haven't forgotten anything, good luck