跳转到主内容

当前版本的文档还未经巡查,您可以查看最新的已查核版本

你所需要的

  1. , 底壳: 步骤 1 中的图像 1,1
    • 拆除以下十颗固定在机壳上的螺丝

    • 三颗13.5mm(14.1 mm) 菲利普斯十字螺丝 。

    • 七颗3 mm 菲利普斯十字螺丝。

    • 卸下这些螺丝时,请注意它们如何以很小的角度伸出。必须以相同的方式重新安装它们。

  2. : 步骤 2 中的图像 1,1
    • 使用双手在后壳接近风扇处提起固定后壳的两个卡扣。

    • 将后壳放置在一边。

  3. , 电池: 步骤 3 中的图像 1,1
    • 卸下将电池固定到上壳的两个7.4 mm Y型螺丝。

    • 注意:对于某些维修(例如硬盘驱动器),不需要卸下电池,但防止电池在主板上意外短路。 如果不取出电池,请小心,因为主板的部件可能会通电。

    • 你不一定要按照步骤3-6来取出电池,以更换硬盘。 然而,建议你在处理电子设备之前,先从电子设备中取出所有电源。

  4. : 步骤 4 中的图像 1,1
    • 用手指尖小心地撕下警告标签的一角,露出隐藏的Y型螺丝。

    • 拆下最后一块7.4毫米的三点螺丝,将电池固定在上盖上。

  5. : 步骤 5 中的图像 1,2 : 步骤 5 中的图像 2,2
    • 用塑料拉片提起电池,将其从上壳的长边滑开。

    • 不要试图完全取出电池。

  6. : 步骤 6 中的图像 1,1
    • 将电池从主板上倾斜到足以触碰电池电路。

    • 将电池电路从主板上的插座中拔出,然后从上盖取出电池。

    • 将电池电路拉离主板的中心。

    • 如果你在安装新电池,你应该在安装完成后进行校准

    • 把电池充满,然后至少继续充电两个小时。之后,像往常一样使用它,消耗电量。当你看到低电量警告时,保存好你的工作,然后让笔记本开着,直到它因为低电量而入睡。再等待至少五个小时,之后再把你的笔记本充满到100%

    • 如果在安装新电池后你发现了一些异常状况或麻烦,你可能需要重置你的Macbook的设备管理器

  7. 这个步骤还没有翻译 帮忙翻译一下

    : 步骤 7 中的图像 1,1
    • Use the flat end of a spudger to carefully pry the AirPort/Bluetooth ribbon cable up off its socket on the logic board.

  8. 这个步骤还没有翻译 帮忙翻译一下

    : 步骤 8 中的图像 1,1
    • Pull the camera cable connector straight out of its socket on the logic board.

    • Pull the cable parallel to the face of the logic board toward the optical drive opening.

  9. 这个步骤还没有翻译 帮忙翻译一下

    : 步骤 9 中的图像 1,1
    • Use the tip of a spudger to pry the three antenna connectors up off the AirPort/Bluetooth board.

  10. 这个步骤还没有翻译 帮忙翻译一下

    : 步骤 10 中的图像 1,2 : 步骤 10 中的图像 2,2
    • De-route all three antenna cables from their channels in the AirPort/Bluetooth housing.

    • De-route the camera cable from its channel in the AirPort/Bluetooth housing.

  11. 这个步骤还没有翻译 帮忙翻译一下

    : 步骤 11 中的图像 1,1
    • Remove the following two screws securing the AirPort/Bluetooth housing to the upper case:

    • One 3.8 mm Phillips

    • One 8.6 mm Phillips

  12. 这个步骤还没有翻译 帮忙翻译一下

    : 步骤 12 中的图像 1,1
    • Remove the AirPort/Bluetooth assembly from the upper case, minding any cables that may get caught.

  13. 这个步骤还没有翻译 帮忙翻译一下

    : 步骤 13 中的图像 1,2 : 步骤 13 中的图像 2,2
    • Remove the 8.6 mm Phillips screw securing the antenna/camera cable retainer to the upper case.

    • Remove the antenna/camera cable retainer from the upper case.

  14. 这个步骤还没有翻译 帮忙翻译一下

    : 步骤 14 中的图像 1,1
    • Remove two of the three 6 mm T6 Torx screws securing the right side of the display to the upper case.

    • We purposely have you leave one screw attaching the display to the upper case to aid in future steps.

  15. 这个步骤还没有翻译 帮忙翻译一下

    : 步骤 15 中的图像 1,3 : 步骤 15 中的图像 2,3 : 步骤 15 中的图像 3,3
    • Grab the plastic pull tab secured to the display data cable lock and rotate it toward the DC-In side of the computer.

    • Pull the display data cable straight out of its socket on the logic board.

    • Do not lift up on the display data cable, as its socket is very fragile. Pull the cable parallel to the face of the logic board.

  16. 这个步骤还没有翻译 帮忙翻译一下

    : 步骤 16 中的图像 1,2 : 步骤 16 中的图像 2,2
    • Remove the 8.6 mm Phillips screw securing the display data cable retainer to the upper case.

    • Remove the display data cable retainer from the upper case.

  17. 这个步骤还没有翻译 帮忙翻译一下

    : 步骤 17 中的图像 1,1
    • Remove two of the three 6 mm T6 Torx screws securing the left side of the display to the upper case.

    • We purposely have you leave one screw attaching the display to the upper case to aid in future steps.

  18. 这个步骤还没有翻译 帮忙翻译一下

    : 步骤 18 中的图像 1,1
    • Open your MacBook Pro so the display is perpendicular to the upper case.

    • Place your opened MacBook Pro on a table as pictured.

    • While holding the display and upper case together with your left hand, remove the remaining T6 Torx screw from the upper display bracket.

  19. 这个步骤还没有翻译 帮忙翻译一下

    : 步骤 19 中的图像 1,1
    • Be sure to hold the display and upper case together with your left hand. Failure to do so may cause the freed display/upper case to fall, potentially damaging each component.

    • Remove the last remaining T6 Torx screw securing the display to the upper case.

  20. 这个步骤还没有翻译 帮忙翻译一下

    : 步骤 20 中的图像 1,3 : 步骤 20 中的图像 2,3 : 步骤 20 中的图像 3,3
    • Grab the upper case with your right hand and rotate it slightly toward the top of the display so the upper display bracket clears the edge of the upper case.

    • Rotate the display slightly away from the upper case.

    • Lift the display up and away from the upper case, minding any brackets or cables that may get caught.

  21. 这个步骤还没有翻译 帮忙翻译一下

    : 步骤 21 中的图像 1,2 : 步骤 21 中的图像 2,2
    • In the following steps, you will use a heat gun to soften the adhesive securing the outer black border around the underside of the front glass panel to the display. The area the adhesive is applied to is shown in red in the second picture.

    • Before starting, be sure to clean the display glass with lint-free cloth moistened with a mild solution; it will make the suction cup adhere better, and will make checking for dust on reassembly easier

    • With the heat gun set to low, start by heating the outer black border near the upper right corner of the glass panel.

    • Always aim the heat gun away from the soft rubber strip around the display glass. Heating the rubber will cause it to melt slightly, turning its finish from matte to glossy. Touching overheated rubber can cause it to permanently deform.

    • Due to the heat applied, it is normal for a layer of condensation to develop on the inside of the glass panel and/or the outside of the LCD. It can be removed with glass cleaner once the glass is separated from the display.

  22. 这个步骤还没有翻译 帮忙翻译一下

    : 步骤 22 中的图像 1,3 : 步骤 22 中的图像 2,3 : 步骤 22 中的图像 3,3
    在这个步骤中使用的工具:
    Heavy-Duty Suction Cups (Pair)
    $14.95
    购买
    • With the panel sufficiently heated, fasten a heavy-duty suction cup near the upper right corner of the display glass.

    • Don't fasten the suction cup on top of the rubber strip around the edge of the display glass.

    • To attach the suction cups we sell, first position the suction cup with the movable handle parallel to the face of the glass panel. While lightly holding the suction cup against the glass, raise the movable handle until it is parallel with the other handle.

    • Slowly and gently pull the corner of the display glass up off the display assembly.

    • If only the top edge of the glass lifts up (as seen in the third picture), repeat steps one and two until you can lift up the corner of the panel.

  23. 这个步骤还没有翻译 帮忙翻译一下

    : 步骤 23 中的图像 1,3 : 步骤 23 中的图像 2,3 : 步骤 23 中的图像 3,3
    • Gently lift the corner of the display glass enough to insert a spudger between it and the display assembly.

    • Use the flat end of a spudger to gently pry up the adhesive securing the front glass to the display.

    • Pry up the glass panel a few inches away from the upper right corner along the top and right edges of the display.

  24. 这个步骤还没有翻译 帮忙翻译一下

    : 步骤 24 中的图像 1,2 : 步骤 24 中的图像 2,2
    • Use a heat gun to soften the adhesive under the black strip along the right side of the front glass panel.

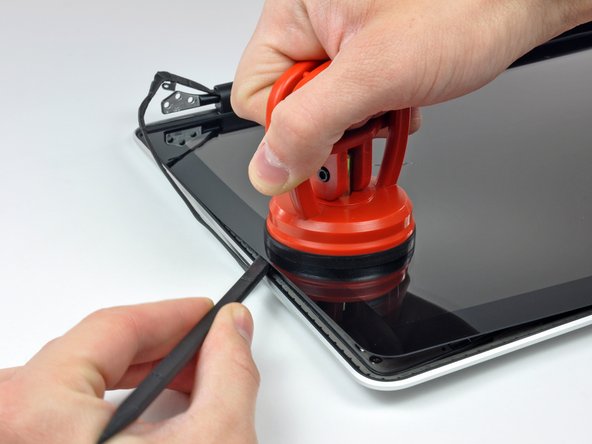
    • Attach a suction cup along the right side of the front glass panel.

    • Pull up on the glass panel while you use the flat end of a spudger to separate it from the rest of the display assembly.

    • Continue working along the right edge of the front display glass until it is separated from the display.

    • It may be helpful to use a guitar pick or another thin plastic object to keep the upper right corner of the front glass panel from sticking back down to the display assembly.

  25. 这个步骤还没有翻译 帮忙翻译一下

    : 步骤 25 中的图像 1,2 : 步骤 25 中的图像 2,2
    • Use your heat gun to soften the adhesive under the black strip along the top edge of the glass display panel.

    • Attach a suction cup near the top edge of the glass display panel and use it to pull the glass panel up off the display.

    • Work along the top edge of the glass panel, carefully using the flat end of a spudger to separate the adhesive if necessary.

  26. 这个步骤还没有翻译 帮忙翻译一下

    : 步骤 26 中的图像 1,2 : 步骤 26 中的图像 2,2
    • Use a heat gun to soften the adhesive under the black strip near the upper left corner of the glass display panel.

    • Attach a suction cup near the upper left corner of the glass display panel.

    • Pull up on the suction cup and use the flat end of a spudger to carefully pry the glass display panel out of the display assembly.

    • Once the upper left corner has been separated from the display, it may be helpful to use a guitar pick or another thin plastic object to keep the glass from sticking back down to the display assembly.

  27. 这个步骤还没有翻译 帮忙翻译一下

    : 步骤 27 中的图像 1,2 : 步骤 27 中的图像 2,2
    • Use a heat gun to soften the adhesive under the black strip along the left side of the front glass panel.

    • Attach a suction cup along the left side of the front glass panel.

    • Pull up on the glass panel while you use the flat end of a spudger to separate it from the rest of the display assembly.

    • Continue working along the left edge of the front display glass until it is separated from the display.

  28. 这个步骤还没有翻译 帮忙翻译一下

    : 步骤 28 中的图像 1,2 : 步骤 28 中的图像 2,2
    • Now that the top, left, and right edges of the glass are free from the display, slowly lift the top edge of the glass panel and gently rotate it out of the display.

    • If necessary, use the flat end of a spudger to free the bottom edge of the glass display panel from the display assembly.

    • Before reassembling, be sure to clean both the inside of the glass display panel and the LCD as any dust or fingerprints trapped inside will be annoyingly visible when the machine is on.

  29. 这个步骤还没有翻译 帮忙翻译一下

    : 步骤 29 中的图像 1,2 : 步骤 29 中的图像 2,2
    • Insert the edge of a plastic opening tool between the display glass and the camera bracket, and run it around the camera bracket to separate it from the display glass.

    • Do not forget to stick the camera bracket down to the new front display glass before reassembly.

  30. 这个步骤还没有翻译 帮忙翻译一下

    : 步骤 30 中的图像 1,3 : 步骤 30 中的图像 2,3 : 步骤 30 中的图像 3,3
    • During the glass removal process, the camera cable may stick to the adhesive on the glass panel, disconnecting it from the camera board as the panel is lifted. If your camera cable is still connected to the camera board, skip this step.

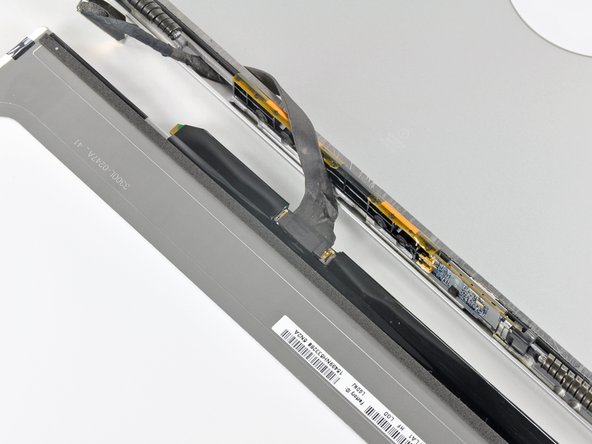
    • To reconnect the cable, first use the tip of a spudger to remove the piece of foam tape over the camera cable ZIF socket.

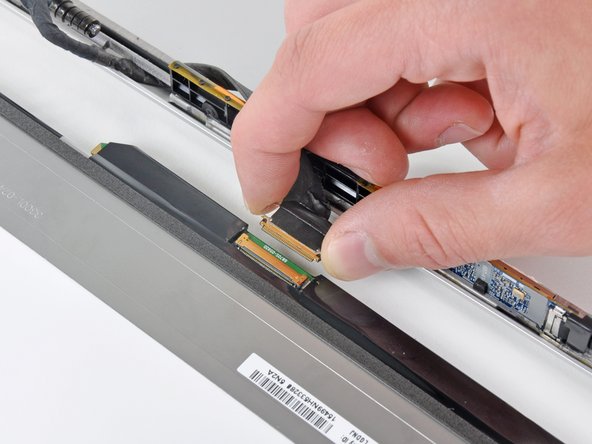
    • Use the tip of a spudger to flip up the ZIF cable retainer on the camera cable socket.

    • Insert the camera cable into its socket on the camera board and use the tip of a spudger to snap down the ZIF cable retainer, locking the cable in place.

    • Reapply the piece of tape covering the camera cable socket.

  31. 这个步骤还没有翻译 帮忙翻译一下

    : 步骤 31 中的图像 1,2 : 步骤 31 中的图像 2,2
    • Slide the clutch cover toward the right edge of the display.

    • The clutch cover will move approximately .25" and stop. Do not force it too far to the right.

    • When reinstalling the clutch cover, be sure to slip it over the components protruding from the lower edge of the display about .25" to the right of its final installed position on the display.

  32. 这个步骤还没有翻译 帮忙翻译一下

    : 步骤 32 中的图像 1,2 : 步骤 32 中的图像 2,2
    • Starting at its far left end, rock the clutch cover along its long axis while pulling it away from the clutch hinge.

    • Working from right to left, carefully continue to release and lift the clutch along the lower edge of the display assembly.

    • Lift the clutch cover up off the front bezel and set it aside.

    • When reinstalling the clutch cover, be sure to widen the opening when slipping it over the small black plastic cosmetic cover that fills the open end of the clutch cover when it is in place. The cosmetic cover has very thin and delicate plastic arms that hold it to the right clutch hinge.

  33. 这个步骤还没有翻译 帮忙翻译一下

    : 步骤 33 中的图像 1,1
    • Remove the six 2.9 mm Phillips screws securing the LCD panel to the front bezel.

  34. 这个步骤还没有翻译 帮忙翻译一下

    : 步骤 34 中的图像 1,1
    • Pull the LCD toward the top edge of the display to slide the circuitry along its lower edge out of the recess in the aluminum display assembly.

    • It may be helpful to use one hand to feed the display data cable through its channel in the aluminum display assembly as you pull the LCD toward the top edge of the display with the other hand.

  35. 这个步骤还没有翻译 帮忙翻译一下

    : 步骤 35 中的图像 1,1
    • Peel the piece of tape covering the display data cable connector away from the edge closest to the LCD.

  36. 这个步骤还没有翻译 帮忙翻译一下

    : 步骤 36 中的图像 1,2 : 步骤 36 中的图像 2,2
    • Use the tip of a spudger to flip up the thin steel retaining clip securing the display data cable to its socket on the LCD.

    • Pull the display data cable straight away from its socket on the LCD.

    • Lift the LCD out of the display assembly and set it aside.

    • If you are replacing the LVDS/display data cable, simply de-route it from its slot cut into the display casing.

终点

39等其他人完成本指南。

8条评论

Everything in this guide is simple, except for tearing the glass plate off. I tried with a hairdryer (1200 Watt) first, without success. Then I used a hot air gun (at 400 deg. Celcius, about 750 Fahrenheit). It worked like a charm, but my rubber edge is somewhat shiny, and in one area there's a fingerprint now. Nevertheless, this operation saved me 400 Euros and I'm happy I did it.

arnebakker - 回复

I followed the guide and it worked very well. However, after heating the glass for removal I found the lower right corner to be the easiest. Then I used an old credit card to separate the glass from the frame by sliding it around. The hardest part was installing the new LCD panel and glass because of dirt particles and fingerprints. Great tutorial and guide.

RodriguezAlberto - 回复

For each step in the disassembly process, put the different screws into different shotglasses. Don't leave the screws lying around your desk unless you are a pro.

On a piece of paper, write the step #, and place the shotglass on it. If you have cats who might knock over your shotglasses, label them (the shotglasses, not the cats) using a piece of scotch tape. Then put them where they will not get destroyed by mischievous felines like a roll of toilet paper when you forget to close the bathroom door.

Read all comments in this section; they helped me a lot. DISCLAIMER: I am an idiot, and I confused the shotglasses containing cable restraints. I then spent about an hour trying to figure out where I'd gone wrong before I realized that the restraint in the photo was not the one in my hand. No wonder my father always gives me that look of disappointment when he sees me. Good luck!

Robert Burt - 回复

Thank you ifixit for making this sound easy. I just shattered my display.

fatlard1993 - 回复

Think you from algeria

fouad hamdouche - 回复

添加评论

浏览统计数据:

过去 24 小时: 6

过去 7 天: 15

过去 30 天: 110

总计 104,730