跳转到主内容

MacBook Pro 15" Retina Display Mid 2014 Speakers Replacement

你所需要的

  1. MacBook Pro 15" Retina Display Mid 2014 Speakers Replacement, Lower Case: 步骤 1 中的图像 1,1
    • Remove the following P5 pentalobe screws securing the lower case to the MacBook Pro:

    • Eight 3.0 mm

    • Two 2.3 mm

  2. MacBook Pro 15" Retina Display Mid 2014 Speakers Replacement: 步骤 2 中的图像 1,1
    • Lifting from the edge nearest the clutch cover, lift the lower case off the MacBook Pro.

    • Set the lower case aside.

  3. MacBook Pro 15" Retina Display Mid 2014 Speakers Replacement, Battery Connector: 步骤 3 中的图像 1,1
    • Peel back the warning label covering the battery connector.

  4. MacBook Pro 15" Retina Display Mid 2014 Speakers Replacement: 步骤 4 中的图像 1,2 MacBook Pro 15" Retina Display Mid 2014 Speakers Replacement: 步骤 4 中的图像 2,2
    • Using the flat end of a spudger, gently pry the battery connector straight up out of its socket on the logic board.

    • Bend the battery cables back and out of the way, ensuring that the battery connector doesn't accidentally make contact with the logic board.

  5. MacBook Pro 15" Retina Display Mid 2014 Speakers Replacement, AirPort/Camera Cable: 步骤 5 中的图像 1,1
    • Use a spudger or tweezers to pry the three AirPort antenna cables straight up off of their sockets on the AirPort board.

    • The cable connection points are fragile. Be careful to lift only on the connector, and not on the socket or cable.

    • To reconnect, align the connector carefully into position over the socket, and press it down firmly with the flat of your spudger.

  6. MacBook Pro 15" Retina Display Mid 2014 Speakers Replacement: 步骤 6 中的图像 1,1
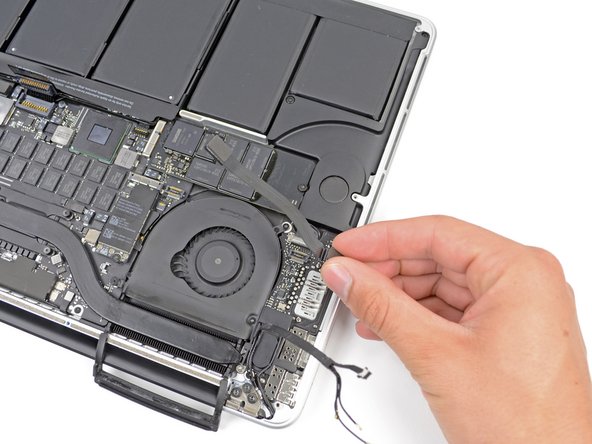
    • Use the tip of a spudger to push the camera cable's plug toward the fan and out of its socket on the logic board.

    • The plug in the photo has six connections, but some models have twelve connections. The process of removing the plug from its socket is the same for both.

    • If the camera cable's plug won't come easily out of its socket on the logic board, fold back the rubber cover over the fan to gain access to the cable, then gently pull on the cable while using the spudger to gently push the plug out of its socket.

    • Be sure to push parallel to the board, first on one side, then the other, to slowly "walk" the plug out of its socket. Do not pry up, or you will damage the socket.

  7. MacBook Pro 15" Retina Display Mid 2014 Speakers Replacement: 步骤 7 中的图像 1,3 MacBook Pro 15" Retina Display Mid 2014 Speakers Replacement: 步骤 7 中的图像 2,3 MacBook Pro 15" Retina Display Mid 2014 Speakers Replacement: 步骤 7 中的图像 3,3
    • Insert the flat end of a spudger underneath the rubber heat sink cover on the right fan.

    • Slide the spudger underneath the length of the cover, releasing the adhesive.

    • Lift the cover and flip it back so that you can access the cables underneath.

  8. MacBook Pro 15" Retina Display Mid 2014 Speakers Replacement: 步骤 8 中的图像 1,3 MacBook Pro 15" Retina Display Mid 2014 Speakers Replacement: 步骤 8 中的图像 2,3 MacBook Pro 15" Retina Display Mid 2014 Speakers Replacement: 步骤 8 中的图像 3,3
    • Use your fingers to pull the AirPort/Camera cables up off the fan.

    • The cables are adhered to the fan, so peel them up carefully to avoid damaging them.

    • Carefully de-route the cables from the plastic cable guide.

  9. MacBook Pro 15" Retina Display Mid 2014 Speakers Replacement, I/O Board Cable: 步骤 9 中的图像 1,3 MacBook Pro 15" Retina Display Mid 2014 Speakers Replacement, I/O Board Cable: 步骤 9 中的图像 2,3 MacBook Pro 15" Retina Display Mid 2014 Speakers Replacement, I/O Board Cable: 步骤 9 中的图像 3,3
    • If your I/O Board cable's connectors have notches in the padding, you will need to release a locking lever underneath the notch in order to remove the cable. If this is the case, don't pry up on the connector until the levers are unlatched.

    • Using the flat end of a spudger, pry the I/O Board connector straight up out of its socket on the logic board.

    • During reassembly, connect this end first, as it does not flex.

    • In a similar fashion, remove the I/O Board cable connector from its socket on the I/O Board.

    • Remove the I/O Board cable from the MacBook Pro.

  10. MacBook Pro 15" Retina Display Mid 2014 Speakers Replacement, Airport Card: 步骤 10 中的图像 1,1
    • Remove the single 2.9 mm T5 Torx screw securing the AirPort card to the logic board.

  11. MacBook Pro 15" Retina Display Mid 2014 Speakers Replacement: 步骤 11 中的图像 1,2 MacBook Pro 15" Retina Display Mid 2014 Speakers Replacement: 步骤 11 中的图像 2,2
    • Grasp the sides of the AirPort card and lift it up to a shallow angle (5-10˚) to separate the light adhesive adhering it to the logic board.

    • Pull the AirPort card parallel out of its connector on the logic board to remove it.

  12. MacBook Pro 15" Retina Display Mid 2014 Speakers Replacement: 步骤 12 中的图像 1,2 MacBook Pro 15" Retina Display Mid 2014 Speakers Replacement: 步骤 12 中的图像 2,2
    • Use the tip of a spudger to flip up the retaining flap on the right fan ribbon cable ZIF socket.

    • Be sure you are prying up on the hinged retaining flap, not the socket itself.

    • Starting at the top of the cable, slide a plastic opening tool under the right fan cable to free it from the logic board.

    • Use caution when freeing the cable, as it is strongly adhered to the logic board.

  13. MacBook Pro 15" Retina Display Mid 2014 Speakers Replacement: 步骤 13 中的图像 1,1
    • Remove the following three screws securing the right fan to the logic board:

    • One 4.4 mm T5 Torx screw

    • One 3.9 mm T5 Wide Head Torx screw

    • One 5.0 mm T5 Torx screw with 2 mm collar

  14. MacBook Pro 15" Retina Display Mid 2014 Speakers Replacement: 步骤 14 中的图像 1,1
    • Lift and remove the right fan out from the MacBook Pro.

    • When reinstalling the fan, it's easiest connect the fan ribbon cable as you drop the fan in place, rather than after you've installed the three fan screws.

  15. MacBook Pro 15" Retina Display Mid 2014 Speakers Replacement, Left Fan: 步骤 15 中的图像 1,1
    • Use the flat end of a spudger to lift the rubber heat sink cover up off the left fan.

  16. MacBook Pro 15" Retina Display Mid 2014 Speakers Replacement: 步骤 16 中的图像 1,1
    • Remove the following three screws securing the left fan to the logic board:

    • One 4.4 mm T5 Torx screw with 2 mm collar

    • One 5.0 mm T5 Torx screw with 2 mm collar

    • One 3.9 mm T5 Wide Head Torx screw

    • When reinstalling the fan and its screws, don't fully torque the screws until you've first installed all of them loosely, so that the fan can move a little and position itself properly as you insert the screws into their threaded standoffs.

  17. MacBook Pro 15" Retina Display Mid 2014 Speakers Replacement: 步骤 17 中的图像 1,3 MacBook Pro 15" Retina Display Mid 2014 Speakers Replacement: 步骤 17 中的图像 2,3 MacBook Pro 15" Retina Display Mid 2014 Speakers Replacement: 步骤 17 中的图像 3,3
    • Use the tip of a spudger to flip up the retaining flap on the left fan ribbon cable ZIF socket.

    • Be sure you are prying up on the hinged retaining flap, not the socket itself.

    • Starting at the top of the cable, slide a plastic opening tool under the left fan cable to free it from the logic board.

    • Use caution when freeing the cable, as it is strongly adhered to the logic board. If necessary, use an iOpener or hair dryer to heat the cable in order to soften the adhesive and make it easier to remove.

    • Lift the left fan out of the device.

    • When reinstalling the fan, it's easier to connect the fan ribbon cable as you drop the fan in place, rather than after you've installed the three fan screws.

  18. MacBook Pro 15" Retina Display Mid 2014 Speakers Replacement, SSD: 步骤 18 中的图像 1,1
    • Remove the single 3.1 mm T5 Torx screw securing the SSD to the logic board.

  19. MacBook Pro 15" Retina Display Mid 2014 Speakers Replacement: 步骤 19 中的图像 1,2 MacBook Pro 15" Retina Display Mid 2014 Speakers Replacement: 步骤 19 中的图像 2,2
    • Slightly lift the rightmost side of the SSD and firmly slide it straight away out of its socket on the logic board.

  20. MacBook Pro 15" Retina Display Mid 2014 Speakers Replacement, I/O Board: 步骤 20 中的图像 1,2 MacBook Pro 15" Retina Display Mid 2014 Speakers Replacement, I/O Board: 步骤 20 中的图像 2,2
    • Use the tip of a spudger to flip up the I/O board data cable lock and rotate it toward the battery side of the computer.

    • Use the flat end of a spudger to slide the I/O board data cable straight out of its socket on the logic board.

    • Do not lift up on the I/O board data cable, as its socket is very fragile. Pull the cable parallel to the face of the logic board.

  21. MacBook Pro 15" Retina Display Mid 2014 Speakers Replacement: 步骤 21 中的图像 1,3 MacBook Pro 15" Retina Display Mid 2014 Speakers Replacement: 步骤 21 中的图像 2,3 MacBook Pro 15" Retina Display Mid 2014 Speakers Replacement: 步骤 21 中的图像 3,3
    • Remove the two 3.1 mm T5 Torx screws securing the I/O board to the logic board.

    • On some models, also removing the silver 3.5 mm T5 Torx screw from the heatsink can aid in I/O board removal.

    • Carefully lift the I/O board and remove it from the lower case.

  22. MacBook Pro 15" Retina Display Mid 2014 Speakers Replacement, Logic Board Removal: 步骤 22 中的图像 1,2 MacBook Pro 15" Retina Display Mid 2014 Speakers Replacement, Logic Board Removal: 步骤 22 中的图像 2,2
    • Use the flat end of a spudger to pry the left speaker connector up and out of its socket on the logic board.

    • Use the tip of a spudger to pry the right speaker connector up and out of its socket on the logic board

    • Be sure to pry on the cable head, and not on the socket itself. Prying on the socket may cause it to separate from the logic board.

  23. MacBook Pro 15" Retina Display Mid 2014 Speakers Replacement: 步骤 23 中的图像 1,3 MacBook Pro 15" Retina Display Mid 2014 Speakers Replacement: 步骤 23 中的图像 2,3 MacBook Pro 15" Retina Display Mid 2014 Speakers Replacement: 步骤 23 中的图像 3,3
    • Peel back the tape covering the top of the keyboard ribbon cable connector.

    • Use the flat end of a spudger to flip up the retaining flap on the keyboard ribbon cable ZIF socket.

    • Be sure you are prying up on the hinged retaining flap, not the socket itself.

    • Use the flat end of a spudger to push the keyboard ribbon cable out of its socket.

  24. MacBook Pro 15" Retina Display Mid 2014 Speakers Replacement: 步骤 24 中的图像 1,1
    • Use the flat end of a spudger to pry the trackpad ribbon cable connector up out of its socket.

  25. MacBook Pro 15" Retina Display Mid 2014 Speakers Replacement: 步骤 25 中的图像 1,1
    • Use the flat end of a spudger to pry the keyboard backlight connector up from its socket on the logic board.

  26. MacBook Pro 15" Retina Display Mid 2014 Speakers Replacement: 步骤 26 中的图像 1,1
    • Use the tip of a spudger or your fingernail to flip up the retaining flap on the microphone ribbon cable ZIF socket.

    • Be sure you are prying up on the hinged retaining flap, not the socket itself.

    • Pull the microphone ribbon cable out of its socket.

  27. MacBook Pro 15" Retina Display Mid 2014 Speakers Replacement: 步骤 27 中的图像 1,2 MacBook Pro 15" Retina Display Mid 2014 Speakers Replacement: 步骤 27 中的图像 2,2
    • Use the tip of a spudger to flip up the display data cable lock and rotate it toward the DC-In side of the computer.

    • Pull the display data cable straight out of its socket on the logic board.

    • Do not lift up on the display data cable, as its socket is very fragile. Pull the cable parallel to the face of the logic board.

  28. MacBook Pro 15" Retina Display Mid 2014 Speakers Replacement: 步骤 28 中的图像 1,1
    • Use the flat end of a spudger to carefully pry off the rubber screw cap on the raised screw head near the MagSafe 2 connector.

    • The location of this screw may vary between models.

  29. MacBook Pro 15" Retina Display Mid 2014 Speakers Replacement: 步骤 29 中的图像 1,1
    • Remove the following six screws securing the logic board to to the upper case:

    • One 3.1 mm T5 Torx screw

    • One 2.5 mm T5 Torx screw

    • One 5.5 mm silver, raised-head T5 Torx screw

    • Two 5.7 mm T5 Torx screws

    • One 3.8 mm silver T5 Torx screw

  30. MacBook Pro 15" Retina Display Mid 2014 Speakers Replacement: 步骤 30 中的图像 1,2 MacBook Pro 15" Retina Display Mid 2014 Speakers Replacement: 步骤 30 中的图像 2,2
    • Lifting from the side nearest the battery, rotate the logic board toward the top of the MacBook Pro.

    • You may need to slide the logic board a few millimeters to the left in order to get clearance for the ports along the right edge of the board.

    • Using the flat end of a spudger, carefully push the MagSafe 2 connector out of its socket on the bottom of the logic board.

    • Disconnecting the MagSafe 2 connector can be difficult. If you are only removing the logic board to temporarily get it out of the way, such as for a battery replacement, you may find it easier to simply remove the two 2.5 mm T5 Torx screws securing the MagSafe DC-In board, and then remove the logic board and MagSafe board together.

  31. MacBook Pro 15" Retina Display Mid 2014 Speakers Replacement: 步骤 31 中的图像 1,3 MacBook Pro 15" Retina Display Mid 2014 Speakers Replacement: 步骤 31 中的图像 2,3 MacBook Pro 15" Retina Display Mid 2014 Speakers Replacement: 步骤 31 中的图像 3,3
    • Remove the logic board assembly from the MacBook Pro.

    • While the logic board and fans are removed, use a can of compressed air and a soft, non-static brush to remove dust and other debris from the upper case and the logic board, particularly from the fan exhaust openings along the rear edge of the upper case.

    • When reinstalling the motherboard, make sure all cables, and the two rubber heat sink/fan covers, are visible and not trapped under the motherboard.

    • Second photo, clockwise from top: battery, right speaker, keyboard backlight, AirPort/camera, display, microphone, left speaker, keyboard, and trackpad.

  32. MacBook Pro 15" Retina Display Mid 2014 Speakers Replacement, Speakers: 步骤 32 中的图像 1,2 MacBook Pro 15" Retina Display Mid 2014 Speakers Replacement, Speakers: 步骤 32 中的图像 2,2
    • Remove the following three screws securing the left speaker to the upper case:

    • One 5.6 mm T5 Torx screw

    • One 6.9 mm T5 Torx screw

    • One 2.6 mm T5 Torx screw

    • Lift the left speaker out of the upper case and set it aside.

    • The speaker is secured to the case with some light adhesive.

  33. MacBook Pro 15" Retina Display Mid 2014 Speakers Replacement: 步骤 33 中的图像 1,2 MacBook Pro 15" Retina Display Mid 2014 Speakers Replacement: 步骤 33 中的图像 2,2
    • Remove the following three screws securing the right speaker to the upper case:

    • One 5.6 mm T5 Torx screw

    • One 6.9 mm T5 Torx screw

    • One 2.6 mm T5 Torx screw

    • Remove the right speaker from the MacBook Pro.

    • The speaker is secured to the case with some light adhesive.

结论

To reassemble your device, follow these instructions in reverse order.

24等其他人完成本指南。

3条评论

2 things need to be redone. Step 12. You need to define a ZIF. Perhaps a video clip. This computer has had a battery replacement done and a keyboard replacement done by Apple. In step 12 you state: Use the tip of a spudger to flip up the retaining flap on the right fan ribbon cable ZIF socket. I do not see a retaining flap. Better photos, video clip, or mine does not have a retainer flap. maybe removed by Apple?

Lastly Step 30. You do NOT need to pull that plug on the lower right. PERIOD! Remember this is only a speaker replacement. Stand the logic board up, R&R speakers and lay it back down. An unnecessary extra step, risking something else getting broken.

Lorne Shantz - 回复

Thank you for developing this guide, especially for the red boxes identifying the cables in Step 31 on reassembly.

fincherr - 回复

添加评论

浏览统计数据:

过去 24 小时: 13

过去 7 天: 78

过去 30 天: 314

总计 37,976