跳转到主内容

更换MacBook Pro 15" Retina Display (2014年中)的散热模组

你所需要的

  1. 更换MacBook Pro 15" Retina Display (2014年中)的散热模组, 后盖: 步骤 1 中的图像 1,1
    • 将固定 MacBook Pro 后盖的 P5 五角螺丝拆掉:

    • 8颗 3.0mm 螺丝

    • 2颗 2.3mm 螺丝

  2. 更换MacBook Pro 15" Retina Display (2014年中)的散热模组: 步骤 2 中的图像 1,1
    • 从后盖盖和主机壳夹扣处抬起,从 MacBook Pro上取下后盖。

    • 将取下的后盖放到一边。

  3. 更换MacBook Pro 15" Retina Display (2014年中)的散热模组, 电池连接器: 步骤 3 中的图像 1,1
    • 揭开盖住电池接口的警告标签。

  4. 更换MacBook Pro 15" Retina Display (2014年中)的散热模组: 步骤 4 中的图像 1,2 更换MacBook Pro 15" Retina Display (2014年中)的散热模组: 步骤 4 中的图像 2,2
    • 使用撬棒平头的那端,轻轻地将电池接口直接从逻辑板上的插座中撬出。

    • 弯曲电池电缆,确保电池接口不会意外接触逻辑板。

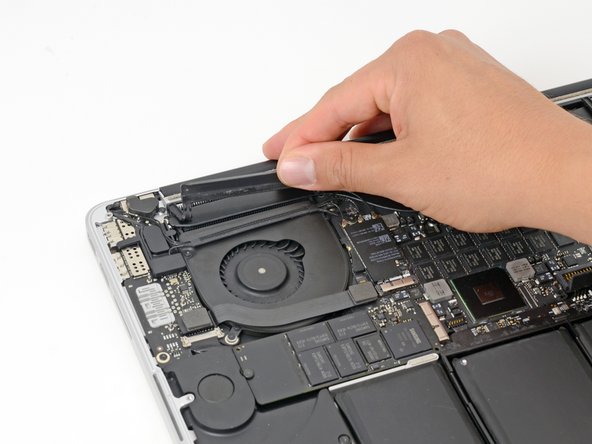
  5. 更换MacBook Pro 15" Retina Display (2014年中)的散热模组, 散热器: 步骤 5 中的图像 1,3 更换MacBook Pro 15" Retina Display (2014年中)的散热模组, 散热器: 步骤 5 中的图像 2,3 更换MacBook Pro 15" Retina Display (2014年中)的散热模组, 散热器: 步骤 5 中的图像 3,3
    • 把撬棒扁平的那一端插入右侧风扇的橡胶散热盖下方。

    • 在橡胶盖下方滑动来分离粘合剂。

    • 提起橡胶盖并把它从散热器上揭开。

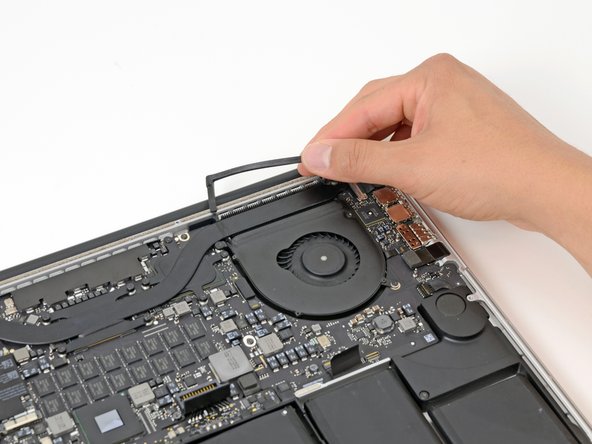
  6. 更换MacBook Pro 15" Retina Display (2014年中)的散热模组: 步骤 6 中的图像 1,3 更换MacBook Pro 15" Retina Display (2014年中)的散热模组: 步骤 6 中的图像 2,3 更换MacBook Pro 15" Retina Display (2014年中)的散热模组: 步骤 6 中的图像 3,3
    • 采用与上一步骤相同的方式,分离粘合剂并翻开左侧风扇的散热盖。

  7. 更换MacBook Pro 15" Retina Display (2014年中)的散热模组: 步骤 7 中的图像 1,1
    • 卸下将散热器固定到主板上的六颗螺丝:

    • 一颗 5.5 毫米银色凸头 T5 梅花头螺钉

    • 四颗 3.5 毫米 T5 梅花头螺丝

    • 如果您的机型使用独立显卡,可能需要卸下更多螺丝。

    • 一颗 3.8 毫米银色 T5 六角螺丝

  8. 更换MacBook Pro 15" Retina Display (2014年中)的散热模组: 步骤 8 中的图像 1,2 更换MacBook Pro 15" Retina Display (2014年中)的散热模组: 步骤 8 中的图像 2,2
    • 从一侧抓住散热片,将散热片从 MacBook Pro 上抬起,使其脱离电脑。

    • 散热膏可能会使散热器难以取下。小心但用力地将散热片拉出,以免损坏主板上的任何元件。

    • 安装新散热器时,不要忘记更换散热器下方的导热膏。有关进一步说明,请参阅我们的导热膏应用指南

结论

要重新组装你的设备,请按照相反的顺序执行这些说明。

22等其他人完成本指南。

由衷感谢以下译者:

en zh

100%

Pasca1正在帮助我们修复这个世界! 您也想加入吗?
开始翻译 ›

6条评论

Half of photos are with mac that has only integrated graphics, half with one that has discrete GPU. This frustrates.

Because of fact that this is about heatsink, it's kinda important to point the difference out.

semioniy - 回复

He could at least just add a note on the heatsink screw photo.

Eduardo Melean -

Are the denser fan blades in some of the pictures from a different model year? iirc my 2014 one had denser fan blades, but not that metallic inner fan part.

tipoo - 回复

do one with the discrete gpu and integrated graphics please

Matthew De Leon - 回复

For the discrete GPU, there are 4 screws surrounding a square copper plate, just unscrew those 4 and follow the steps above. It’s very similar to the integrated graphics board, but with 4 extra screws.

JoeyLovesTrains -

添加评论

浏览统计数据:

过去 24 小时: 6

过去 7 天: 32

过去 30 天: 163

总计 33,543