跳转到主内容

MacBook Pro 13" Retina Display Late 2012 Feet Replacement

你所需要的

  1. MacBook Pro 13" Retina Display Late 2012 Feet Replacement, Lower Case: 步骤 1 中的图像 1,1
    在这个步骤中使用的工具:
    Magnetic Project Mat
    $19.95
    购买
    • Remove the following ten screws securing the lower case to the upper case:

    • Two 2.3 mm P5 Pentalobe screws

    • Eight 3.0 mm P5 Pentalobe screws

    • Throughout this repair, keep track of each screw and make sure it goes back exactly where it came from to avoid damaging your device.

  2. MacBook Pro 13" Retina Display Late 2012 Feet Replacement: 步骤 2 中的图像 1,1
    • Wedge your fingers between the upper case and the lower case.

    • Gently pull the lower case away from the upper case.

    • Remove the lower case and set it aside.

  3. MacBook Pro 13" Retina Display Late 2012 Feet Replacement: 步骤 3 中的图像 1,3 MacBook Pro 13" Retina Display Late 2012 Feet Replacement: 步骤 3 中的图像 2,3 MacBook Pro 13" Retina Display Late 2012 Feet Replacement: 步骤 3 中的图像 3,3
    • During reassembly, gently push down the center of the lower case to reattach the two plastic clips.

    • The lower case is connected to the upper case at the center, with two plastic clips.

  4. MacBook Pro 13" Retina Display Late 2012 Feet Replacement, Feet: 步骤 4 中的图像 1,2 MacBook Pro 13" Retina Display Late 2012 Feet Replacement, Feet: 步骤 4 中的图像 2,2
    • Peel away any stickers from the backside of the rear case covering the feet you have chosen to replace.

    • Any stickers you remove will most likely be unsalvageable for re-use. That's okay! Your MacBook does not need them to function.

  5. MacBook Pro 13" Retina Display Late 2012 Feet Replacement: 步骤 5 中的图像 1,2 MacBook Pro 13" Retina Display Late 2012 Feet Replacement: 步骤 5 中的图像 2,2
    • Remove any broken or damaged feet.

    • If the foot you are replacing is still intact, you can use your tweezers push it out from the inside.

    • If the old foot is difficult to remove, use a hair dryer or a heat gun to apply some heat to the area and loosen the adhesive.

  6. MacBook Pro 13" Retina Display Late 2012 Feet Replacement: 步骤 6 中的图像 1,1
    • Scrub the foot cavity with adhesive remover to remove any remaining adhesive.

  7. MacBook Pro 13" Retina Display Late 2012 Feet Replacement: 步骤 7 中的图像 1,1
    • Wipe the foot cavity with an isopropyl alcohol prep pad to remove any cleaner residue and prep the area for the adhesive on the new foot.

  8. MacBook Pro 13" Retina Display Late 2012 Feet Replacement: 步骤 8 中的图像 1,1
    • Peel a replacement foot from the plastic backing.

    • The adhesive is fairly strong—make sure that you are peeling the foot up, not tearing the plastic backing.

  9. MacBook Pro 13" Retina Display Late 2012 Feet Replacement: 步骤 9 中的图像 1,3 MacBook Pro 13" Retina Display Late 2012 Feet Replacement: 步骤 9 中的图像 2,3 MacBook Pro 13" Retina Display Late 2012 Feet Replacement: 步骤 9 中的图像 3,3
    • Align the new foot inside the cavity.

    • Make sure the alignment nub on the foot is lined up with the small hole near the perimeter of the pad.

    • You may want to use a pencil to lightly mark where the alignment nub is located. Be careful not to scratch the lower case with your pencil.

    • Lay the foot down while keeping it properly aligned.

    • Check for proper alignment from the inside of the case. The alignment nub should be slightly visible through the alignment hole.

  10. MacBook Pro 13" Retina Display Late 2012 Feet Replacement: 步骤 10 中的图像 1,2 MacBook Pro 13" Retina Display Late 2012 Feet Replacement: 步骤 10 中的图像 2,2
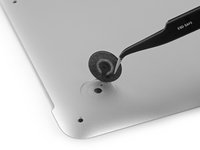
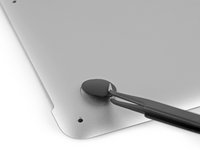
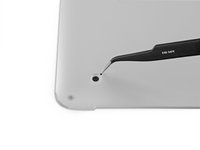
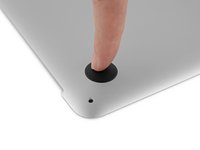
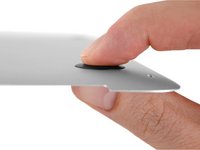
    • Press the new foot into place firmly with your finger, then apply pressure by pinching the foot from either side of the case with your finger and your thumb.

    • Maintain pressure for 30 seconds to set the pressure-sensitive adhesive.

    • Repeat the last seven steps for any remaining broken or worn feet.

结论

To reassemble your device, follow these instructions in reverse order.

6等其他人完成本指南。

Taylor Dixon

于06/26/18注册

67,033 声望

创作了94篇指南

0条评论

添加评论

浏览统计数据:

过去 24 小时: 0

过去 7 天: 1

过去 30 天: 20

总计 4,360