简介
Use this guide to replace the USB-C board in a 2019 MacBook Air.
你所需要的
-
-
If your MacBook is running Big Sur v11.1 or later, disabling Auto Boot may not work. You can proceed normally, but make sure to disconnect the battery as soon as you're inside.
-
Use a P5 driver to remove the following screws:
-
Two 7.9 mm screws
-
Two 7.1 mm screws
-
Six 2.6 mm screws
-
-
-
Wedge your fingers between the display and the lower case and pull upward to pop the lower case off the Air.
-
Remove the lower case.
-
-
-
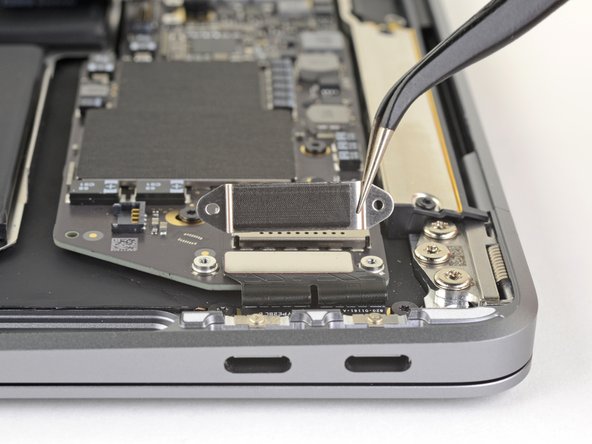
Peel back the tape covering the battery connector enough to reveal the connector underneath.
-
-
-
-
Use a T3 Torx driver to remove the two 1.4 mm screws securing the USB-C connector bracket.
-
Remove the USB-C connector bracket.
-


Compare your new replacement part to the original part—you may need to transfer remaining components or remove adhesive backings from the new part before installing.
To reassemble your device, follow the above steps in reverse order.
Take your e-waste to an R2 or e-Stewards certified recycler.
Repair didn’t go as planned? Check out our Answers community for troubleshooting help.
9等其他人完成本指南。

5条评论
I bought a new Macbook air in 2019 but I didn’t open it until September of 2020. While activating and upgrade the operating system. My laptop shows a dying battery. Eventually, it is not powering up or startup at all. I want to pay it off before I use it and I am not aware of the warranty beginning on the same day I placed the order with BestBuy. I replaced the battery from eBay and didn’t work. Now I am stuck with a brick that I don’t know what to do with it. Replacing the USB c port resolves the problem of no power at all?
yung danny - 回复
Instructions were very clear with the exception of the re-attachment of the USB-C board. There is a metal "grille" on both the USB-C board and the computer; are they supposed to "click" together? I aligned them geometrically, but there was no positive feedback when I pressed them together. - David
Just finished mine without a problem. I've used iFixit 64 bit set from Home Depot. This saved $400 repair. Thanks!
Excellent guide to remove part. While installing the replacement isn't difficult and is basically the reverse of removal. It would have been nice to have a note that you need to fold over the ribbon cable for the part to fit correctly.
But the steps above lay out the removal process clearly and completely.
I lost one of the tiny 1.4mm screws inside the laptop. Those little things are almost impossible to get back in. Will that prevent the charger from working with only one screw? Needless to say the charger is not working after replacement