跳转到主内容

当前版本的文档还未经巡查,您可以查看最新的已查核版本

你所需要的

  1. 这个步骤还没有翻译 帮忙翻译一下

    : 步骤 1 中的图像 1,1
    在这个步骤中使用的工具:
    P5 Pentalobe Screwdriver Retina MacBook Pro and Air
    $5.99
    购买
    • Before proceeding, power off the device, close the lid and lay it on a soft surface top-side down.

    • Remove the following ten screws:

    • Two 9 mm 5-point Pentalobe screws

    • Eight 2.6 mm 5-point Pentalobe screws

    • The special screwdriver needed to remove the eight 5-point Pentalobe screws can be found here.

  2. 这个步骤还没有翻译 帮忙翻译一下

    : 步骤 2 中的图像 1,1
    • Wedge your fingers between the display and the lower case and pull upward to pop the lower case off the Air.

    • Remove the lower case and set it aside.

  3. , 电池: 步骤 3 中的图像 1,1
    • 抓住电池连接器上的透明塑料拉片,将其拉向 Air 的前缘,以断开电池与逻辑板的连接。

    • 断开连接时不要向上提连接器。

  4. : 步骤 4 中的图像 1,1
    • 卸下固定电池和上盖的五颗螺丝:

    • 三颗 6.3 毫米 T5 Torx 螺丝

    • 两颗 2.4 毫米 T5 Torx 螺丝

  5. : 步骤 5 中的图像 1,1
    • 处理电池时,请避免挤压或接触四个暴露的锂聚合物电池。

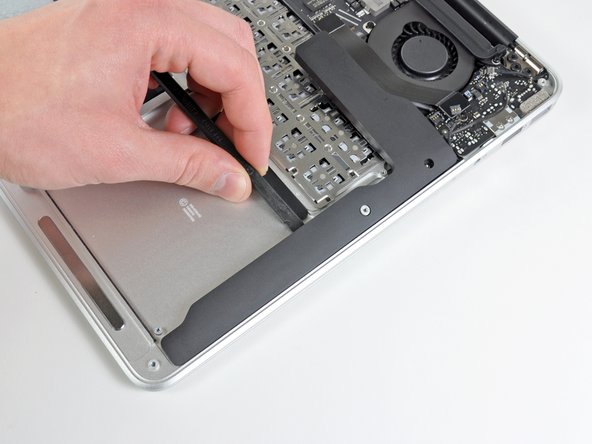
    • 从最靠近主板的边缘处提起电池,并将其从上壳中取出。

    • 在你使用的电池之前先 校准 它:

    • 充电至100%,然后继续充电至少2小时。然后,拔下并正常使用以排空电池。当您看到低电量警告时,请保存你的工作,并保持笔记本电脑一直打开,直到它因电池电量不足而进入睡眠状态。等待至少5个小时,然后不间断地将笔记本电脑充电至100%。

    • 在你安装好你的新电池之后,如果你注意到任何不寻常的举动或是问题,你可能需要重置你MacBook Pro的SMC

    • 替换电池可能带有塑料衬垫和薄膜。塑料薄膜很容易撕下,应在安装前撕下。衬垫较厚,起到防止穿刺的作用。请勿将衬垫从电池上取下。

  6. 这个步骤还没有翻译 帮忙翻译一下

    : 步骤 6 中的图像 1,2 : 步骤 6 中的图像 2,2
    • Use the flat end of a spudger to pry the left speaker cable connector up and out of its socket on the I/O board.

    • Pry up from beneath the wires.

  7. 这个步骤还没有翻译 帮忙翻译一下

    : 步骤 7 中的图像 1,1
    • Use the flat end of a spudger to pry the microphone cable connector up and out of its socket on the I/O board.

    • Pry up from beneath the wires.

  8. 这个步骤还没有翻译 帮忙翻译一下

    : 步骤 8 中的图像 1,1
    • Remove the single 2.7 mm T5 Torx screw securing the left speaker to the upper case.

  9. 这个步骤还没有翻译 帮忙翻译一下

    : 步骤 9 中的图像 1,3 : 步骤 9 中的图像 2,3 : 步骤 9 中的图像 3,3
    • Use the flat end of a spudger to pry the left speaker off the adhesive securing it to the upper case.

    • Remove the left speaker from the upper case.

  10. 这个步骤还没有翻译 帮忙翻译一下

    : 步骤 10 中的图像 1,2 : 步骤 10 中的图像 2,2
    • Use the tip of a spudger to pry the microphone off the adhesive securing it to the left side of the upper case.

    • Remove the microphone from the upper case.

终点

2等其他人完成本指南。

0条评论

添加评论

浏览统计数据:

过去 24 小时: 2

过去 7 天: 11

过去 30 天: 22

总计 5,819