跳转到主内容

此翻译可能不反映源指南的最新更新。 帮助更新翻译查看源指南

更换Mac mini A1176 的 CPU

你所需要的

  1. 这个步骤还没有翻译 帮忙翻译一下

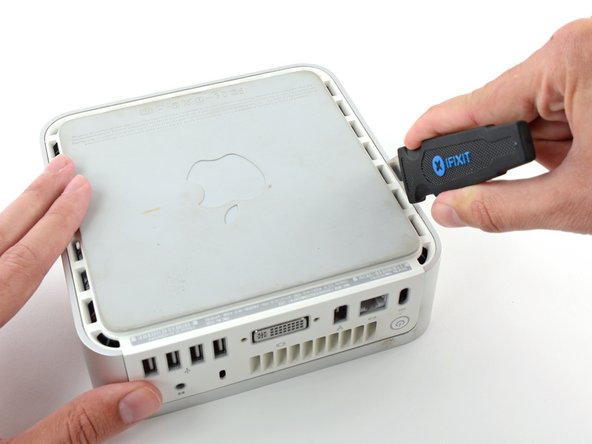
    更换Mac mini A1176 的 CPU, 顶盖: 步骤 1 中的图像 1,2 更换Mac mini A1176 的 CPU, 顶盖: 步骤 1 中的图像 2,2
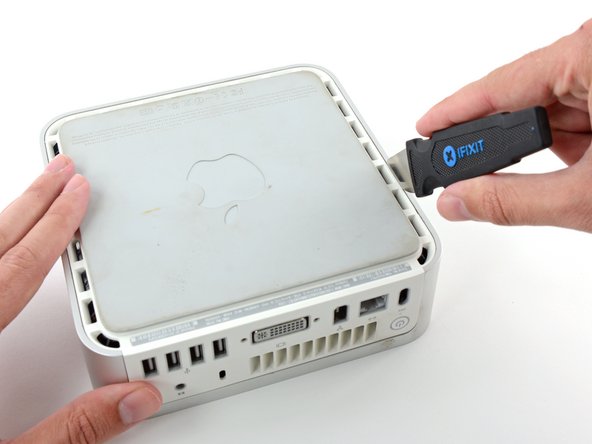
    • Power down your Mac mini, disconnect all of the cables, and flip it over.

    • Insert the Jimmy into the crack between the aluminum top housing and the plastic lower housing.

    • The Jimmy should reach a stop about 3/8" down.

  2. 这个步骤还没有翻译 帮忙翻译一下

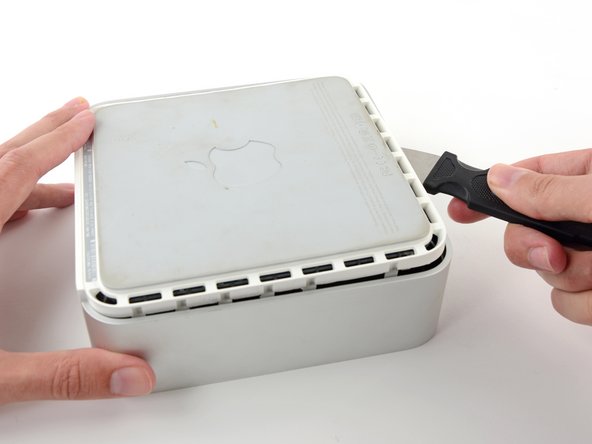
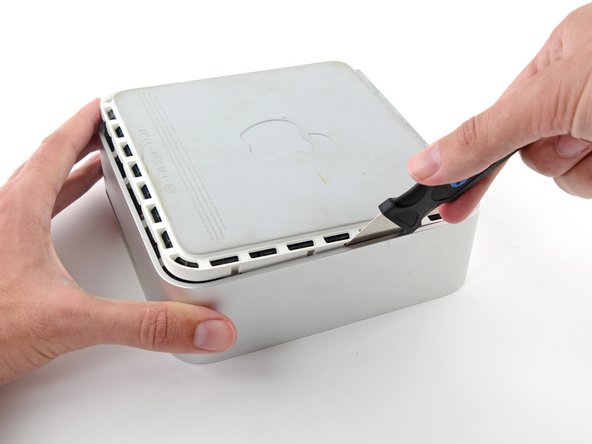
    更换Mac mini A1176 的 CPU: 步骤 2 中的图像 1,3 更换Mac mini A1176 的 CPU: 步骤 2 中的图像 2,3 更换Mac mini A1176 的 CPU: 步骤 2 中的图像 3,3
    • Gently bend the Jimmy outwards to pry the crack open a little larger and lift the lower housing up a small amount.

    • There are several plastic clips on the lower housing that fit into a channel in the aluminum top housing. Your goal is to use the Jimmy to push these clips inward enough to free them from the channel, while gently pulling up on the lower housing.

  3. 这个步骤还没有翻译 帮忙翻译一下

    更换Mac mini A1176 的 CPU: 步骤 3 中的图像 1,2 更换Mac mini A1176 的 CPU: 步骤 3 中的图像 2,2
    • Once you have the first side free, rotate the Mac mini and start prying up on the front edge.

    • Use the same prying motion to both bend the clips inward and lift the lower housing up out of the top housing.

  4. 这个步骤还没有翻译 帮忙翻译一下

    更换Mac mini A1176 的 CPU: 步骤 4 中的图像 1,2 更换Mac mini A1176 的 CPU: 步骤 4 中的图像 2,2
    • You may need to move the Jimmy along the edge to pry up all of the clips. Be patient and do a little bit at a time.

  5. 这个步骤还没有翻译 帮忙翻译一下

    更换Mac mini A1176 的 CPU: 步骤 5 中的图像 1,2 更换Mac mini A1176 的 CPU: 步骤 5 中的图像 2,2
    • Keep working around the perimeter, freeing the clips along the final edge.

  6. 更换Mac mini A1176 的 CPU: 步骤 6 中的图像 1,2 更换Mac mini A1176 的 CPU: 步骤 6 中的图像 2,2
    • 將Mac mini翻回正面,並將上蓋拿起。

  7. 这个步骤还没有翻译 帮忙翻译一下

    更换Mac mini A1176 的 CPU, Internal Frame: 步骤 7 中的图像 1,3 更换Mac mini A1176 的 CPU, Internal Frame: 步骤 7 中的图像 2,3 更换Mac mini A1176 的 CPU, Internal Frame: 步骤 7 中的图像 3,3
    • Later in this guide you will remove several recessed Phillips screws. Bit drivers are generally too large to fit in the recesses, so be sure to have a thin shafted Phillips screwdriver on hand.

    • First remove the AirPort antenna (the larger of the two), located near the power button.

    • Slightly squeeze the two retaining arms toward each other and lift the AirPort antenna off its post.

    • Squeezing the two posts excessively will surely break them off the internal frame. Work delicately.

    • During reinstallation, you will have to slightly squeeze the two posts together so they fit into the openings on the AirPort antenna board.

  8. 这个步骤还没有翻译 帮忙翻译一下

    更换Mac mini A1176 的 CPU: 步骤 8 中的图像 1,2 更换Mac mini A1176 的 CPU: 步骤 8 中的图像 2,2
    • Use the tip of a spudger to slightly lift the left side of the ZIF cable lock up from its socket.

    • The ZIF cable lock will lift about 1 mm and stop. Do not try to completely remove the ZIF cable lock.

  9. 这个步骤还没有翻译 帮忙翻译一下

    更换Mac mini A1176 的 CPU: 步骤 9 中的图像 1,1
    • Lift the audio board ribbon cable up out of its socket.

    • If it refuses to lift from its socket, the ZIF cable lock is not fully released. Make sure it is evenly lifted about 1 mm from the socket on the interconnect board.

  10. 这个步骤还没有翻译 帮忙翻译一下

    更换Mac mini A1176 的 CPU: 步骤 10 中的图像 1,2 更换Mac mini A1176 的 CPU: 步骤 10 中的图像 2,2
    • Rotate the mini so that the SuperDrive slot loading mechanism is facing you.

    • Use a pair of tweezers to lift the hard drive thermal sensor cable connector up off its socket on the logic board.

    • Use tweezers to grab the connector (as seen in the picture), not the wires.

    • The connector is located under the optical drive opening, next to the PRAM battery.

  11. 这个步骤还没有翻译 帮忙翻译一下

    更换Mac mini A1176 的 CPU: 步骤 11 中的图像 1,2 更换Mac mini A1176 的 CPU: 步骤 11 中的图像 2,2
    • In the next few steps, you will remove the four Phillips screws securing the internal frame to the bottom case. Included in each step is an overview picture showing the general location and a closeup showing the actual screw.

    • Remove the recessed Phillips screw near the power button securing the internal frame to the bottom housing.

  12. 这个步骤还没有翻译 帮忙翻译一下

    更换Mac mini A1176 的 CPU: 步骤 12 中的图像 1,2 更换Mac mini A1176 的 CPU: 步骤 12 中的图像 2,2
    • Remove the recessed Phillips screw near the sleep light securing the internal frame to the bottom housing.

    • This screw is the longest of the four screws securing the internal frame to the bottom case.

  13. 这个步骤还没有翻译 帮忙翻译一下

    更换Mac mini A1176 的 CPU: 步骤 13 中的图像 1,2 更换Mac mini A1176 的 CPU: 步骤 13 中的图像 2,2
    • Remove the Phillips screw from the internal frame near the Bluetooth antenna.

  14. 这个步骤还没有翻译 帮忙翻译一下

    更换Mac mini A1176 的 CPU: 步骤 14 中的图像 1,2 更换Mac mini A1176 的 CPU: 步骤 14 中的图像 2,2
    • Remove the Phillips screw near the audio ports securing the internal frame to the bottom case.

  15. 这个步骤还没有翻译 帮忙翻译一下

    更换Mac mini A1176 的 CPU: 步骤 15 中的图像 1,2 更换Mac mini A1176 的 CPU: 步骤 15 中的图像 2,2
    • Gently lift the internal frame up from the bottom housing, minding the AirPort antenna and any other cables that may get caught.

    • It may be necessary to pull up near the interconnect board to separate it from the logic board.

  16. 这个步骤还没有翻译 帮忙翻译一下

    更换Mac mini A1176 的 CPU: 步骤 16 中的图像 1,1
    • Firmly grasp the power button cable connector with a pair of tweezers and lift it straight up off the logic board.

  17. 这个步骤还没有翻译 帮忙翻译一下

    更换Mac mini A1176 的 CPU: 步骤 17 中的图像 1,1
    • Firmly grasp the sleep light cable connector with a pair of tweezers and lift it straight up off the logic board.

  18. 这个步骤还没有翻译 帮忙翻译一下

    更换Mac mini A1176 的 CPU: 步骤 18 中的图像 1,1
    • Remove the single T10 torx lug securing the logic board to the bottom housing.

  19. 这个步骤还没有翻译 帮忙翻译一下

    更换Mac mini A1176 的 CPU: 步骤 19 中的图像 1,1
    • Use the flat end of a spudger to slightly lift the logic board near the PRAM battery to separate it from the bottom housing.

    • It will be necessary to gently pull the sleep light (shown in red) away from the mini to clear the edge of the logic board.

  20. 这个步骤还没有翻译 帮忙翻译一下

    更换Mac mini A1176 的 CPU: 步骤 20 中的图像 1,1
    • Gently lift the free end of the logic board and wiggle the board as you pull it away from the I/O ports.

  21. 更换Mac mini A1176 的 CPU, CPU: 步骤 21 中的图像 1,2 更换Mac mini A1176 的 CPU, CPU: 步骤 21 中的图像 2,2
    • 卸下处理器之前,必须先卸下铝制散热器。

    • 为避免造成散热片弯曲,请勿过度挤压散热器的上部。

    • 散热器每个角上都有弹簧与塑料销,它们将散热器固定在处理器的上。

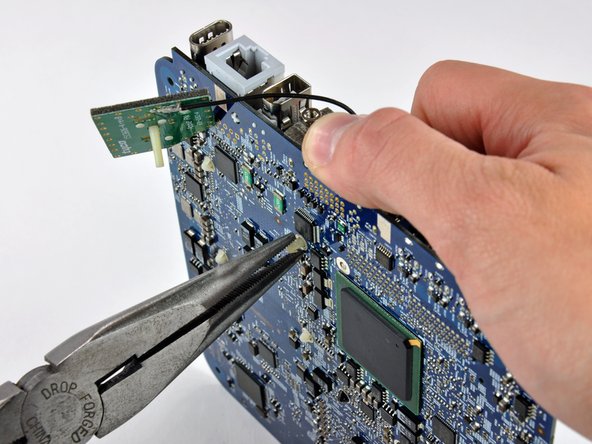
    • 塑料销的一端有倒钩,一旦引脚穿过主板,则倒钩会伸展。 必须先挤压倒钩,才能穿过主板上的孔。 将倒钩与钳子一起挤压在主板裸露面附近时,请格外小心。

  22. 更换Mac mini A1176 的 CPU: 步骤 22 中的图像 1,2 更换Mac mini A1176 的 CPU: 步骤 22 中的图像 2,2
    • 此步骤需要双手进行,并且将主板放在膝盖上可能会更好地完成操作。

    • 一只手用塑料撬棒(或类似工具)向下推一根将散热器固定在逻辑板上的销钉。

    • 从主板的散热器一侧向下压销时,另一只手用钳子将主板背面的两个倒钩压在销的塑料轴上。

    • 将倒钩挤压在一起,将销钉穿过主板上的孔。

    • 对将散热器固定在主板上的四个塑料销中的每一个重复此过程。

  23. 这个步骤还没有翻译 帮忙翻译一下

    更换Mac mini A1176 的 CPU: 步骤 23 中的图像 1,1
    • The heat sink is still attached to the logic board by the thermal sensor cables.

    • Lift the heat sink off the processor and lay it on the AirPort card.

  24. 这个步骤还没有翻译 帮忙翻译一下

    更换Mac mini A1176 的 CPU: 步骤 24 中的图像 1,3 更换Mac mini A1176 的 CPU: 步骤 24 中的图像 2,3 更换Mac mini A1176 的 CPU: 步骤 24 中的图像 3,3
    • Use the tip of a spudger to push the heat sink thermal sensor connector out of its socket.

    • It may be necessary to work from alternating sides to 'walk' the connector out of its socket.

    • Remove the heat sink and set it aside.

  25. 这个步骤还没有翻译 帮忙翻译一下

    更换Mac mini A1176 的 CPU: 步骤 25 中的图像 1,2 更换Mac mini A1176 的 CPU: 步骤 25 中的图像 2,2
    • To unlock the processor, use a small flathead screwdriver to rotate the processor lock 180 degrees counter-clockwise until the indicator is near the open lock symbol.

  26. 这个步骤还没有翻译 帮忙翻译一下

    更换Mac mini A1176 的 CPU: 步骤 26 中的图像 1,1
    • Grab the processor by its edges and lift it straight up off its socket.

    • Rotating the processor while lifting it out has the potential to break pins off inside the socket. Lift it straight up.

  27. 这个步骤还没有翻译 帮忙翻译一下

    更换Mac mini A1176 的 CPU: 步骤 27 中的图像 1,3 更换Mac mini A1176 的 CPU: 步骤 27 中的图像 2,3 更换Mac mini A1176 的 CPU: 步骤 27 中的图像 3,3
    • Processors are extremely sensitive to electrostatic discharge. Only handle your processor by its edges.

    • To aid in installation, processors and sockets have a small alignment arrow (shown in red) so the chip is installed in the correct orientation.

    • Align the chip so that the arrow in its upper right corner corresponds to the arrow molded into the upper right corner of the socket.

    • Carefully lower the processor onto its socket.

    • Note that if you are upgrading from a core solo or core duo processor to a core 2 duo processor and wish to run operating systems of Lion or later, you must delete the hidden file /System/Library/CoreServices/PlatformSupport.plist after the upgrade.

  28. 这个步骤还没有翻译 帮忙翻译一下

    更换Mac mini A1176 的 CPU: 步骤 28 中的图像 1,1
    • Use a small flathead screwdriver to rotate the processor lock 180 degrees clockwise until the indicator points toward the closed lock symbol.

  29. 这个步骤还没有翻译 帮忙翻译一下

    更换Mac mini A1176 的 CPU: 步骤 29 中的图像 1,2 更换Mac mini A1176 的 CPU: 步骤 29 中的图像 2,2
    • Now that the processor is in place, turn your attention to the heat sink.

    • Apple uses a thermally conductive film that must be removed prior to reinstalling the heat sink.

    • Use a razor blade (or anyother flat object such as a credit card, etc.) to remove all of the old solidified thermal material from the heat sink.

    • Next use a small amount of rubbing alcohol to remove all traces of the old thermal material.

    • Allow the heat sink to dry before proceeding.

  30. 这个步骤还没有翻译 帮忙翻译一下

    更换Mac mini A1176 的 CPU: 步骤 30 中的图像 1,1
    • Apply a thin layer of thermal paste to the reflective silicon face of the processor.

    • Check out our thermal paste guide for detailed instructions on applying thermal paste.

  31. 这个步骤还没有翻译 帮忙翻译一下

    更换Mac mini A1176 的 CPU: 步骤 31 中的图像 1,1
    • Lay the heat sink on the AirPort card and use a spudger to reconnect the heat sink thermal sensor.

  32. 这个步骤还没有翻译 帮忙翻译一下

    更换Mac mini A1176 的 CPU: 步骤 32 中的图像 1,1
    • Position the heat sink the same way it will permanently sit before lowering it onto the processor to avoid spreading thermal paste on regions not in contact with the processor.

    • Gently lower the heat sink onto the processor.

  33. 这个步骤还没有翻译 帮忙翻译一下

    更换Mac mini A1176 的 CPU: 步骤 33 中的图像 1,2 更换Mac mini A1176 的 CPU: 步骤 33 中的图像 2,2
    • While holding the heat sink in place, press the four plastic posts down through the logic board to reattach the heat sink.

结论

要重新组装设备,请按照相反的顺序进行操作。

169等其他人完成本指南。

由衷感谢以下译者:

en zh

35%

王乐天正在帮助我们修复这个世界! 您也想加入吗?
开始翻译 ›

43条评论

I'm learning from cpu-world.com that the Core Duo (and Core Solo) are 32-bit architecture, whereas the Core 2 Duo is a 64-bit design. Does this matter in any way?

Richard - 回复

Hi Richard. I realize this post is very old, but did you ever get an answer to your question as to whether the 64-bits of the Core 2 Duo Processor will be recognized/utilized in the 32-bit architecture of the Mac Mini A1176? Thanks, John

John Trevett -

Hi. I'm afraid I can no longer answer the question "does it matter in any way", since I eventually upgraded to a new Mac Mini.

I can say that it didn't *seem* to matter, which means no software failed to run or performed noticeably poorly because of the upgrade. But I'm not especially performance sensitive, so it is possible that all/most/some software was running in 32-bit mode and not taking advantage of the higher throughput of a 64-bit architecture. The most CPU intense stuff I was running when I decided to upgrade was: Parallels running WinXP and some Windows-only legal software, along with Chrome with far too many tabs open, and iTunes. That proved to be too much, and it'd slow to a crawl too often. But I think the upgrade kept me on that iMac and extra two or three years, and was an interesting exercise.

Richard -

Hi, the processor will work just fine, but it’s recommended to do an EFI upgrade from 1,1 to 2,1, then you can run Lion and unofficially newer OSes

Arek Plewa -

When going to all the trouble of replacing the CPU, a few other upgrades can be done at the same time:

- Upgrade RAM to 2GB maximum (required for OS X Lion), for example, Crucial CT541128

- Upgrade internal 2.5" SATA hard drive to larger size, and/or faster 7400 RPM or SDD.

- Replace PRAM battery with a fresh one (CR2032 lithium 3V)
Jake Errs - 回复

添加评论

浏览统计数据:

过去 24 小时: 7

过去 7 天: 49

过去 30 天: 312

总计 224,536