跳转到主内容

当前版本的文档还未经巡查,您可以查看最新的已查核版本

你所需要的

  1. , 底壳: 步骤 1 中的图像 1,2 , 底壳: 步骤 1 中的图像 2,2
    • 将您的拇指放在底盖的凹陷处。

    • 逆时针旋转底盖,直到底盖上的白点与外壳上刻的环对准。

    • 在转动时,您不需要向下施加很大的压力。

  2. : 步骤 2 中的图像 1,1
    • 倾斜mini,使底盖从外壳上脱落。

    • 取下底盖,放置在一边。

  3. , 风扇: 步骤 3 中的图像 1,1
    • 卸下天线板附近,把风扇固定在逻辑板上的两颗11.3 mm T6 Torx螺丝。

  4. : 步骤 4 中的图像 1,1
    • 将靠近RAM附近一侧的风扇从固定外壳的支架上提起。

    • 拆卸下支架螺丝,不需要卸下风扇。 你只需要将风扇提的足够高来将风扇支架上的螺丝取掉。

  5. : 步骤 5 中的图像 1,3 : 步骤 5 中的图像 2,3 : 步骤 5 中的图像 3,3
    • 将风扇提升的足够到的高度来将连接器分离。

    • 小心的将风扇排线连接器从逻辑板的插座中拔出。

    • 移除风扇。

  6. , 整流罩: 步骤 6 中的图像 1,1
    • 从散热器附近移除固定整流罩的一颗 3.5 mm T6 Torx螺丝。

  7. : 步骤 7 中的图像 1,1
    • 将整流罩从天线板的那一端提起。

    • 提起整流罩,将其从mini中移除。

  8. , 无线接收器金属网: 步骤 8 中的图像 1,1
    • 卸下下列固定天线板的螺丝。

    • 两颗6.6 mm T8 Torx 螺丝。

    • 两颗5.0 mm T8 Torx螺丝或者2.0 mm Hex screws 任意一把螺丝刀都会起作用。

    • 当装回的时候:

    • 将会很难将硬盘与天线板正确对齐。 如果螺丝孔没有与硬盘上的对齐,请确保后方的两颗螺丝与天线板上的孔对齐,在第二个硬盘壳上。

    • 天线板直接与硬盘相连(红色位置),因此与硬盘连接的天线板可以与硬盘移动,并松开硬盘与逻辑板的连接。

  9. : 步骤 9 中的图像 1,2 : 步骤 9 中的图像 2,2
    • 在RAM附近稍微的提起天线板。

    • 小心的将天线板拉离金属外壳。

    • 切勿现在拆下天线板,它仍与AirPort/蓝牙板相连。

  10. : 步骤 10 中的图像 1,1
    • 用尖锐的工具或者撬棒小心地将天线连接器从 AirPort /蓝牙板上的插座上撬开。

  11. : 步骤 11 中的图像 1,1
    • 从 mini 上移除天线板

  12. , 逻辑板: 步骤 12 中的图像 1,2 , 逻辑板: 步骤 12 中的图像 2,2
    • 从逻辑板上的插座中撬起硬盘连接插头。

  13. : 步骤 13 中的图像 1,1
    • 使用撬棒尖端从逻辑板上的插座中撬起IR传感器连接插头。

    • 确保您在线缆下方撬动而不是插座下方。

  14. : 步骤 14 中的图像 1,1
    • 移除下列三颗螺丝。

    • 一颗5.0mm T8 梅花螺丝 或者 2.0mm 六角螺丝。 (两个螺丝刀都能拧动)

    • 一颗16.2mm T6 梅花螺丝

    • 一颗 26mm T6梅花 支座

  15. : 步骤 15 中的图像 1,3 : 步骤 15 中的图像 2,3 : 步骤 15 中的图像 3,3
    在这个步骤中使用的工具:
    Mac mini Logic Board Removal Tool
    $4.99
    购买
    • 要卸下逻辑板,必须将Mac Mini 逻辑板拆卸工具的两个圆柱杆插入图片红色圆圈的孔中。将工具插入红色圆圈以外的逻辑板孔可能会损坏逻辑板。

    • Mac Mini 逻辑板拆卸工具插入红色圆圈的两个孔中。 在继续之前,确保它与逻辑板下面的外壳的顶部接触。

    • 小心地将工具拉向I / O板。 逻辑板和I / O板组件应稍微从外壳中滑出。

    • 当I / O板与外壳明显分离时,停止撬动。

    • 取下Mac Mini 逻辑板拆卸工具。

  16. : 步骤 16 中的图像 1,1
    • 将I / O板/逻辑板组件从外壳中拉出,以便找到电源连接插头。

    • 用手指断开直流输入电缆与逻辑板的连接。

    • 将电源线连接插头朝向mini的前侧拉。

  17. : 步骤 17 中的图像 1,1
    • 小心地将逻辑板组件从mini中取出,注意任何可能被挂到的线缆。

  18. 这个步骤还没有翻译 帮忙翻译一下

    : 步骤 18 中的图像 1,1
    • The PRAM battery is located on the top side of the logic board.

    • Use the tip of a spudger to carefully pry the PRAM battery up and out of its holder on the logic board.

  19. 这个步骤还没有翻译 帮忙翻译一下

    : 步骤 19 中的图像 1,1
    • Remove the PRAM battery from the logic board.

    • The PRAM battery is a commonly available BR2032 coin-cell.

  20. 这个步骤还没有翻译 帮忙翻译一下

    : 步骤 20 中的图像 1,1
    • Remove the following two screws securing the speaker to the logic board assembly:

    • One 3.5 mm T6 Torx screw

    • One 3.7 mm T6 Torx screw

  21. 这个步骤还没有翻译 帮忙翻译一下

    : 步骤 21 中的图像 1,2 : 步骤 21 中的图像 2,2
    • Lift but do not remove the speaker assembly, as it still remains connected to the logic board via the speaker connector.

    • Carefully lift the speaker wires upward to lift the speaker connector up and out of its socket on the logic board.

    • Lift and remove the speaker away from the logic board.

  22. 这个步骤还没有翻译 帮忙翻译一下

    : 步骤 22 中的图像 1,2 : 步骤 22 中的图像 2,2
    • Use the flat end of a spudger to pry both antenna connectors up from their sockets on the AirPort/Bluetooth board.

  23. 这个步骤还没有翻译 帮忙翻译一下

    : 步骤 23 中的图像 1,1
    • Use your spudger to help disconnect the AirPort/Bluetooth ribbon cable from its socket on the AirPort/Bluetooth board.

  24. 这个步骤还没有翻译 帮忙翻译一下

    : 步骤 24 中的图像 1,1
    • Remove the two 2.6 mm T6 Torx screws securing the AirPort/Bluetooth board to the logic board.

  25. 这个步骤还没有翻译 帮忙翻译一下

    : 步骤 25 中的图像 1,1
    • Remove the AirPort/Bluetooth board from the logic board.

  26. 这个步骤还没有翻译 帮忙翻译一下

    : 步骤 26 中的图像 1,1
    • Use the flat end of a spudger to pry the AirPort/Bluetooth ribbon cable up off the logic board.

    • Remove the AirPort/Bluetooth ribbon cable.

  27. 这个步骤还没有翻译 帮忙翻译一下

    : 步骤 27 中的图像 1,3 : 步骤 27 中的图像 2,3 : 步骤 27 中的图像 3,3
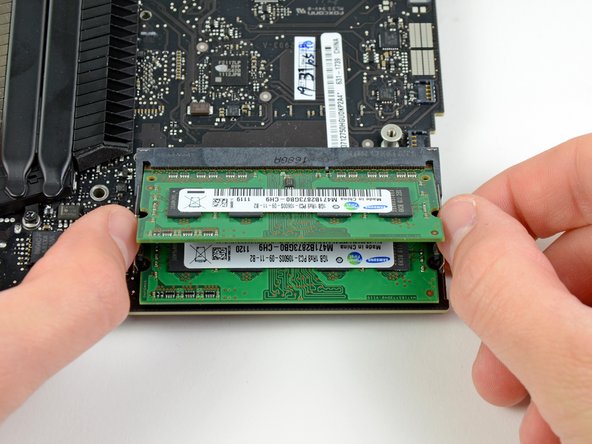
    • Release the tabs on each side of the RAM chip by simultaneously pushing each tab away from the chip.

    • These tabs lock the chip in place and releasing them will cause the chip to "pop" up.

    • After the RAM chip has popped up, pull it straight out of its socket.

    • Repeat this process if a second RAM chip is installed.

  28. 这个步骤还没有翻译 帮忙翻译一下

    : 步骤 28 中的图像 1,1
    • Remove the single 5 mm T6 Torx standoff from the heat sink near the edge of the logic board.

  29. 这个步骤还没有翻译 帮忙翻译一下

    : 步骤 29 中的图像 1,1
    • Remove the following screws securing the heat sink to the logic board:

    • Four 8.6 mm T8 Torx screws

    • One 2.6 mm T6 Torx screw

    • Keep track of the springs held beneath each of the T8 heat sink screws.

  30. 这个步骤还没有翻译 帮忙翻译一下

    : 步骤 30 中的图像 1,1
    • Remove the heat sink from the logic board, minding any cables that may get caught.

    • If the heat sink appears to be stuck to the logic board after removing all screws, it may be helpful to use a spudger to separate the two components.

    • If you need to mount the heat sink back onto the logic board, we have a thermal paste guide that makes replacing the thermal compound easy.

    • Logic board remains.

终点

25等其他人完成本指南。

7条评论

Can you replace the logic board in this Mac Mini Server, with one from the newer faster one, such as the 2012 2.6GHZ i7 server?

jim - 回复

You absolutely can. My mid 2011 Mini logic board died, and I just had a 2012 board put in, which not only upgrades the USB ports to USB3, it also increases bus speed, although the slower RAM 1333 vs 1600 will still work fine.

birdsquared - 回复

I’m wanting to replace my 2011 Mac mini logic board with a 2012. I have a couple questions.

do you need to upgrade your power supply as well?

would the hard drive get formatted(meaning it’ll wipe the hard drive that has important information)?

thank you.

p.s. Dave posted about changing it with a 2014? Not sure if that’s a thing

Daniel W Olson -

Is it worth replacing the motherboard and can you get a replacement with an ungraded graphics chip as the 2011 integrated graphics was not designed for 2k or 4k?

It seems to be the only problem with my logic board and it already been burned torched once.

JB Brighton - 回复

I realize this is an old post. But, I have a Mac Mini 2011 model that works fine, but can no longer update the IOS due to age. I was wondering if I am able to put something like a 2014 logic board in it?
Dave - 回复

添加评论

浏览统计数据:

过去 24 小时: 0

过去 7 天: 27

过去 30 天: 107

总计 40,727