跳转到主内容

Logitech Harmony 650 Screen Replacement

你所需要的

  1. Logitech Harmony 650 Screen Replacement, Case: 步骤 1 中的图像 1,2 Logitech Harmony 650 Screen Replacement, Case: 步骤 1 中的图像 2,2
    • Remove the battery cover by applying pressure to the indented area and pushing the cover toward the rear of the device.

  2. Logitech Harmony 650 Screen Replacement: 步骤 2 中的图像 1,1
    • Remove the batteries using the silver pull tab.

  3. Logitech Harmony 650 Screen Replacement: 步骤 3 中的图像 1,1
    • Using a J000 Philips head screwdriver remove the four 5mm screws around the rim of the battery chamber.

  4. Logitech Harmony 650 Screen Replacement: 步骤 4 中的图像 1,1
    在这个步骤中使用的工具:
    Flathead 3/32" or 2.5 mm Screwdriver
    $5.49
    购买
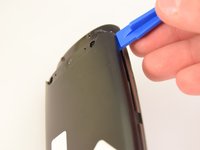
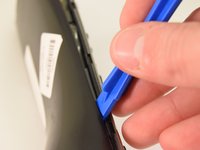
    • Remove the small plastic cover beneath the plastic LED housing by using a 3.0 flathead screwdriver and a spudger to pry it off. It is glued to the case. If you are having trouble removing it try applying some heat to loosen the glue.

  5. Logitech Harmony 650 Screen Replacement: 步骤 5 中的图像 1,1
    • Remove the two 5mm screws located underneath the cover using a J000 Philips screwdriver bit.

  6. Logitech Harmony 650 Screen Replacement: 步骤 6 中的图像 1,2 Logitech Harmony 650 Screen Replacement: 步骤 6 中的图像 2,2
    • Using a plastic opening tool, pry the case off starting from the top of the device (nearest the transmitter). There are 3 tabs along the side of the case and one at the back.

    • The top led protector plastic cover will also be freed once back is removed.

  7. Logitech Harmony 650 Screen Replacement: 步骤 7 中的图像 1,1
    • Remove the rear cover.

  8. Logitech Harmony 650 Screen Replacement, Motherboard: 步骤 8 中的图像 1,2 Logitech Harmony 650 Screen Replacement, Motherboard: 步骤 8 中的图像 2,2
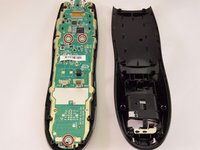
    • Using a J0 screwdriver remove the three 5mm screws holding the motherboard to the front face. Two are located just below the processor in the middle of the device and the third is located at the very bottom.

  9. Logitech Harmony 650 Screen Replacement: 步骤 9 中的图像 1,1
    • Remove the motherboard by gently pulling it away from the case.

  10. Logitech Harmony 650 Screen Replacement, Screen: 步骤 10 中的图像 1,2 Logitech Harmony 650 Screen Replacement, Screen: 步骤 10 中的图像 2,2
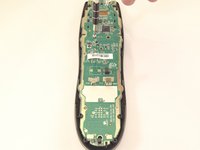
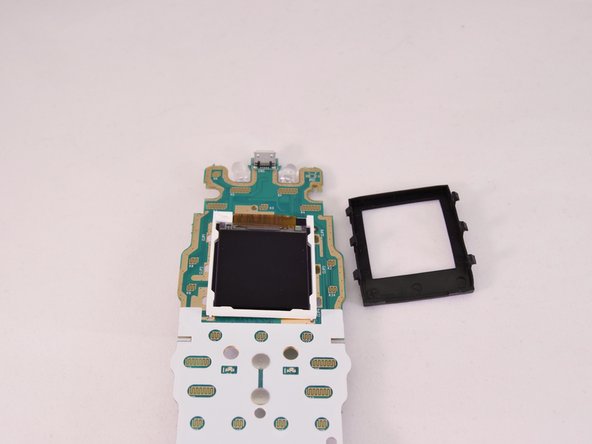
    • Remove the black rubber gasket that surrounds the screen from the top face of the motherboard.

    • The gasket has 3 tabs along each side. The thick side of the gasket faces the top.

  11. Logitech Harmony 650 Screen Replacement: 步骤 11 中的图像 1,1
    • Use a soldering iron to loosen the solder that connects the screen strip to the back of the motherboard. If it does not loosen easily then try using a soldering remover wick.

    • The soldering iron gets extremely hot use caution when using it around components.

  12. Logitech Harmony 650 Screen Replacement: 步骤 12 中的图像 1,1
    • Use a metal spudger to cut the strip from the motherboard along the solder line.

    • Refer to 如何焊接和拆焊 for help with soldering.

  13. Logitech Harmony 650 Screen Replacement: 步骤 13 中的图像 1,1
    • Use a spudger or your hand to remove the screen from the motherboard. It is glued down.

结论

To reassemble your device, follow these instructions in reverse order.

4等其他人完成本指南。

2条评论

Hey will beat buy honor a warrenty

antonioofficial - 回复

so where can i buy the screen!!!!

shortemperd Gotico - 回复

添加评论

浏览统计数据:

过去 24 小时: 0

过去 7 天: 3

过去 30 天: 10

总计 2,658