跳转到主内容

Lenovo ThinkPad X1 Carbon 6th Gen Motherboard Replacement

你所需要的

  1. Lenovo ThinkPad X1 Carbon 6th Gen Motherboard Replacement, Back Cover: 步骤 1 中的图像 1,2 Lenovo ThinkPad X1 Carbon 6th Gen Motherboard Replacement, Back Cover: 步骤 1 中的图像 2,2
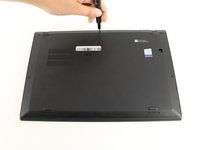
    • Use a Phillips #0 screwdriver to unscrew the five screws that secure the back cover to the laptop.

    • The screws do not completely come off from the back cover. Loosen until the screws are completely loose.

  2. Lenovo ThinkPad X1 Carbon 6th Gen Motherboard Replacement: 步骤 2 中的图像 1,2 Lenovo ThinkPad X1 Carbon 6th Gen Motherboard Replacement: 步骤 2 中的图像 2,2
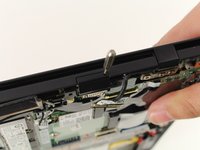
    • Use a Jimmy to lift the cover directly up off of the locating pins.

    • Though a metal opening tool is shown in the image, we recommend using plastic opening tools to minimize any cosmetic damage.

    • Remove the back cover.

    • If you encounter resistance when lifting the cover, revisit the screws to see if any of them are still threaded on to the device.

    I thank you for these instructions. They were quite helpful and I successfully replaced the fan. There is one thing however. Your instructions stated the following: "Be sure to pull on all of the cables at the same time."

    I disagree. One should never pull the wires. I was able to nudge the one part of the connector loose from the other part that it fit into." I then put the new fan in and gently and carefully pushed the connecting parts together.

    Otherwise, your instructions were clear and to the point. Thank you very much

    ALAN L SILBERLIGHT - 回复

    The image shows prying the cover open at the bottom right. In fact, there are tabs securing the bottom edge to the frame. The cover needs to be pried open at the top edge. Once the top edge is released, the cover can be shifted slightly toward the top of the image to disengage the tabs at the bottom.

    This error, along with the similar error about removing the battery in step 4, suggests that the instructions were written with the laptop in the opposite orientation than what is shown in the images.

    EatCroc3 - 回复

  3. Lenovo ThinkPad X1 Carbon 6th Gen Motherboard Replacement, Fan: 步骤 3 中的图像 1,2 Lenovo ThinkPad X1 Carbon 6th Gen Motherboard Replacement, Fan: 步骤 3 中的图像 2,2
    • Use a Phillips #0 screwdriver to loosen the four screws that secure the fan to the motherboard.

    • The screws do not completely come off from the fan mount. Loosen until the screws are completely loose.

  4. Lenovo ThinkPad X1 Carbon 6th Gen Motherboard Replacement: 步骤 4 中的图像 1,2 Lenovo ThinkPad X1 Carbon 6th Gen Motherboard Replacement: 步骤 4 中的图像 2,2
    在这个步骤中使用的工具:
    Nylon Tipped Tweezers
    $4.99
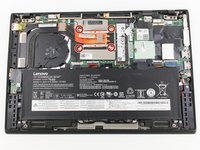
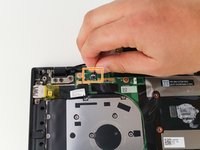
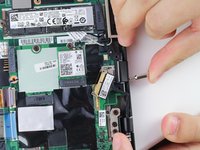
    • Use nylon tipped tweezers, or your fingers, to gently pull the fan's power cable towards the SSD, disconnecting it from the pins.

    • Be sure to pull on all of the cables at the same time.

  5. Lenovo ThinkPad X1 Carbon 6th Gen Motherboard Replacement: 步骤 5 中的图像 1,2 Lenovo ThinkPad X1 Carbon 6th Gen Motherboard Replacement: 步骤 5 中的图像 2,2
    • Use a plastic opening pick to lift the fan mount.

    • Use your fingers to gently pull the fan diagonally away from where it is connected.

  6. Lenovo ThinkPad X1 Carbon 6th Gen Motherboard Replacement: 步骤 6 中的图像 1,1
    • Turn the fan over to expose the interior.

    • If necessary, clean out the fan or wipe away and replace the thermal paste.

    All good. But most of us occasional Fixit-ers don't happen to have thermal paste lying around. Would have been helpful to include it in your list of necessary parts and tools. Otherwise, instructions were clear as crystal and worked as advertised. Tx!

    ESR Westchester - 回复

    Great call out! I updated this guide to include the Thermal Paste as a required component. Thank you!!

    Matt Zieminski -

    I'm about to do this repair, and I'm planning to use Honeywell PTM7950 SP rather than thermal paste. It occurred to me that maybe I should ask the experts if this is a good idea. PTM7950 has rave reviews on heat conductivity, and it appears that it will fit fine under the fan. But am I missing a problem that will come back to haunt me someday?

    BiggerHammer - 回复

  7. Lenovo ThinkPad X1 Carbon 6th Gen Motherboard Replacement, Motherboard: 步骤 7 中的图像 1,3 Lenovo ThinkPad X1 Carbon 6th Gen Motherboard Replacement, Motherboard: 步骤 7 中的图像 2,3 Lenovo ThinkPad X1 Carbon 6th Gen Motherboard Replacement, Motherboard: 步骤 7 中的图像 3,3
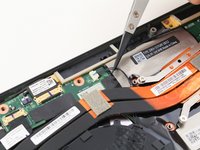
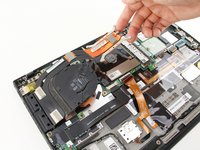
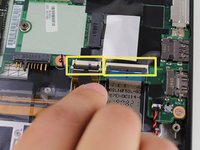
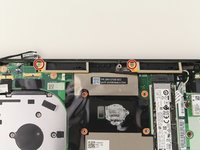
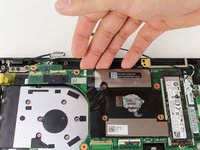
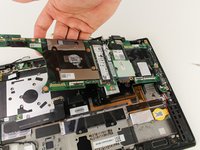
    • Remove each of the 7 main ribbon cables that connect the motherboard to the rest of the laptop.

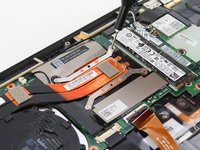
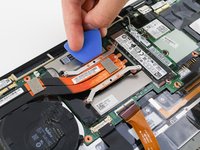
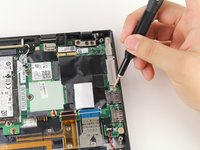
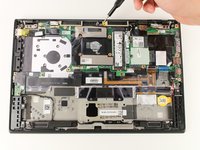
    • Detach the last ribbon cable in the same way as before.

    • These connectors and cables and are all very fragile. Handle with care.

    • For the red and orange cables, use a spudger to lift the black plastic bar.

    • The bar should be lifted to the point where it can move easily.

    Somewhere between these steps the battery was removed. Can you add a step here describing that?

    Bill Brown - 回复

    Battery removal starts on Step 3 above.

    steve mooers -

  8. Lenovo ThinkPad X1 Carbon 6th Gen Motherboard Replacement: 步骤 8 中的图像 1,2 Lenovo ThinkPad X1 Carbon 6th Gen Motherboard Replacement: 步骤 8 中的图像 2,2
    在这个步骤中使用的工具:
    Tweezers
    $4.99
    • Place a spudger under the cables to disconnect them from the WLAN card.

    • Tweezers or a hook may also be used for this step.

  9. Lenovo ThinkPad X1 Carbon 6th Gen Motherboard Replacement: 步骤 9 中的图像 1,2 Lenovo ThinkPad X1 Carbon 6th Gen Motherboard Replacement: 步骤 9 中的图像 2,2
    • Use a Phillips #00 screwdriver to remove the two 3mm screws that secure the IO bracket.

  10. Lenovo ThinkPad X1 Carbon 6th Gen Motherboard Replacement: 步骤 10 中的图像 1,2 Lenovo ThinkPad X1 Carbon 6th Gen Motherboard Replacement: 步骤 10 中的图像 2,2
    • The antenna brackets act as a securing mount for the motherboard to the device.

    • Remove the two 3mm antenna bracket screws using a Phillips #00 screwdriver.

  11. Lenovo ThinkPad X1 Carbon 6th Gen Motherboard Replacement: 步骤 11 中的图像 1,1
    • Lift from the location of the screw towards you. Then pull towards the screw side to remove the bracket.

  12. Lenovo ThinkPad X1 Carbon 6th Gen Motherboard Replacement: 步骤 12 中的图像 1,1
    • Lift the white and black wires from their press on connections. Make sure to grab the connector head, not the wire itself

    The detaching of the connectors is done in step 8 already

    Peter - 回复

  13. Lenovo ThinkPad X1 Carbon 6th Gen Motherboard Replacement: 步骤 13 中的图像 1,1
    • The housing for the SD card slot is directly attached to the device.

    • Remove and unscrew the two 5mm screws with a Phillips #0 screwdriver.

  14. Lenovo ThinkPad X1 Carbon 6th Gen Motherboard Replacement: 步骤 14 中的图像 1,2 Lenovo ThinkPad X1 Carbon 6th Gen Motherboard Replacement: 步骤 14 中的图像 2,2
    • Using an iFixit SIM card screw head tip, apply pressure to the hole to disconnect the SD card slot from the device.

  15. Lenovo ThinkPad X1 Carbon 6th Gen Motherboard Replacement: 步骤 15 中的图像 1,1
    • Use a Phillips #00 screwdriver to remove each of the four remaining 3mm screws securing the motherboard to the device.

  16. Lenovo ThinkPad X1 Carbon 6th Gen Motherboard Replacement: 步骤 16 中的图像 1,2 Lenovo ThinkPad X1 Carbon 6th Gen Motherboard Replacement: 步骤 16 中的图像 2,2
    • Lift from the top of the motherboard towards you.

    • Pull away from the IO port side to remove the motherboard.

结论

To reassemble your device, follow these instructions in reverse order.

5等其他人完成本指南。

Michael Megna

于01/23/20注册

1,322 声望

创作了7篇指南

团队

Cal Poly, Team S19-G4, White Winter 2020 Cal Poly, Team S19-G4, White Winter 2020 的会员

CPSU-WHITE-W20S19G4

3 名成员

创作了23篇指南

2条评论

Step 3 should be removing the battery. There are 4 screws to do this.

Jesse Corbel - 回复

is it true these boards have a problem and stop functioning? I bought it at Costco 2-3 years ago. My computer won't power on and my local tec shop thinks this is the problem. I like it bc is light and small and since I paid $1100 for it I think I should get a little more life out of it, right? I just bought a new battery too. thanks.

(X1 Carbon 6th Gen - (Type 20KH, 20KG) Laptop (ThinkPad) - Type 20KG; 8th Generation Intel® Core™ i7-8550U Processor(Core i7-8550U) Machine Type Model: 20KG0022US.)

foggy - 回复

添加评论

浏览统计数据:

过去 24 小时: 8

过去 7 天: 40

过去 30 天: 194

总计 9,655