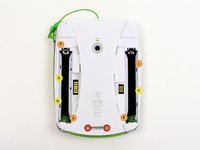
跳转到主内容

LeapFrog LeapPad2 Explorer Screen Replacement

你所需要的

  1. LeapFrog LeapPad2 Explorer Screen Replacement, Battery: 步骤 1 中的图像 1,2 LeapFrog LeapPad2 Explorer Screen Replacement, Battery: 步骤 1 中的图像 2,2
    • Before disassembling your LeapPad, ensure your device is shut off.

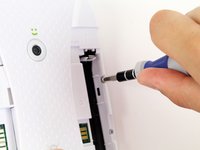
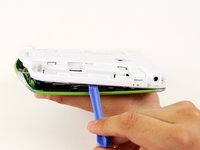
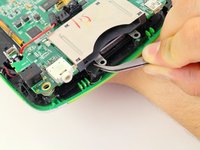
    • Push outward on the plastic side panels to remove and reveal battery.

    • The panels should detach fully from the main device.

  2. LeapFrog LeapPad2 Explorer Screen Replacement: 步骤 2 中的图像 1,3 LeapFrog LeapPad2 Explorer Screen Replacement: 步骤 2 中的图像 2,3 LeapFrog LeapPad2 Explorer Screen Replacement: 步骤 2 中的图像 3,3
    • Push down from the positive end of the battery towards the negative end to pry the battery up out of its dispenser.

    • Remove all four AA alkaline batteries from the device.

  3. LeapFrog LeapPad2 Explorer Screen Replacement, Back Cover: 步骤 3 中的图像 1,2 LeapFrog LeapPad2 Explorer Screen Replacement, Back Cover: 步骤 3 中的图像 2,2
    • This step will void your device warranty.

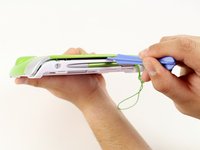
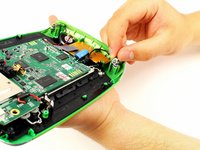
    • Remove the following screws securing the back cover to the main device:

    • Two 10.0 mm Phillips screws

    • Four 4.0 mm Phillips screws

    • Three 3.0 mm Phillips screws

  4. LeapFrog LeapPad2 Explorer Screen Replacement: 步骤 4 中的图像 1,3 LeapFrog LeapPad2 Explorer Screen Replacement: 步骤 4 中的图像 2,3 LeapFrog LeapPad2 Explorer Screen Replacement: 步骤 4 中的图像 3,3
    • Insert a plastic opening tool into the seam between the front and rear covers to detach the back cover from the rest of the device.

    • Move the plastic opening tool around the perimeter of the LeapPad2.

    • Lift up and remove the rear case from the tablet.

    • A butter knife can help when prying the device.

  5. LeapFrog LeapPad2 Explorer Screen Replacement, Front Cover: 步骤 5 中的图像 1,2 LeapFrog LeapPad2 Explorer Screen Replacement, Front Cover: 步骤 5 中的图像 2,2
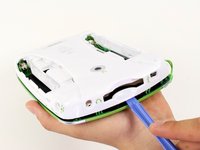
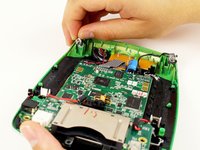
    • Remove the following screws securing the front cover to the main device:

    • Three 6.0 mm Phillips screws

    • Three 7.0 mm Phillips screws

    • Two 10.0 mm Phillips screws

    • Three 7.0 mm Phillips screws (bulkier screw head than other 7.0 mm Phillips screws)

    • The white plastic component holding the speaker must be removed to reach the third 7.0 mm Phillips screw. Refer to Step 2.

  6. LeapFrog LeapPad2 Explorer Screen Replacement: 步骤 6 中的图像 1,2 LeapFrog LeapPad2 Explorer Screen Replacement: 步骤 6 中的图像 2,2
    • Unscrew the white plastic piece to expose the third 7.0 mm Phillips screw mentioned.

  7. LeapFrog LeapPad2 Explorer Screen Replacement: 步骤 7 中的图像 1,2 LeapFrog LeapPad2 Explorer Screen Replacement: 步骤 7 中的图像 2,2
    • When unscrewing the game cartridge screws, you will find a loose black plastic component underneath the game cartridge.

    • Use tweezers to remove the piece.

    • In case the piece falls out unexpectedly, refer to this step to make sure you put this piece back in place during the reassembly of your device.

  8. LeapFrog LeapPad2 Explorer Screen Replacement: 步骤 8 中的图像 1,2 LeapFrog LeapPad2 Explorer Screen Replacement: 步骤 8 中的图像 2,2
    • Desolder the through hole-components in power plugs on both sides of the device where the batteries were once connected.

    • Do not refer to the pictures in this step for correct soldering and de-soldering techniques. They are solely for illustration purposes.

    • For proper soldering and desoldering techniques reference 如何焊接和拆焊.

    • Soldering requires the iron to be at hot temperatures and can cause burns. Wear safety glasses as needed.

    • Be extremely careful with the cables in this step as they could melt, burn, or break.

  9. LeapFrog LeapPad2 Explorer Screen Replacement: 步骤 9 中的图像 1,2 LeapFrog LeapPad2 Explorer Screen Replacement: 步骤 9 中的图像 2,2
    • Pry the power cables from the device using your fingers or tweezers.

    • Now you should be able to lift up the front cover, leaving you with the motherboard and screen.

  10. LeapFrog LeapPad2 Explorer Screen Replacement, Screen: 步骤 10 中的图像 1,3 LeapFrog LeapPad2 Explorer Screen Replacement, Screen: 步骤 10 中的图像 2,3 LeapFrog LeapPad2 Explorer Screen Replacement, Screen: 步骤 10 中的图像 3,3
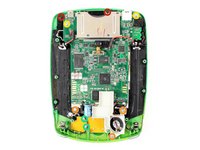
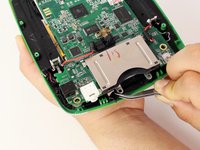
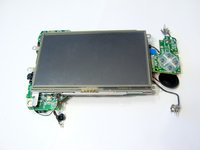
    • Lift the screen from the motherboard by pushing the board out from the three metal tabs.

    • Do not be too aggressive when separating the components, as the parts are still connected.

  11. LeapFrog LeapPad2 Explorer Screen Replacement: 步骤 11 中的图像 1,1
    • Fold screen away from the motherboard along the yellow ribbon, lay the device's components flat open like a book.

    • Do not be too aggressive when separating the components, as the parts are still connected.

  12. LeapFrog LeapPad2 Explorer Screen Replacement: 步骤 12 中的图像 1,1
    • Gently remove the tape covering the yellow ribbon connecting screen to motherboard.

  13. LeapFrog LeapPad2 Explorer Screen Replacement: 步骤 13 中的图像 1,1
    • To safely remove yellow ribbon, lift up the retaining flap.

    • Removing or reinserting the cable by brute force could damage it.

  14. LeapFrog LeapPad2 Explorer Screen Replacement: 步骤 14 中的图像 1,1
    • Pull the yellow ribbon towards the screen to disconnect the screen from the socket on the motherboard.

    • If the flap is up, as show in the picture, no force should be required to remove the cable.

结论

To reassemble your device, follow these instructions in reverse order.

11等其他人完成本指南。

Nupur Garg

于04/12/14注册

867 声望

创作了7篇指南

团队

Cal Poly, Team 8-10, Regan Spring 2014 Cal Poly, Team 8-10, Regan Spring 2014 的会员

CPSU-REGAN-S14S8G10

4 名成员

创作了16篇指南

19条评论

where do you get a new screen from????

Paula Leflar - 回复

We got one on eBay. It was actually a LeapPad (original, not a LeapPad 2 Explorer) that would not boot. I figured the screen would be ok, even if the logic board was bad, and it turned out to be true. Our LeapPad 2 Explorer now works great. Bit of a pain moving the screen assembly from the old model to the new one, but it fits fine and works perfectly.

Jeremiah -

Where do you get a new screen from ??? Please help!

Carmen Nida - 回复

where can I get a screen for the leappad2?

sophia - 回复

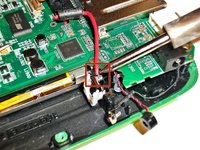
No need to desolder positive battery terminals... (on step 8)

They pull straight up just like the negative terminals just a bit tighter..

Easiest way to do this is by using a small diameter screw driver... pass it under the upper metal bend of positive contact and pull straight up..

SiRaDuDe - 回复

添加评论

浏览统计数据:

过去 24 小时: 0

过去 7 天: 6

过去 30 天: 18

总计 69,296