跳转到主内容

Jawbone MINI JAMBOX Speaker Replacement

你所需要的

  1. Jawbone MINI JAMBOX Speaker Replacement, Outer Case: 步骤 1 中的图像 1,2 Jawbone MINI JAMBOX Speaker Replacement, Outer Case: 步骤 1 中的图像 2,2
    • Using the standard metal spudger, begin by prying at the bottom of the plain rubber end cap (the end without the USB or auxiliary input).

  2. Jawbone MINI JAMBOX Speaker Replacement: 步骤 2 中的图像 1,1
    • Continue prying around the end panel, prying at different points until the entire panel is out of its seating.

    • Carefully remove the end panel.

    • The tabs which connect the panel are on the short sides.

    • WARNING: you will likely cause cosmetic damage to the end cap.

  3. Jawbone MINI JAMBOX Speaker Replacement: 步骤 3 中的图像 1,1
    • Slide out the rubber foot located on the bottom of the case.

  4. Jawbone MINI JAMBOX Speaker Replacement: 步骤 4 中的图像 1,1
    • Using a T6 bit, remove the flat topped 5mm screw located on the bottom of the casing, underneath the rubber foot.

    • This is the only flat topped screw in the speaker, so keep track of which one it is.

  5. Jawbone MINI JAMBOX Speaker Replacement: 步骤 5 中的图像 1,3 Jawbone MINI JAMBOX Speaker Replacement: 步骤 5 中的图像 2,3 Jawbone MINI JAMBOX Speaker Replacement: 步骤 5 中的图像 3,3
    • Push against the side without end cap to slide the internal components out of the case.

    • While holding the metal outset casing with one hand, press on the black inner plastic casing with your thumb.

    • It will be very difficult the first time. There is a rubber seal on the outside of the plastic inner case that creates a lot of friction with the metal outer case.

  6. Jawbone MINI JAMBOX Speaker Replacement, Motherboard: 步骤 6 中的图像 1,1
    • Remove all connecting ribbons from the motherboard.

    • One ZIF or "zero insertion force" ribbon connecting at the side.

    • One standard ribbon connector in the middle (Note: this ZIF ribbon is lightly glued to the surface).

  7. Jawbone MINI JAMBOX Speaker Replacement: 步骤 7 中的图像 1,1
    • Unscrew all four 5mm T6 screws holding the motherboard to the plastic case.

    • Unlike the flat top screw holding the metal housing, these screws are roundtop.

  8. Jawbone MINI JAMBOX Speaker Replacement: 步骤 8 中的图像 1,1
    • Desolder the grounding plug from the motherboard.

    • Make sure your soldering iron is tinned and carefully touch the tip of your iron to the grounding lug. Allow the the solder to liquify. While liquified, lift the motherboard off the grounding lug.

    • WARNING: Do not allow the solder to spill over and bridge any connection on the motherboard.

    • New to soldering? Look at iFixit's soldering guide here.

  9. Jawbone MINI JAMBOX Speaker Replacement: 步骤 9 中的图像 1,1
    • Carefully lift the motherboard out of the plastic housing.

  10. Jawbone MINI JAMBOX Speaker Replacement, Speaker: 步骤 10 中的图像 1,2 Jawbone MINI JAMBOX Speaker Replacement, Speaker: 步骤 10 中的图像 2,2
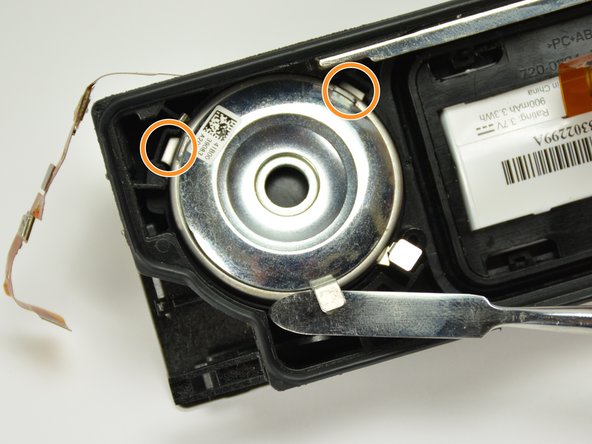
    • In order to remove the speakers, you must rotate them. Rotate the circled tabs away from their adjacent tabs.

    • Once the speakers are completely rotated, you should see new tabs rotate into sight (see the orange marks).

  11. Jawbone MINI JAMBOX Speaker Replacement: 步骤 11 中的图像 1,1
    • Carefully lift the speaker out of the plastic casing using the rotated metal tabs.

  12. Jawbone MINI JAMBOX Speaker Replacement: 步骤 12 中的图像 1,1
    • Replace the blown speaker with a new one and reassemble the JAMBOX.

结论

To reassemble your device, follow these instructions in reverse order.

5等其他人完成本指南。

Liam McDonnell

于04/01/15注册

559 声望

创作了3篇指南

团队

Cal Poly, Team 12-1, Lancaster Spring 2015 Cal Poly, Team 12-1, Lancaster Spring 2015 的会员

CPSU-LANCASTER-S15S12G1

5 名成员

创作了11篇指南

3条评论

where can i buy replacement speakers

Jeffrey S Wardell - 回复

What is the serial number or supplier for the speakers? Need to buy replacement.

candacec - 回复

Thank you for the instructions. I was wondering where to start.

Pradeep Mangalagiri - 回复

添加评论

浏览统计数据:

过去 24 小时: 0

过去 7 天: 2

过去 30 天: 12

总计 5,138