跳转到主内容

JLab Pro-7 Speaker Replacement

你所需要的

  1. JLab Pro-7 Speaker Replacement, JLab Pro-7 Disassembly: 步骤 1 中的图像 1,1
    • The tools needed in order to complete this task are above in the tools section.

    • Grab your tablet and have your tools ready in order to open it and fix the components inside.

  2. JLab Pro-7 Speaker Replacement: 步骤 2 中的图像 1,1
    • At the bottom of the tablet there are two screws.

    • One screw is on the bottom left corner and the other is in the bottom right corner.

    • Here, you need to grab a small Phillips screwdriver and carefully take out these screws. Be careful not to strip the screws when taking them out.

  3. JLab Pro-7 Speaker Replacement: 步骤 3 中的图像 1,1
    • Now grab your iFixit prying tool and try to carefully pry off the back casing.

    • The back doesn't want to dislodge easily so make sure the end of your pry tool is underneath the screen in order to get enough leverage to start popping off the back case from the screen.

    • Be careful when prying the edge of your tablet! Avoid snapping the volume and lock buttons. Also try not to dig into the tablet too deep with your prying tool so you don't damage any components inside.

  4. JLab Pro-7 Speaker Replacement: 步骤 4 中的图像 1,1
    • Make sure to make your way around the perimeter of the tablet in order to take off the back casing.

    • Put small amounts of pressure around the perimeter until you see that section pop off.

    • Keep moving your way clockwise or counterclockwise until the back is fully removed.

  5. JLab Pro-7 Speaker Replacement: 步骤 5 中的图像 1,1
    • There you have it now the back should be fully removed.

    • Make sure to inspect your tablet for any damage from prying off the back panel of your panel.

    • If any internals did fall out or seem to be damaged check out our guides we may be able to help you!

  6. JLab Pro-7 Speaker Replacement, Speaker: 步骤 6 中的图像 1,2 JLab Pro-7 Speaker Replacement, Speaker: 步骤 6 中的图像 2,2
    • Remove the cover from the tablet using the instruction from the prerequisite guide.

  7. JLab Pro-7 Speaker Replacement: 步骤 7 中的图像 1,1
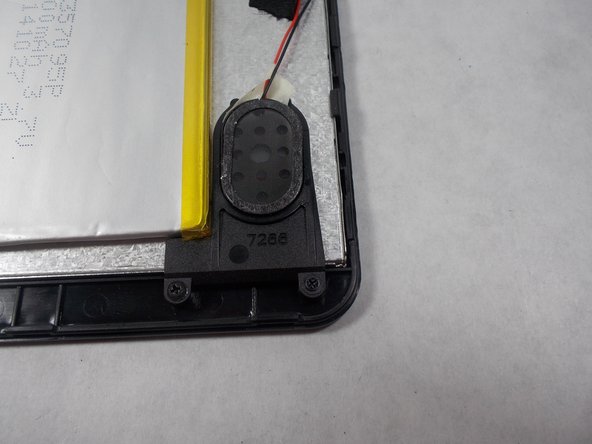
    • The speaker, located on the bottom right corner, is attached to the tablet by a small magnet.

    • To remove the speaker from its plastic fitting, just lift up the speaker and it will detach from its base.

  8. JLab Pro-7 Speaker Replacement: 步骤 8 中的图像 1,1
    • The connecting wires for the speaker are held in place by a small strip of thermal tape.

    • Slowly remove the black thermal tape from the tablet back so the entire connecting wire can move freely.

    • Be careful not to damage the motherboard power ribbon cable.

  9. JLab Pro-7 Speaker Replacement: 步骤 9 中的图像 1,1
    • Use the soldering iron to desolder the connecting wires from the contact points.

    • Carefully remove the wires from the motherboard.

    • Check out this awesome guidefor soldering and desoldering tips.

结论

To reassemble your device, follow these instructions in reverse order.

RichardCollette

于03/05/17注册

201 声望

创作了2篇指南

团队

0条评论

添加评论

浏览统计数据:

过去 24 小时: 0

过去 7 天: 8

过去 30 天: 8

总计 126