跳转到主内容

当前版本的文档还未经巡查,您可以查看最新的已查核版本

你所需要的

  1. 这个步骤还没有翻译 帮忙翻译一下

    : 步骤 1 中的图像 1,2 : 步骤 1 中的图像 2,2
    • Before performing any repairs, perform a water test on the pump by raising and lowering the handle a full 40 strokes. A properly performing pump will yield greater than 10 liters.

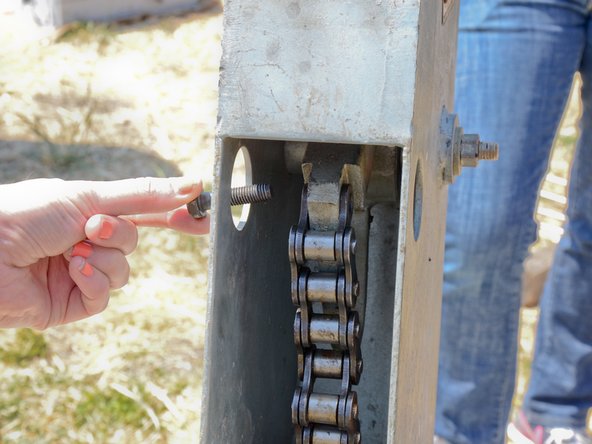
    • Remove the hex head bolt from the top of the access door on the pump head.

    • On reassembly, this bolt should be hand-tight.

  2. 这个步骤还没有翻译 帮忙翻译一下

    : 步骤 2 中的图像 1,3 : 步骤 2 中的图像 2,3 : 步骤 2 中的图像 3,3
    • Pull the access door straight up off the pump head.

    • Store the access door in a sanitary place to prevent contamination.

  3. 这个步骤还没有翻译 帮忙翻译一下

    : 步骤 3 中的图像 1,2 : 步骤 3 中的图像 2,2
    • The access door has a tongue that fits into the base of the pump head.

    • The access door makes a convenient tray to hold nuts and bolts during the disassembly.

  4. 这个步骤还没有翻译 帮忙翻译一下

    : 步骤 4 中的图像 1,3 : 步骤 4 中的图像 2,3 : 步骤 4 中的图像 3,3
    • Place the spacer collar around the pump rod below the raised chain, with the beveled side down, and the flat side facing up.

  5. 这个步骤还没有翻译 帮忙翻译一下

    : 步骤 5 中的图像 1,3 : 步骤 5 中的图像 2,3 : 步骤 5 中的图像 3,3
    • The following procedure requires two people. If you attempt to do this alone, you risk injuring yourself and damaging the pump.

    • Lift the pump handle until the base of the chain comes to rest on the spacer collar, and the chain is slack. Hold the handle in this position while the chain is being detached.

  6. 这个步骤还没有翻译 帮忙翻译一下

    : 步骤 6 中的图像 1,3 : 步骤 6 中的图像 2,3 : 步骤 6 中的图像 3,3
    • Using the two access holes, place an angled socket wrench on the bolt and nut attaching the chain to the pump handle.

  7. 这个步骤还没有翻译 帮忙翻译一下

    : 步骤 7 中的图像 1,3 : 步骤 7 中的图像 2,3 : 步骤 7 中的图像 3,3
    • Hold the wrench on the bolt stationary.

    • Loosen the nut.

  8. 这个步骤还没有翻译 帮忙翻译一下

    : 步骤 8 中的图像 1,3 : 步骤 8 中的图像 2,3 : 步骤 8 中的图像 3,3
    • Remove the nut from the chain bolt.

  9. 这个步骤还没有翻译 帮忙翻译一下

    : 步骤 9 中的图像 1,2 : 步骤 9 中的图像 2,2
    • Remove the washer from the chain bolt.

  10. 这个步骤还没有翻译 帮忙翻译一下

    : 步骤 10 中的图像 1,2 : 步骤 10 中的图像 2,2
    • Remove the chain bolt.

  11. 这个步骤还没有翻译 帮忙翻译一下

    : 步骤 11 中的图像 1,3 : 步骤 11 中的图像 2,3 : 步骤 11 中的图像 3,3
    • Pull the top of the chain straight off of the pump handle.

  12. 这个步骤还没有翻译 帮忙翻译一下

    : 步骤 12 中的图像 1,3 : 步骤 12 中的图像 2,3 : 步骤 12 中的图像 3,3
    • Remove the two bolts from the handle side of the pump head.

    • Use one wrench on the bolt and another on the nut beneath. Hold the bolt stationary and loosen the nut.

  13. 这个步骤还没有翻译 帮忙翻译一下

    : 步骤 13 中的图像 1,3 : 步骤 13 中的图像 2,3 : 步骤 13 中的图像 3,3
    • Remove the two bolts and nuts from the handle side.

  14. 这个步骤还没有翻译 帮忙翻译一下

    : 步骤 14 中的图像 1,2 : 步骤 14 中的图像 2,2
    • After removing the two handle side bolts, have your partner support the weight of the handle.

    • Remove the two remaining bolts in the same fashion.

  15. 这个步骤还没有翻译 帮忙翻译一下

    : 步骤 15 中的图像 1,3 : 步骤 15 中的图像 2,3 : 步骤 15 中的图像 3,3
    • Lift and remove the pump head from the pump.

    • Store the pump head in a sanitary place, preferably above ground, to prevent contamination.

终点

团队

iFixit iFixit 的会员

Staff

136 名成员

创作了17,299篇指南

0条评论

添加评论

浏览统计数据:

过去 24 小时: 0

过去 7 天: 2

过去 30 天: 12

总计 191