跳转到主内容

当前版本的文档还未经巡查,您可以查看最新的已查核版本

你所需要的

  1. 这个步骤还没有翻译 帮忙翻译一下

    : 步骤 1 中的图像 1,3 : 步骤 1 中的图像 2,3 : 步骤 1 中的图像 3,3
    • The Making of a Power Mac g5 Mailbox

  2. 这个步骤还没有翻译 帮忙翻译一下

    : 步骤 2 中的图像 1,3 : 步骤 2 中的图像 2,3 : 步骤 2 中的图像 3,3
    • Tools Needed

  3. 这个步骤还没有翻译 帮忙翻译一下

    : 步骤 3 中的图像 1,2 : 步骤 3 中的图像 2,2
    • Mark where you are going to have to cut

  4. 这个步骤还没有翻译 帮忙翻译一下

    : 步骤 4 中的图像 1,2 : 步骤 4 中的图像 2,2
    • Cut a hole big enough to slide the mailbox into the case

  5. 这个步骤还没有翻译 帮忙翻译一下

    : 步骤 5 中的图像 1,3 : 步骤 5 中的图像 2,3 : 步骤 5 中的图像 3,3
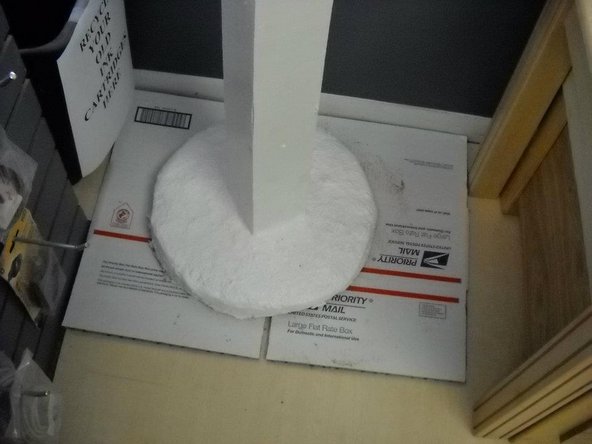
    • Drill 4 holes through the bottom of the case and put wood underneath the case and screw the wood pieces to the bottom of the mailbox. Put a piece of wood under the mailbox to have something to screw it to. You may have to drill more holes to screw the boards together with long screws.

  6. 这个步骤还没有翻译 帮忙翻译一下

    : 步骤 6 中的图像 1,1
    • Slide in the mailbox and then put screws into the side of the mailbox going into the wood underneath.

  7. 这个步骤还没有翻译 帮忙翻译一下

    : 步骤 7 中的图像 1,1
    • Put a screw in the front and back of the inside of the mailbox.

  8. 这个步骤还没有翻译 帮忙翻译一下

    : 步骤 8 中的图像 1,3 : 步骤 8 中的图像 2,3 : 步骤 8 中的图像 3,3
    • Using the flag as a guide to where to drill the holes. Mark a spot for a hole for the flag to go through in the door of the case. Then drill holes accordingly.

  9. 这个步骤还没有翻译 帮忙翻译一下

    : 步骤 9 中的图像 1,2 : 步骤 9 中的图像 2,2
    • Insert an S hook and use pliers to close the S hook around the plastic connector to hold the flag on.

  10. 这个步骤还没有翻译 帮忙翻译一下

    : 步骤 10 中的图像 1,3 : 步骤 10 中的图像 2,3 : 步骤 10 中的图像 3,3
    • Take a rubber fuel line and wrap it in silver hvac tape and slit the hose down the middle to make a seal to fill in the gaps between the mailbox. The silver tape is optional.

  11. 这个步骤还没有翻译 帮忙翻译一下

    : 步骤 11 中的图像 1,2 : 步骤 11 中的图像 2,2
    • Use the silver tape to cover the screw heads inside of the mailbox.

  12. 这个步骤还没有翻译 帮忙翻译一下

    : 步骤 12 中的图像 1,3 : 步骤 12 中的图像 2,3 : 步骤 12 中的图像 3,3
    • Take a flower pot and cut a hole in it to make a concrete base (optional) Mix the quickcrete up and fill the flower pot with it and flip it over and stick the wood pole in the concrete.

    • Use a level and something to hold the wood in a level position while it dries

  13. 这个步骤还没有翻译 帮忙翻译一下

    : 步骤 13 中的图像 1,2 : 步骤 13 中的图像 2,2
    • Paint the wood pole and the concrete white.

  14. 这个步骤还没有翻译 帮忙翻译一下

    : 步骤 14 中的图像 1,1
    • Using L metal brackets screw the mailbox to the pole.

  15. 这个步骤还没有翻译 帮忙翻译一下

    : 步骤 15 中的图像 1,2 : 步骤 15 中的图像 2,2
    • Put the side panel with the flag back on and you should have finished mail box ready to be buried or in this case used as a self standing mailbox.

终点

另外一个人完成了本指南。

joe

于12/31/13注册

3,320 声望

撰写一个指南

团队

Joespcrepairs.com Joespcrepairs.com 的会员

Business

1 名成员

创作了1篇指南

0条评论

添加评论

浏览统计数据:

过去 24 小时: 0

过去 7 天: 5

过去 30 天: 15

总计 956