简介
If your screen fails to light up or is physically damaged, you most likely have a faulty screen that requires replacement.
To access the screen, you will first need to open your HP Pavilion 15-cd040wm by disassembling its back cover.
Before beginning, make sure to power off your laptop completely and disconnect it from any external power source. Once the back cover is off, be sure to disconnect the battery from the motherboard to ensure there is no power going to the laptop while it is being worked on.
你所需要的
-
-
The first step is to remove the four rubber non-slip pads on the bottom of the laptop to expose screws hidden underneath them. Peel off each tab with your fingers.
-
-
-
Using the iFixit opening tool, carefully pry along the sides of the back cover.
-
After all of the edges of the back cover have been freed, use your opening tool to carefully unclip the tabs holding the back cover to the CD drive.
-
After everything is unclipped, you can safely remove the back cover from the rest of the device.
-
-
-
-
2x 5mm Philips screws
-
2x 3mm Philips screws
-
Remove all screws using a size Phillips #0 screwdriver.
-
-
-
Remove the four 6.0 mm screws from the hinges using a size Phillips #0 screwdriver.
-
Use the iFixit opening tool to lift both of the hinges.
-
-
-
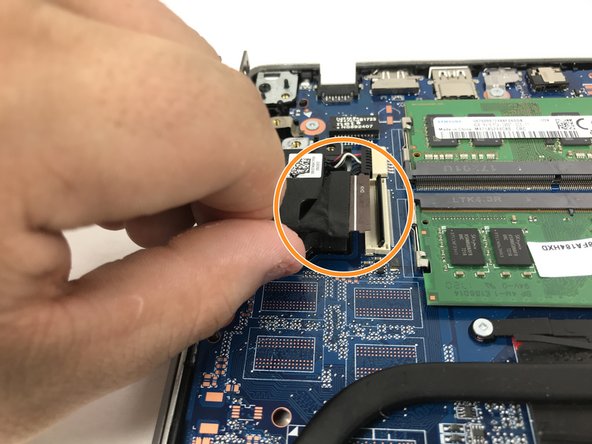
Using the spudger or opening tool, remove the ribbon that connects to the screen.
-
Gently pull the ribbon out of the port after using the spudger to lift the supporter up.
-
Carefully remove the two antenna wires that connect to the screen as well. Do this by gently pulling them free from their connectors at the wifi card.
-


To reassemble your device, follow these instructions in reverse order.
To reassemble your device, follow these instructions in reverse order.
另外一个人完成了本指南。
团队

UMass Dartmouth, Team S1-G1, Botvin Fall 2019 UMass Dartmouth, Team S1-G1, Botvin Fall 2019 的会员
UMASSD-BOTVIN-F19S1G1
4 名成员
创作了7篇指南