简介
在本指南中,您将学习如何卸下Google Pixelbook的后面板以更换电池。 由于背面板牢固地粘附在电池上,因此几乎不可能在不造成损坏的情况下将其卸下。 我们强烈建议购买一个全新的后面板/电池组,而不要尝试将它们分开。
你所需要的
-
-
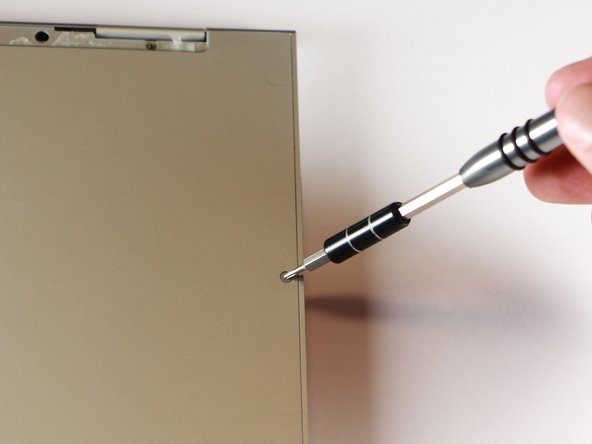
从底部面板上卸下17颗3.0mm T5梅花螺钉。
Just a heads up on “Step 3”: (not sure if maybe mine is a newer model since I just got it about a week ago) But there are only 15 of the T5 Screws on mine… Not 17. There are only 2, instead of 4, screws at the top of the picture (located at the hinge) showing the back where they are all circled.
Jeff Lewis - 回复
I had the same experience as Jeff.
-
-
-
-
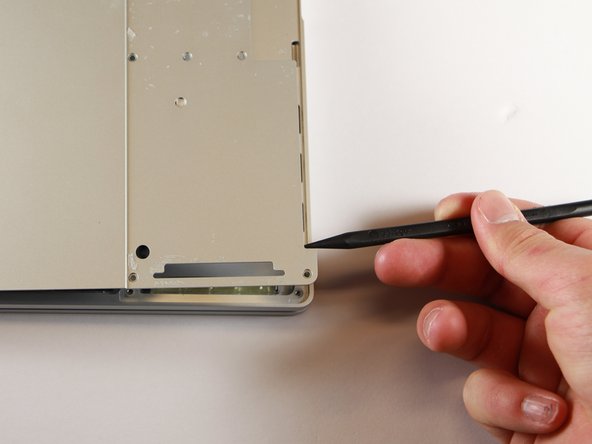
使用T3梅花螺丝刀逆时针方向旋转面板中间的黄色2.0毫米黄色螺丝。
For me, these were T4 and not T3 screws (everything labelled T3 was a T4 for me).
-
-
-
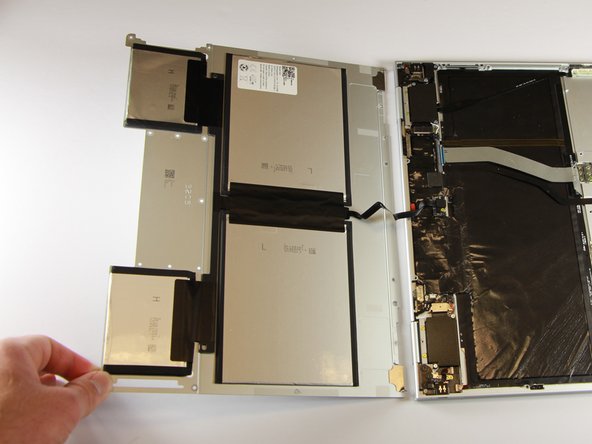
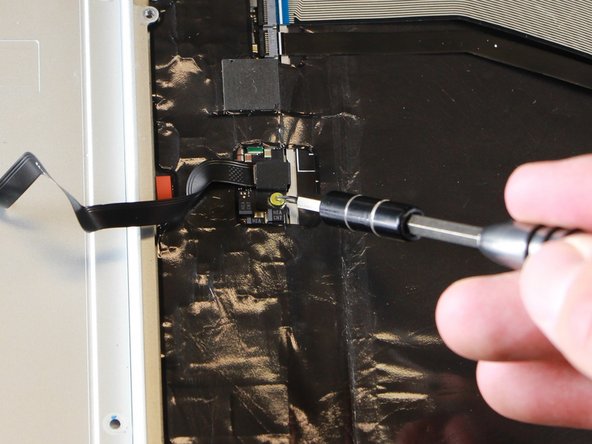
通过使用撬棒将其从其位置提起,卸下黑色的保护外壳。
Does anyone know if I can get the cable shown in this image as its own part? It is the only thing wrong with my machine and I don't want to fork out £70 for an entire new battery and cable.
-


要重新组装设备,请按照相反的顺序进行操作。
要重新组装设备,请按照相反的顺序进行操作。
28等其他人完成本指南。
团队

Cal Poly, Team S18-G1, Livingston Winter 2018 Cal Poly, Team S18-G1, Livingston Winter 2018 的会员
CPSU-LIVINGSTON-W18S18G1
4 名成员
创作了7篇指南
25条评论
Question; with the rubber pads removed from the bottom…is there adhesive and if so, what’s best used to replace those and make it look factory stock again?
The rubber pads are fixed with double sided tape.
I just use Isopropyl alcohol to quickly and completely remove any adhesive residue and use an ample amount of JB Weld and Automotive Bondo to get the unit ready. Use a wet rag to remove any excess adhesive. Do not fo0rget to centrealize the Feline Eyelash right at the longest point of the night and invokie MARDUK!!! AAAHHRHRGH.
So yeah basic Chemistry coupled with the ‘Dark Arts’ have created a sustainable situation.!
Where did you buy the back case replacement part?
My battery health shows only 47.28%. where can i find a new battery for my dear pixelbook. help….
Yep, that is the hardest question to solve. The device is too good to leave that. It works without a battery from charger for a time.
The battery is removable from the back cover, though !&&* of a job. Also fixed with double sided tape, plenty of. Use isopropyl alcohol and plastic card.
Yeah where can I buy the battery?
Got one on ebay
How was the replacement process? Easier or harder than you thought? Also, was the back panel you got a good battery percentage. The only ones I see only guarantee 75 percent.
I replaced with a new battery, check the ebay link provided or search for Pixelbook COA battery. Getting the battery off from the aluminium plate is harsh, but can be done with patience, a flat surface and some plastic card.
Got one that was pulled on ebay and did this. Works great now! Hardest part was finding a T3 locally. Found a set at HomeDepot for $10 USD. Walmart caries the double stick tape $3 USD. Used a spudger for the back and a small spatula for the front. Go slow and you can reuse most of the tape. The smaller back piece has a flexible metal core, so get it as flat as possible before you stick it back on.
where do you get parts
Please check the comments. The usual source from ebay has disappearred, but you may find it by the battery code.
Question: Is it possible to charge the battery independently of the PB? Connecting the flat cable to a charger? My PB doesn’t boot anymore (the battery was fine before running to 0%) Now flickering keyboard, 1 x white and 1 x red led blink and no boot.
Christophe - 回复
Just finished replacing my Pixelbook 2017 battery.
Ebay new battery $85.00
Lowes phone repair kit $35.00 (has all torx drivers needed plus spudger and pick)
Office Depot Scotch double sided tape (permanent) $8.00
Followed ifixit instructions
Took about 1 1/2 hours to remove the old battery and clean all the mounting tape. Went back together flawlessly.
Formerly the battery health was 50-60 %, now is 101.29 %
The old battery was destroyed by the time I got it off, but the metal back is still perfect. The two pieces of trim took a bit to clean but look fine. The new battery comes with all double sided tape already applied so its pretty easy to install. I did draw lines with a sharpie around the old battery before taking it off. Then after cleaning the back just laid down the new battery and reassembled.
Hey Guys, I am looking for a new battery and it is really hard. Following previous comments, I found a new battery with the label "LG A50"... I dig into it and found the LG A50 (LG Gram Laptop) battery have same layout as Pixelbook Eve battery. Could anyone with more tech skills take a look about it to confirm we can change our pixelbook eve battery with some LG Gram parts?
I hope we can find a new way to repair our excellent laptops!
I might have to do this now as my pixelbooks battery or port is finally bad after some light to mid use from it , I'm extremely saddened that I can't replace it or have pros do it let alone me finding a battery I'm ok with buying and using on my product .... I'm extremely dissatisfied with the short life span of this laptop and how hot it got only watching Netflix for 20 minutes or typing letters ... Not sure if I want to even repair it let alone get a pixel book go unfortunately
Is it common for it to not boot AT ALL when the battery is bad, even when it's plugged into power? Often when my battery is low I'll have to charge for 30m or so before it will turn on, until then it'll only flash the keyboard backlights a bit if I try to turn it on.
Trying to figure out if it's worth attempting battery replacement for this thing or problems run deeper.
Had a strikingly similar issue, took mine apart and have found that the ribbon cable that connects the batteries (in the back plate) to the motherboard had somehow been cut in half.
So it seems it is a "simple" replacement of that cable, but first I need to find somewhere to buy just that cable from!
Can someone who successfully replaced the battery confirm if they ever had any symptoms like white charging light next to charging port whilst the opposite side LED glowed red slowly, but no signs of life when attempting to power up with the old battery fitted?
I measured the voltage and power draw with a USB-C meter and it reports the PixelBook is drawing 1.96A at 4.91V, so it would seem like it's charging, but have left it like that for 4 hours now and still no signs of life.
After using the spurger to start lifting the rubber like cover at a corner, a two inch wide paint scrapper proved to be an easy way to continue. Using the scrapper at roughly a 30 degree angle (with respect to the laptop rectangle) allowed progressive lifting of the cover. Ripping of the cover tended to occur if only the narrow spurger was used.
Marvin Stodolsky - 回复
Please i need to buy the motherboard
This my email chikaubah33@yahoo.com
chika ubah - 回复
The narrow rubber foot at the base of the display is supported by bendable metal. Be careful how evenly you remove it as uneven motions will result in a more bent and harder to re-apply piece.
Meta Data - 回复