跳转到主内容
加入维修社区 - 创建账户

Gateway MA6 Laptop Cooling Assembly Replacement

你所需要的

    1. Gateway MA6 Laptop Cooling Assembly Replacement, Cooling Assembly: 步骤 1 中的图像 1,2 Gateway MA6 Laptop Cooling Assembly Replacement, Cooling Assembly: 步骤 1 中的图像 2,2
      • Loosen the seven 6 mm Phillips #0 screws on the back of the case.

      • Leave all the screws in the back plate and so you don't lose them.

      询问修复机器人

      添加评论

    2. Gateway MA6 Laptop Cooling Assembly Replacement: 步骤 2 中的图像 1,2 Gateway MA6 Laptop Cooling Assembly Replacement: 步骤 2 中的图像 2,2
      • Pull upwards on the top of the back cover to remove it.

      询问修复机器人

      添加评论

    3. Gateway MA6 Laptop Cooling Assembly Replacement: 步骤 3 中的图像 1,1
      • Remove the four 9 mm Phillips #0 screws from the cooling assembly.

      询问修复机器人

      添加评论

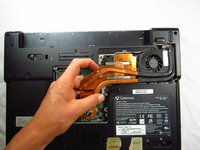
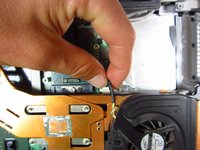
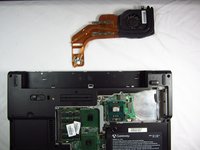
    4. Gateway MA6 Laptop Cooling Assembly Replacement: 步骤 4 中的图像 1,3 Gateway MA6 Laptop Cooling Assembly Replacement: 步骤 4 中的图像 2,3 Gateway MA6 Laptop Cooling Assembly Replacement: 步骤 4 中的图像 3,3
      • Gently and carefully remove the cooling assembly to avoid ripping the wire attaching it to the computer.

      • Gently flip the cooling fan assembly upside-down on the computer surface.

      • Carefully grab the wire attached to the computer and pull away from the port.

      • The cooling fan is now safe for removal.

      询问修复机器人

      添加评论

    5. Gateway MA6 Laptop Cooling Assembly Replacement: 步骤 5 中的图像 1,1
      • When reinstalling heat sink and fans clean off the old thermal paste from both the heat sink and the CPU and then add new paste to CPU

      • If your unfamiliar with applying thermal paste 如何涂散热膏

      询问修复机器人

      添加评论

结论

To reassemble your device, follow these instructions in reverse order.

取消:我没有完成这个指南。

2等其他人完成本指南。

团队

Cal Poly, Team 6-2, Forte Spring 2014 Cal Poly, Team 6-2, Forte Spring 2014 的会员

CPSU-FORTE-S14S6G2

5 名成员

创作了66篇指南

0指南评论

添加评论

浏览统计数据:

过去 24 小时: 0

过去 7 天: 12

过去 30 天: 41

总计 1,297