跳转到主内容

Garmin Nüvi 370 LCD Display Replacement

你所需要的

  1. Garmin Nüvi 370 LCD Display Replacement, Into Core Components: 步骤 1 中的图像 1,2 Garmin Nüvi 370 LCD Display Replacement, Into Core Components: 步骤 1 中的图像 2,2
    • Unscrew the two screws on the antenna unit using a torc-head screwdriver.

    • The Torx-Head Screws' size is T-5, which is about 1.5mm.

    • Gently pry open the antenna unit with your fingers.

    • Be careful and try not to damage the small plastic tab.

  2. Garmin Nüvi 370 LCD Display Replacement: 步骤 2 中的图像 1,3 Garmin Nüvi 370 LCD Display Replacement: 步骤 2 中的图像 2,3 Garmin Nüvi 370 LCD Display Replacement: 步骤 2 中的图像 3,3
    • Slide out the inner casing attached to the antenna body.

    • Remove the rotating joint connecting the antenna casing to the main device:

    • Squeeze tweezers into the shown location and compress the spring.

    • Lift out the outer casing while keeping the spring compressed.

    • watch out, as the spring loaded portion may fly out unexpectedly.

  3. Garmin Nüvi 370 LCD Display Replacement: 步骤 3 中的图像 1,1
    • Using a torx-head screwdriver, unscrew the two revealed screws that connect the front and back of the device.

    • The Torx-Head Screws' size is T-5, which is about 1.5mm.

  4. Garmin Nüvi 370 LCD Display Replacement: 步骤 4 中的图像 1,3 Garmin Nüvi 370 LCD Display Replacement: 步骤 4 中的图像 2,3 Garmin Nüvi 370 LCD Display Replacement: 步骤 4 中的图像 3,3
    • Insert the plastic opening tool into the center of the edge as shown in first picture.

    • Slide the plastic opening tool along the central gap of device, making sure that each edge is free, as shown in the second picture.

  5. Garmin Nüvi 370 LCD Display Replacement: 步骤 5 中的图像 1,3 Garmin Nüvi 370 LCD Display Replacement: 步骤 5 中的图像 2,3 Garmin Nüvi 370 LCD Display Replacement: 步骤 5 中的图像 3,3
    • Detach the front display from the back panel of the device.

  6. Garmin Nüvi 370 LCD Display Replacement: 步骤 6 中的图像 1,2 Garmin Nüvi 370 LCD Display Replacement: 步骤 6 中的图像 2,2
    • Using tweezers, gently lift the microphone from its resting position to fully separate the device into two parts.

    • Finally, remove the screw that connects the motherboard to the back casing with a 3mm head driver.

  7. Garmin Nüvi 370 LCD Display Replacement, LCD Display: 步骤 7 中的图像 1,1
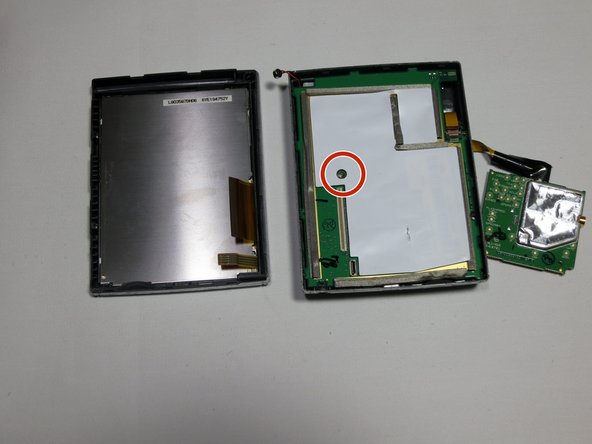
    • After following the instructions in the main dis-assembly guide, you should have the screen detached from the motherboard.

  8. Garmin Nüvi 370 LCD Display Replacement: 步骤 8 中的图像 1,1
    • Hold the front panel plastic and screen as shown.

    • Gently apply pressure on the left and top left corner to allow the screen to come out of the plastic shell.

  9. Garmin Nüvi 370 LCD Display Replacement: 步骤 9 中的图像 1,1
    • Once the top-left corner is out, carefully start detaching the bottom of the screen, starting from the bottom left.

  10. Garmin Nüvi 370 LCD Display Replacement: 步骤 10 中的图像 1,1
    • Finally, gently pull the screen out of the right side of the plastic shell.

  11. Garmin Nüvi 370 LCD Display Replacement: 步骤 11 中的图像 1,1
    • The screen should now be completely detached.

    • Insert new, functional display screen.

结论

To reassemble your device, follow these instructions in reverse order.

另外一个人完成了本指南。

Matt West

于04/18/13注册

31 声望

创作了4篇指南

团队

Cal Poly, Team 13-65, Johann Spring 2013 Cal Poly, Team 13-65, Johann Spring 2013 的会员

CPSU-JOHANN-S13S13G65

3 名成员

创作了6篇指南

0条评论

添加评论

浏览统计数据:

过去 24 小时: 0

过去 7 天: 0

过去 30 天: 0

总计 548