跳转到主内容

Fairphone 4 Charging Port Replacement

你所需要的

  1. Fairphone 4 Charging Port Replacement, Pry the back cover up: 步骤 1 中的图像 1,2 Fairphone 4 Charging Port Replacement, Pry the back cover up: 步骤 1 中的图像 2,2
    • Be sure to power off your phone before you begin.

    • Insert your thumbnail, or a prying tool like a spudger, into the notch at the bottom right of the back cover.

    • Pry the back cover up to start separating its plastic clips.

  2. Fairphone 4 Charging Port Replacement: 步骤 2 中的图像 1,3 Fairphone 4 Charging Port Replacement: 步骤 2 中的图像 2,3 Fairphone 4 Charging Port Replacement: 步骤 2 中的图像 3,3
    • Using your thumbnail or an opening pick, slide along the right side of the phone to loosen the plastic clips.

  3. Fairphone 4 Charging Port Replacement: 步骤 3 中的图像 1,3 Fairphone 4 Charging Port Replacement: 步骤 3 中的图像 2,3 Fairphone 4 Charging Port Replacement: 步骤 3 中的图像 3,3
    • Slide along the bottom of the phone to loosen the plastic clips.

  4. Fairphone 4 Charging Port Replacement: 步骤 4 中的图像 1,3 Fairphone 4 Charging Port Replacement: 步骤 4 中的图像 2,3 Fairphone 4 Charging Port Replacement: 步骤 4 中的图像 3,3
    • Slide along the left side of the phone to loosen the plastic clips.

    • Lift the back cover to release the rest of the plastic clips and remove it.

    • To reinstall the back cover press it firmly into place until you hear a snap from the plastic clips.

  5. Fairphone 4 Charging Port Replacement, Lever up the Battery: 步骤 5 中的图像 1,3 Fairphone 4 Charging Port Replacement, Lever up the Battery: 步骤 5 中的图像 2,3 Fairphone 4 Charging Port Replacement, Lever up the Battery: 步骤 5 中的图像 3,3
    • Use a fingernail or a prying tool at the marked notch to lever the battery out of its recess.

    • Lift the battery out of its recess and remove it.

    • Remove the battery.

  6. Fairphone 4 Charging Port Replacement, Unscrew the loudspeaker: 步骤 6 中的图像 1,1
    • Remove the six 4.8 mm-long Phillips screws.

  7. Fairphone 4 Charging Port Replacement, Slide beneath the loudspeaker: 步骤 7 中的图像 1,2 Fairphone 4 Charging Port Replacement, Slide beneath the loudspeaker: 步骤 7 中的图像 2,2
    • Use an opening pick to slide beneath the loudspeaker.

    • Slide the opening pick to the right side of the loudspeaker to release the clips that hold it in place.

  8. Fairphone 4 Charging Port Replacement, Lift up the loudspeaker: 步骤 8 中的图像 1,2 Fairphone 4 Charging Port Replacement, Lift up the loudspeaker: 步骤 8 中的图像 2,2
    • Slide the opening pick to the left side of the loudspeaker to release the clips that hold it in place.

    • Twist the opening pick to lift up the loudspeaker.

  9. Fairphone 4 Charging Port Replacement, Remove the loudspeaker: 步骤 9 中的图像 1,2 Fairphone 4 Charging Port Replacement, Remove the loudspeaker: 步骤 9 中的图像 2,2
    • Grab the loudspeaker and flip it towards the bottom to remove it.

  10. Fairphone 4 Charging Port Replacement, Disconnect the cable: 步骤 10 中的图像 1,2 Fairphone 4 Charging Port Replacement, Disconnect the cable: 步骤 10 中的图像 2,2
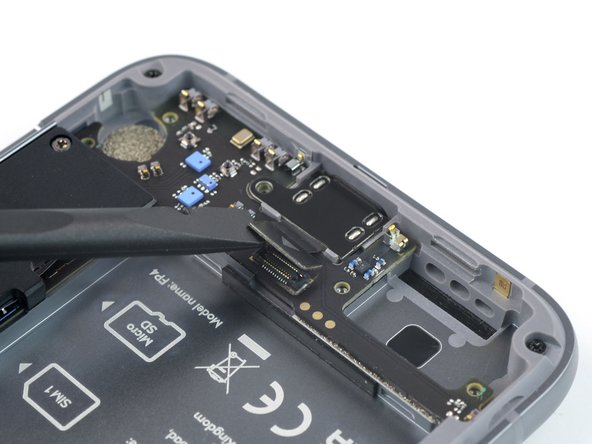
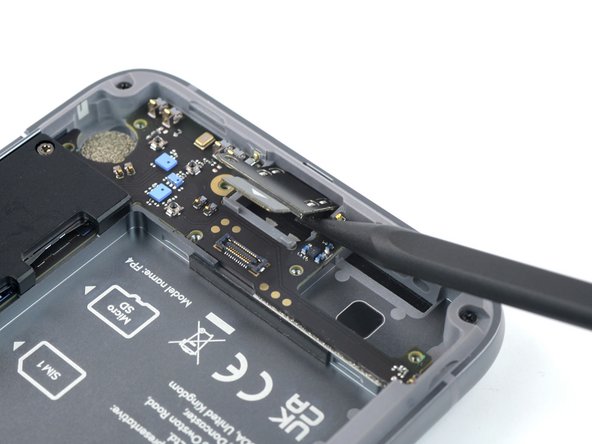
    • Use a spudger to disconnect the charging port by prying the connector straight up from its socket.

  11. Fairphone 4 Charging Port Replacement, Lift out the charging port: 步骤 11 中的图像 1,3 Fairphone 4 Charging Port Replacement, Lift out the charging port: 步骤 11 中的图像 2,3 Fairphone 4 Charging Port Replacement, Lift out the charging port: 步骤 11 中的图像 3,3
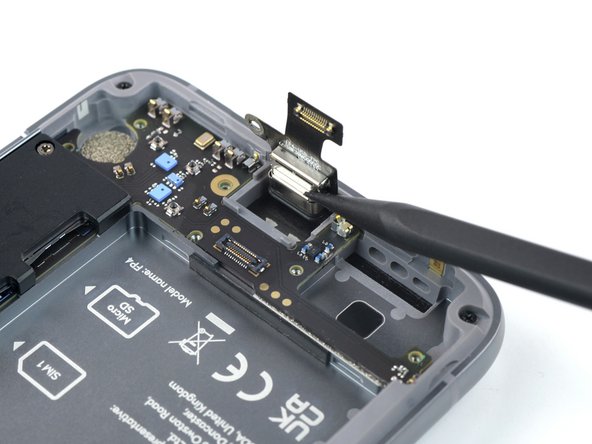
    • Use the pointed side of the spudger to lift the charging port out of its recess.

    • The small cutout visible on the opposite side of the charging port screw hole can be used to insert the spudger.

  12. Fairphone 4 Charging Port Replacement, Remove the charging port: 步骤 12 中的图像 1,2 Fairphone 4 Charging Port Replacement, Remove the charging port: 步骤 12 中的图像 2,2
    • Grab the charging port and remove it.

结论

To reassemble your device, follow these instructions in reverse order.

Take your e-waste to an R2 or e-Stewards certified recycler.

Repair didn’t go as planned? Try some basic troubleshooting, or ask our Answers community for help.

8等其他人完成本指南。

Manuel Haeussermann

于07/13/22注册

16,286 声望

创作了71篇指南

团队

iFixit iFixit 的会员

Staff

140 名成员

创作了18,077篇指南

2条评论

Der Tausch war sehr einfach mit eurer Anleitung und der USB-C Anschluss funktioniert wieder einwandfrei, besser als zuvor sogar.

Ich hatte von Anfang an Probleme mit dem USB-C Anschluss und vermute dieser war bereits fehlerhaft montiert. Die Konnektivität wurde immer schlechter, nur bestimmte Ladekabel funktionierten noch. Säubern hat nichts gebracht. Nach dem Wechsel funktionieren wieder alle Kabel bzw. Stecker und klicken richtig an. Das war vorher nie so.

Bei den ganzen Problemen und dem Verschleiß von USB-C Buchsen ist es schade dass Fairphone sich wegen der schlechteren Effizienz immer noch gegen QI-Charging entscheidet. Es könnte die Lebensdauer von Ladeanschlüssen verlängern. Ich denke das sollte man hinsichtlich der Nachhaltigkeit mehr berücksichtigen.

Muto - 回复

My phone only charged with some of my known good cables. It's 2 years and a couple months old.

The fix was very easy. probably not even 25 minutes. Only the screws didn't want to come out after unscrewing, They came out with carefully removing the speaker assembly, knowing the screws are loose. I also removed dust from the speaker while in here.

My phone charges normally again.

amelore - 回复

添加评论

浏览统计数据:

过去 24 小时: 12

过去 7 天: 64

过去 30 天: 256

总计 5,584