跳转到主内容

Desktop PC Motherboard Replacement

你所需要的

  1. Desktop PC Motherboard Replacement, Left Panel: 步骤 1 中的图像 1,1
    • Unplug the computer from the power supply before any maintenance or disassembly.

    • Remove the two Phillips #2 head 5mm screws from the back side of the computer case. You only need to remove the screws that hold down the panel.

    • These screws can usually be removed by hand.

    • Be sure to wear an anti-static bracelet or use an anti-static mat to ensure important components are not damaged by static electricity.

  2. Desktop PC Motherboard Replacement: 步骤 2 中的图像 1,2 Desktop PC Motherboard Replacement: 步骤 2 中的图像 2,2
    • Next, remove the side panel of the computer case to allow access into the computer. Slide the panel towards the back of the computer and lift it up to remove.

    • If there is a fan mounted on the side panel, make sure to unplug the cable before fully removing the panel.

  3. Desktop PC Motherboard Replacement, Right Panel: 步骤 3 中的图像 1,1
    • Remove two Phillips #2 head 5mm screws from the back side of the computer case.

  4. Desktop PC Motherboard Replacement: 步骤 4 中的图像 1,2 Desktop PC Motherboard Replacement: 步骤 4 中的图像 2,2
    • Next, remove the side panel of the computer case to allow access into the computer.

  5. Desktop PC Motherboard Replacement, Graphics Card: 步骤 5 中的图像 1,1
    • Remove the Phillips #2 head, 5mm screw holding the graphics card in place.

    • Make sure that you have grounded yourself so that upon removal of the graphics card you do not accidentally shock the circuit board and damage it.

  6. Desktop PC Motherboard Replacement: 步骤 6 中的图像 1,2 Desktop PC Motherboard Replacement: 步骤 6 中的图像 2,2
    • Press the latch on the side of the connector area to unlock the graphics card, and carefully slide the graphics card out from its slot in the computer.

    • A good technique is to lay the computer onto it side, push the latch down and lift the graphics card out.

  7. Desktop PC Motherboard Replacement, Hard Drive: 步骤 7 中的图像 1,1
    • Remove two Phillips #2 head 5mm screws holding the hard drive in place.

  8. Desktop PC Motherboard Replacement: 步骤 8 中的图像 1,1
    • Remove two Phillips #2 head 5mm screws holding in the other side of the hard drive.

  9. Desktop PC Motherboard Replacement: 步骤 9 中的图像 1,1
    • Slide the hard drive out from the metal casing.

  10. Desktop PC Motherboard Replacement: 步骤 10 中的图像 1,1
    • Remove the cables from the back of the hard drive.

  11. Desktop PC Motherboard Replacement, Motherboard: 步骤 11 中的图像 1,2 Desktop PC Motherboard Replacement, Motherboard: 步骤 11 中的图像 2,2
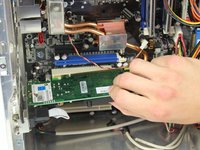
    • Begin to disconnect all cables from the motherboard. Many of the cables will have clips that need to be undone before you can remove them from the motherboard.

  12. Desktop PC Motherboard Replacement: 步骤 12 中的图像 1,1
    • Remove nine Phillips #2 head 5mm screws from the motherboard. Be sure to have your computer on its side, so that once the screws are out nothing falls and gets damaged.

  13. Desktop PC Motherboard Replacement: 步骤 13 中的图像 1,1
    • Double check and make sure all wires and screws have been removed, then carefully remove the motherboard from the computer case.

结论

To reassemble your device, follow these instructions in reverse order.

108等其他人完成本指南。

David Lennon

于04/14/15注册

9,944 声望

创作了10篇指南

团队

Cal Poly, Team 4-5, Maness Spring 2015 Cal Poly, Team 4-5, Maness Spring 2015 的会员

CPSU-MANESS-S15S4G5

4 名成员

创作了45篇指南

5条评论

If you aim to replace just the motherboard, I don’t think removing the hard drive from the case should be neccessary. The point of removing SATA cable from the motherboard still stands.

Ingmārs Zaicevs - 回复

Generally a good article for a beginner. Very thorough. I personally do not remove the hard drives or cpu fans as it makes it both faster and easier to hold. Disconnect all the cables and graphics card then unscrew the motherboard screws and you are good to go!

Scott Sinclair - 回复

such great info thanks for sharing with us.great blog

jade kelly - 回复

hey my pc turn on but it doesn't show on screen.

Thapelo - 回复

Hi, first thing I would check is video output default settings, so if you have the monitor connected to a dedicated/discreet graphics card try connecting the video cable to the mobo integrated one or viceversa. Otherwise, the fix could be as simple as replacing the BIOS battery (if the motherboard you are using as replacement is an old one) but could also be a hardware failure/compatibility issue, or a missing power cable (do you hear any beep during power-on self-test?), knowing the PC specs would help identify the problem.

Simone -

添加评论

浏览统计数据:

过去 24 小时: 8

过去 7 天: 85

过去 30 天: 287

总计 29,390