跳转到主内容

ColecoVision Power Switch Replacement

你所需要的

  1. ColecoVision Power Switch Replacement, Power Switch: 步骤 1 中的图像 1,1
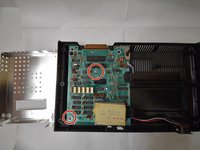
    • Flip the ColecoVision over with the pegs facing the ceiling.

    • Remove the eight 15mm screws holding the bottom of the ColecoVision in place using the Phillips #1 screwdriver.

  2. ColecoVision Power Switch Replacement: 步骤 2 中的图像 1,2 ColecoVision Power Switch Replacement: 步骤 2 中的图像 2,2
    • Carefully remove the bottom of the ColecoVision out of the top.

    • I would recommend running a metal spudger along the rim of the case to remove the bottom.

  3. ColecoVision Power Switch Replacement: 步骤 3 中的图像 1,1
    • Remove the two 15 mm screws holding the casing in place using the Phillips #1 screwdriver.

  4. ColecoVision Power Switch Replacement: 步骤 4 中的图像 1,2 ColecoVision Power Switch Replacement: 步骤 4 中的图像 2,2
    • Using a Phillips #1 screwdriver, remove the two 15mm screws on the motherboard.

    • Pull the entire motherboard towards the back of the system and carefully lift the entire motherboard.

  5. ColecoVision Power Switch Replacement: 步骤 5 中的图像 1,1
    • Flip the motherboard over.

    • Using a soldering iron, carefully desolder the power switch from the motherboard.

    • Refer to this soldering technique guide for reference.

  6. ColecoVision Power Switch Replacement: 步骤 6 中的图像 1,1
    • Wait for power switch to cool down.

    • Turn the motherboard over upright.

    • Carefully lift up the power switch to completely remove it from the motherboard.

结论

To reassemble your device, follow these instructions in reverse order.

另外一个人完成了本指南。

Bobby

于10/17/18注册

380 声望

创作了2篇指南

团队

UW Tacoma, Team S1-G2, Rose Fall 2018 UW Tacoma, Team S1-G2, Rose Fall 2018 的会员

UWT-ROSE-F18S1G2

4 名成员

创作了12篇指南

0条评论

添加评论

浏览统计数据:

过去 24 小时: 1

过去 7 天: 7

过去 30 天: 23

总计 1,657