跳转到主内容

当前版本的文档还未经巡查,您可以查看最新的已查核版本

你所需要的

  1. 这个步骤还没有翻译 帮忙翻译一下

    : 步骤 1 中的图像 1,1
    • Turn the camera to the side that has the attachment for the wrist strap.

    • Unscrew the two black 3.4 mm screws with a #00 Phillips screwdriver.

  2. 这个步骤还没有翻译 帮忙翻译一下

    : 步骤 2 中的图像 1,1
    • Remove the plastic subsection by prying it with your fingers.

    • Note: It may be helpful to pry from the bottom of the camera with the battery door open.

    • The wrist strap attachment behind the subsection will come loose and may fall out.

  3. 这个步骤还没有翻译 帮忙翻译一下

    : 步骤 3 中的图像 1,1
    • Turn the camera over to the side opposite of the wrist strap.

    • Remove the two silver 3.4 mm screws with a #00 Phillips screwdriver.

  4. 这个步骤还没有翻译 帮忙翻译一下

    : 步骤 4 中的图像 1,1
    • Flip the camera upside down.

    • Remove the following screws with a #00 Phillips screwdriver.

    • One black 3.4 mm Phillips screw.

    • One silver 3.4 mm Phillips screw.

    • NOTE: Using your fingernails may help in removal.

  5. 这个步骤还没有翻译 帮忙翻译一下

    : 步骤 5 中的图像 1,1
    • Place the camera on the side opposite of the wrist strap handle.

    • Then begin to pry the casing apart with both hands by applying pressure to the top and bottom of the camera.

    • Remove the small metal plate underneath the plastic covering and set aside. (It should be loosely attached)

    • Note: A rubber foam washer that separates the lens from the casing will fall off when the case is removed. Be sure to store it safely.

    • Note: When reassembling ensure the back plate screw tabs are over the wrist strap attachment and the front plate screw tabs go under orange casing.

  6. 这个步骤还没有翻译 帮忙翻译一下

    : 步骤 6 中的图像 1,1
    • Flip the camera right side up.

    • Remove the silver 3.5 mm screw (located on top of the camera) with a #00 Phillips screwdriver.

    • Grip the corner of the A/V digital port and pull up and outward.

    • Note: You may encounter some resistance when removing the A/V digital port. Apply enough pressure in order to remove this piece.

    • Note: When reassembling, snap the corner plate back into its position. (Push down and inward)

  7. 这个步骤还没有翻译 帮忙翻译一下

    : 步骤 7 中的图像 1,1
    • Turn the camera forward so that the LCD screen is facing you.

    • Remove the silver 3.4 mm screw at the top right hand corner of the LCD screen with a #00 Phillips screwdriver.

  8. 这个步骤还没有翻译 帮忙翻译一下

    : 步骤 8 中的图像 1,1
    • Slide the LCD screen to the left of the camera and then gently pull the LCD screen away from the camera.

    • Note: Hold the screen and frame together.

    • Be sure to align the screen properly.

    • Be gentile and do not tear the ribbon connector for the LCD screen to camera.

  9. 这个步骤还没有翻译 帮忙翻译一下

    : 步骤 9 中的图像 1,2 : 步骤 9 中的图像 2,2
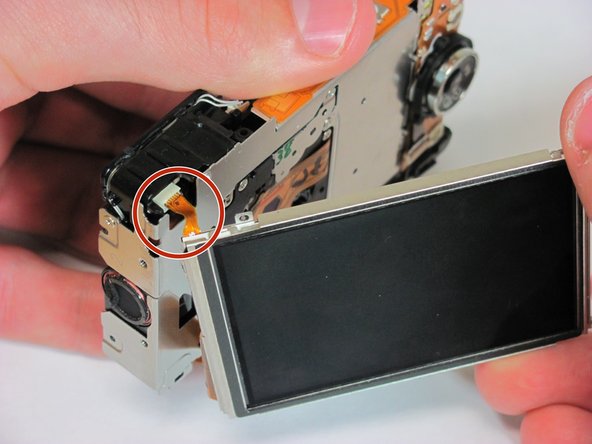
    • Locate the two ribbons connected to the camera and the LCD screen. (One is red and small and the other is wide and orange)

    • Remove the top left red ribbon by gripping the connector on the camera and sliding it straight out.

    • Remove the side orange ribbon by gripping the connector on the camera and sliding it straight out.

    • Note: It may be helpful to use tweezers when removing the connectors. (Pay close attention to how the ribbons are disconnected as this will help in replacing the screen later)

    • Note: When reassembling, use tweezers to reconnect the small red connector on the top left of the screen.

终点

2等其他人完成本指南。

团队

Cal Poly, Team 14-37, Forte Fall 2010 Cal Poly, Team 14-37, Forte Fall 2010 的会员

CPSU-FORTE-F10S14G37

4 名成员

创作了6篇指南

2条评论

Those were excellent instructions. I replaced the screen quickly. Thanks!!!

jimtassano - 回复

easy to follow but I need the screen and I don’t know where to find it ; do they still have them in stock ?

tony - 回复

添加评论

浏览统计数据:

过去 24 小时: 1

过去 7 天: 11

过去 30 天: 44

总计 10,355