跳转到主内容

Azpen A740 Motherboard Replacement

你所需要的

  1. Azpen A740 Motherboard Replacement, Back Panel: 步骤 1 中的图像 1,1
    • Use the plastic opening tool or black spudger tool to lift the back panel off the tablet.

  2. Azpen A740 Motherboard Replacement, Camera: 步骤 2 中的图像 1,1
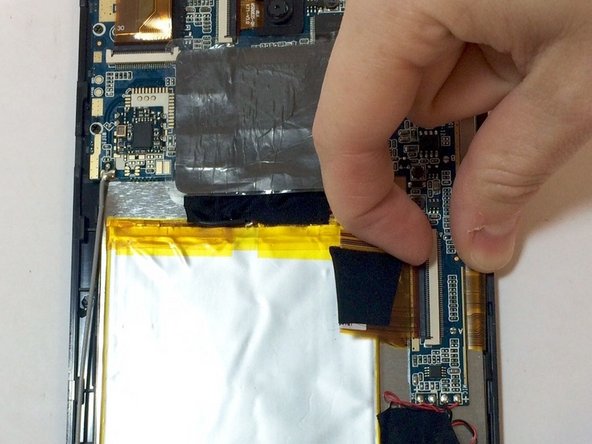
    • You should see the motherboard, the speaker, and the battery.

    • The camera is surrounded by the red square.

  3. Azpen A740 Motherboard Replacement: 步骤 3 中的图像 1,1
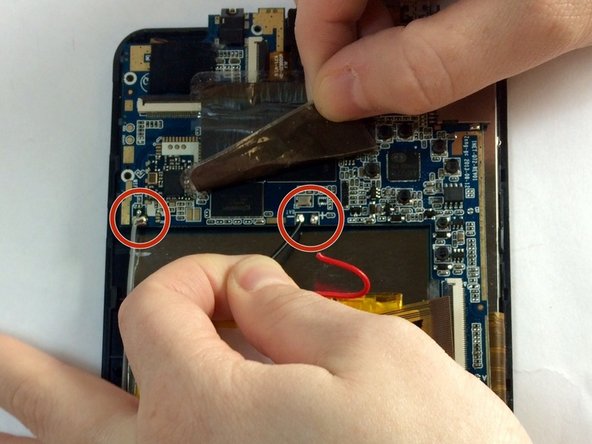
    • The camera is located at the top of the device and is attached by one screw with 3.75mm which is inside of the red circle. And one clip which is inside of the orange rectangle.

    • First remove the screw from the plastic connecting the camera to the motherboard.

    • The ZIF connector attaching the camera to the motherboard.

  4. Azpen A740 Motherboard Replacement: 步骤 4 中的图像 1,1
    • With the plastic now removed from the camera, the user is able to unclip the camera from the motherboard by pulling up the black clip and sliding out the camera.

    • Here you can see the rear camera is on the top and the front camera is on the top. As you can see, it is not possible to replace one camera and not the other.

  5. Azpen A740 Motherboard Replacement: 步骤 5 中的图像 1,1
    • This is what the camera looks like once completely removed from the tablet.

    • This is where the camera was previously, it is the place where the new camera must be placed.

  6. Azpen A740 Motherboard Replacement: 步骤 6 中的图像 1,1
    • Now you are able to insert the new camera.

    • To reassemble your device, follow these instructions in reverse order.

  7. Azpen A740 Motherboard Replacement, Motherboard: 步骤 7 中的图像 1,1
    • Unscrew the motherboard from the frame with a pentalobe screwdriver; there are 7 screws (3.53mm-4.53mm) with 2 of the 7 holding the speaker in place and 1 of the 7 holding the camera in place which you already removed.

    • You do not need to remove the 2 screws connecting the speaker.

  8. Azpen A740 Motherboard Replacement: 步骤 8 中的图像 1,2 Azpen A740 Motherboard Replacement: 步骤 8 中的图像 2,2
    • There should be two cips that are also holding the motherboard in place, they should look similar to the one that held the camera in place. Unclip these the same way you did the camera.

  9. Azpen A740 Motherboard Replacement: 步骤 9 中的图像 1,2 Azpen A740 Motherboard Replacement: 步骤 9 中的图像 2,2
    • Now comes the desoldering. If you have never done this before, you may want to read this: 如何焊接和拆焊

    • In all, there should be 7 wires that need to be desoldered: 2 that are connected to the speaker, 2 that are connected to the screen, 2 that are directly connected to the battery and 1 that is connected to a thick wire that feeds into a sticker on the battery.

  10. Azpen A740 Motherboard Replacement: 步骤 10 中的图像 1,1
    • Once all connections are removed from the motherboard, it is able to be removed by gently placing the plastic opening tool under the motherboard and lifting up the motherboard from the bottom of the screen.

    • To reassemble your device, follow these instructions in reverse order.

结论

To reassemble your device, follow these instructions in reverse order.

Mallory

于01/21/15注册

346 声望

创作了3篇指南

团队

USF Tampa, Team 4-5, Brown Winter 2015 USF Tampa, Team 4-5, Brown Winter 2015 的会员

USFT-BROWN-W15S4G5

3 名成员

创作了12篇指南

0条评论

添加评论

浏览统计数据:

过去 24 小时: 1

过去 7 天: 3

过去 30 天: 4

总计 319