跳转到主内容

当前版本的文档还未经巡查,您可以查看最新的已查核版本

你所需要的

  1. , 移除后壳: 步骤 1 中的图像 1,2 , 移除后壳: 步骤 1 中的图像 2,2
    • 用你的指甲来小心地在图片上所展示的地方来撬起后壳。 并用指甲在后壳上滑动边角处,直到后壳被卸下。

  2. , 移除内壳螺丝: 步骤 2 中的图像 1,1
    • 使用JIS 00 螺丝刀来移除内壳上13颗黑色的螺丝,以及1颗银色的螺丝。

    • 黑色螺丝2.8mm 长

    • 银色螺丝5.5mm 长

    • 黑色螺丝位于摄像头的附近,闪光灯被贴纸覆盖。 如果螺丝顶上没有贴纸就可以很容易的被移走。 螺丝刀的尖端可能很容易的将贴纸穿过。

  3. , 移除内壳: 步骤 3 中的图像 1,2 , 移除内壳: 步骤 3 中的图像 2,2
    • 使用塑料打开工具来移走内壳。

    • 内壳被两侧的两个卡扣固定,很容易通过使用塑料打开工具从下方来将卡扣撬起。

  4. , 移除扬声器: 步骤 4 中的图像 1,1
    • 注意: 扬声器单元的位置,您可以在重新组装时将其放在正确的位置。

    • 把扬声器从手机的背面拿出来。 一旦内壳被拆除,它应该很容易取出来,因为没有什么将其固定住。

  5. 这个步骤还没有翻译 帮忙翻译一下

    : 步骤 5 中的图像 1,2 : 步骤 5 中的图像 2,2
    • Use a plastic opening tool to gently pry up both ends of the antenna.

    • Carefully remove the antenna wire from the plastic keepers along the side. Note their position for reassembly.

    • The antenna connections can be easily bent out of shape. Be sure to lift from underneath the cable as shown.

  6. 这个步骤还没有翻译 帮忙翻译一下

    : 步骤 6 中的图像 1,2 : 步骤 6 中的图像 2,2
    • Using the plastic opening tool, unlock the ribbon cable attaching the battery to the circuit board by prying up the yellow tab.

  7. 这个步骤还没有翻译 帮忙翻译一下

    : 步骤 7 中的图像 1,1
    • Using a plastic opening tool, gently pry the vibration motor from its mount.

  8. 这个步骤还没有翻译 帮忙翻译一下

    : 步骤 8 中的图像 1,1
    • Gently remove the circuit board from the phone by gently pulling it away from the bottom of the phone.

  9. 这个步骤还没有翻译 帮忙翻译一下

    : 步骤 9 中的图像 1,2 : 步骤 9 中的图像 2,2
    • Using the plastic opening tool, disconnect the ribbon cables from their connectors by gently prying them up.

  10. 这个步骤还没有翻译 帮忙翻译一下

    : 步骤 10 中的图像 1,1
    • Carefully remove the battery pack from the phone using your hand. The battery is glued in placed by a strip of adhesive on the top side so some force may be necessary.

    • There are fragile tabs on the left and right side of the battery, be careful not to break them off.

  11. 这个步骤还没有翻译 帮忙翻译一下

    : 步骤 11 中的图像 1,3 : 步骤 11 中的图像 2,3 : 步骤 11 中的图像 3,3
    • Using a plastic opening tool, lift the copper sheet heat strip from the body of the phone by sticking the tool into one of the upper corner of the copper sheet and slowly sliding it along the edges.

    • Be careful not to rip the copper sheet.

  12. 这个步骤还没有翻译 帮忙翻译一下

    : 步骤 12 中的图像 1,2 : 步骤 12 中的图像 2,2
    • Using a plastic opening tool, unplug the ribbon cable indicated in the picture.

  13. 这个步骤还没有翻译 帮忙翻译一下

    : 步骤 13 中的图像 1,2 : 步骤 13 中的图像 2,2
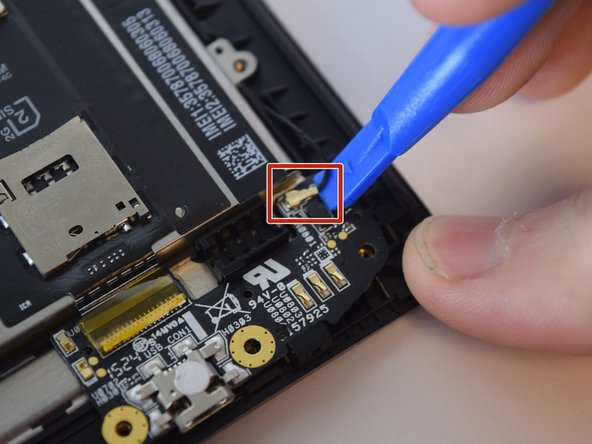
    • Using a plastic opening tool, disconnect the display cable from the side of the motherboard by carefully sticking the tool underneath the display cable and gently pulling outward.

  14. 这个步骤还没有翻译 帮忙翻译一下

    : 步骤 14 中的图像 1,3 : 步骤 14 中的图像 2,3 : 步骤 14 中的图像 3,3
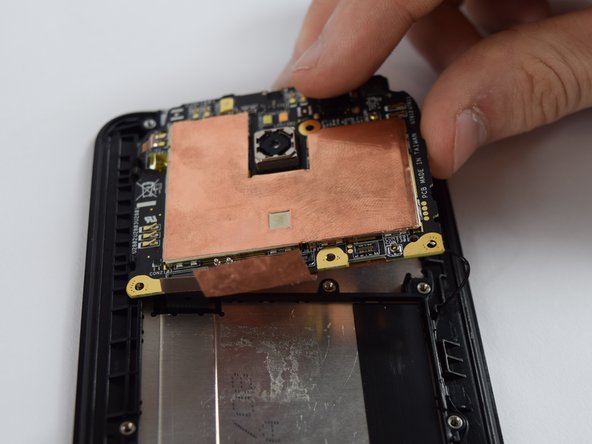
    • There are four black plastic retainers, two on each side, that keep the motherboard fix in place. To get the motherboard out, stick a plastic opening tool under one top corner of the motherboard and carefully lift upward using a small amount of force to pop this side of the motherboard out of the plastic retainers.

    • Be careful not to break the black plastic retainers as these are needed to put the motherboard back in place.

  15. 这个步骤还没有翻译 帮忙翻译一下

    : 步骤 15 中的图像 1,1
    • Once one side of the motherboard is out of the black plastic retainers, remove the whole motherboard from the phone.

    • The motherboard should come out easily once one side of it is freed from the black plastic retainers.

  16. 这个步骤还没有翻译 帮忙翻译一下

    : 步骤 16 中的图像 1,2 : 步骤 16 中的图像 2,2
    • Using the plastic opening tool, pry the display cable from the body of the phone.

  17. 这个步骤还没有翻译 帮忙翻译一下

    : 步骤 17 中的图像 1,1
    • Using a hair dryer or a heat gun, heat up the adhesive that attaches the display to the housing. The adhesive lies around the edges of the display.

    • Using a heat gun will allow you to melt the adhesive in about 30 seconds; whereas a hair dryer will take about 3-5 minutes to melt the adhesive.

  18. 这个步骤还没有翻译 帮忙翻译一下

    : 步骤 18 中的图像 1,2 : 步骤 18 中的图像 2,2
    • Using the plastic opening tool, pry off the display by inserting the tool in between the display and the housing at the edges of the phone.

    • Once the screen comes away from the backing, gently slide the opening tool around the edges while prying the rest of the screen away.

    • Be careful not to bend the screen too much, or it might break.

  19. 这个步骤还没有翻译 帮忙翻译一下

    : 步骤 19 中的图像 1,1
    • Once the screen has been separated from the backing, remove the display cable out of the hole in the top of the phone body.

    • You don't need to be careful removing this cable because it will be replaced by a new cable along with the new display. If you want to save it, rotate the display as you separate the display from the backing.

  20. 这个步骤还没有翻译 帮忙翻译一下

    : 步骤 20 中的图像 1,3 : 步骤 20 中的图像 2,3 : 步骤 20 中的图像 3,3
    • Using a plastic opening tool, remove the speaker grill from the display.

    • Place it in its designated spot on the body of the phone.

    • We recommend attaching the speaker grill to the actual body of the phone rather than the display.

  21. 这个步骤还没有翻译 帮忙翻译一下

    : 步骤 21 中的图像 1,1
    • Carefully feed the antenna cables of the new display through the appropriate holes in the housing.

    • Reattach the phone display with adhesive. You can either use the old adhesive (if it is in good enough condition), or newly purchased adhesive (2 mm thick, double sided).

终点

75等其他人完成本指南。

Jessica Nguyen

于02/10/16注册

3,904 声望

撰写一个指南

团队

USF Tampa, Team 2-5, Sullivan Spring 2016 USF Tampa, Team 2-5, Sullivan Spring 2016 的会员

USFT-SULLIVAN-S16S2G5

4 名成员

创作了16篇指南

11条评论

You forgot to mention that there is very strong adhesive under the battery!!!!!!!! I ripped through the freaking battery casing because of that!!!!

Dylan Tucker - 回复

Thank you !!!

seba12 - 回复

Hi i would like to know where do you find the phone parts from, trying to find lcd and housing to fix.

yiling110 - 回复

I used this guide to replace the Zenfone 2 model Z00D display.

The procedure is similar but something change (connectors position for example).

But if you have a Z00D you can follow this guide anyway.

Thank you

Alessandro - 回复

What is the adhesive that has to be used?

Esteban Zanolli - 回复

添加评论

浏览统计数据:

过去 24 小时: 1

过去 7 天: 11

过去 30 天: 32

总计 29,945