跳转到主内容

Asus ROG G752V Keyboard Replacement

你所需要的

  1. Asus ROG G752V Keyboard Replacement, Keyboard: 步骤 1 中的图像 1,2 Asus ROG G752V Keyboard Replacement, Keyboard: 步骤 1 中的图像 2,2
    • Make sure you disconnect the charger before starting this guide.

    • Using a pair of tweezers, remove all 11 rubber plugs off of the back cover.

  2. Asus ROG G752V Keyboard Replacement: 步骤 2 中的图像 1,2 Asus ROG G752V Keyboard Replacement: 步骤 2 中的图像 2,2
    • Using a Phillips #0 screwdriver, remove all twelve 5.2mm screws on the back of the laptop.

    • There is one 5.2 mm screw under the rubber plug in the middle.

  3. Asus ROG G752V Keyboard Replacement: 步骤 3 中的图像 1,1
    • Pull up the rubber seal and the service cover will come off.

  4. Asus ROG G752V Keyboard Replacement: 步骤 4 中的图像 1,1
    • Using the Phillips #00 screwdriver, remove the six 5.2 mm screws under the service cover.

  5. Asus ROG G752V Keyboard Replacement: 步骤 5 中的图像 1,1
    • Using your hands, pull the optical drive out.

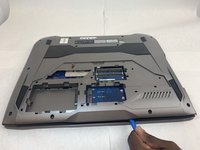
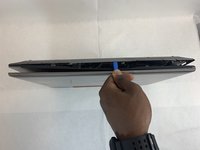
  6. Asus ROG G752V Keyboard Replacement: 步骤 6 中的图像 1,2 Asus ROG G752V Keyboard Replacement: 步骤 6 中的图像 2,2
    • Use the iFixit opening tool to pry apart the back panel from the main body of the laptop.

    • Start from the front side of the laptop and then continue to the side for easier access.

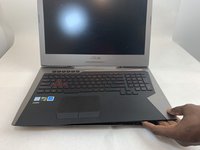
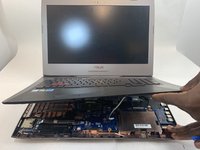
  7. Asus ROG G752V Keyboard Replacement: 步骤 7 中的图像 1,2 Asus ROG G752V Keyboard Replacement: 步骤 7 中的图像 2,2
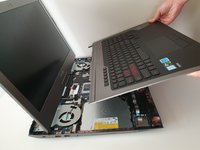
    • Slowly pull out the keyboard while lifting it about an inch.

    • There are cables attached to the keyboard and motherboard. DO NOT lift it more than 2 inches above the laptop.

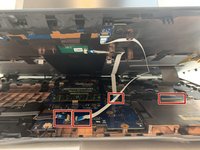
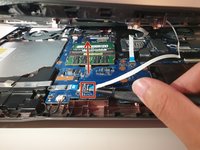
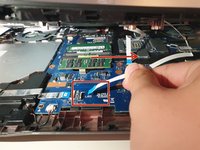
  8. Asus ROG G752V Keyboard Replacement: 步骤 8 中的图像 1,3 Asus ROG G752V Keyboard Replacement: 步骤 8 中的图像 2,3 Asus ROG G752V Keyboard Replacement: 步骤 8 中的图像 3,3
    • Using an ESD safe tool, detach all 3 ribbon cables. To do so, lift up the cable up and out.

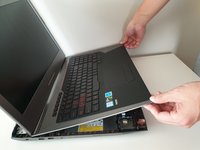
  9. Asus ROG G752V Keyboard Replacement: 步骤 9 中的图像 1,2 Asus ROG G752V Keyboard Replacement: 步骤 9 中的图像 2,2
    • Once the cables are detached, lift the keyboard about 2 inches up and remove it from the rest of the body.

    • Make sure that the screen is open like the photo. This will ensure that none your laptop components will not be bent.

结论

To reassemble your device, follow these instructions in reverse order.

2等其他人完成本指南。

一条评论

That is not the "Keyboard" that is the entire top section or palm rest. Which also includes the touchpad and special function buttons. You should re name this as it is not accurate.

Doug Harris - 回复

添加评论

浏览统计数据:

过去 24 小时: 2

过去 7 天: 5

过去 30 天: 41

总计 3,532