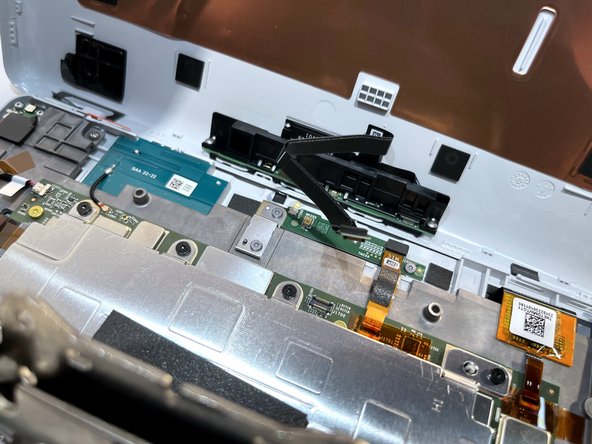
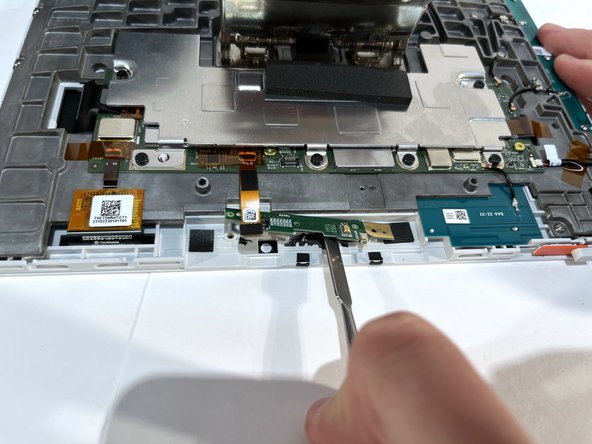
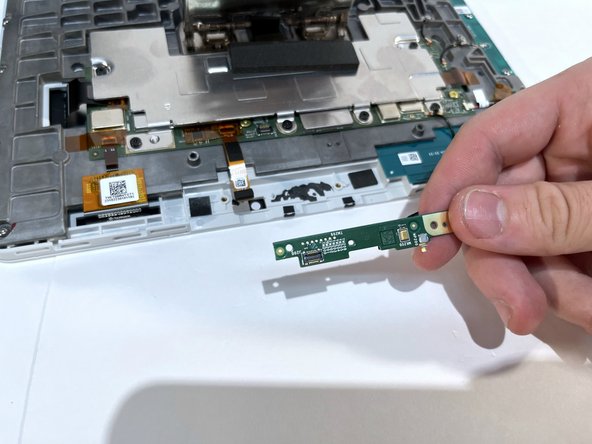
跳转到主内容

Amazon Echo Show 10 3rd Gen Camera Replacement

你所需要的

  1. Amazon Echo Show 10 3rd Gen Camera Replacement, Microphone: 步骤 1 中的图像 1,1
    • Insert a Jimmy along the seam of the screen and the shell and slide it along the length to separate the two sides.

    • For this particular step, a careful amount of force may be needed to separate the two parts. The connection is especially tight at the four corners. Use the iOpener to loosen the small amount of adhesive.

  2. Amazon Echo Show 10 3rd Gen Camera Replacement: 步骤 2 中的图像 1,1
    • Gently separate the display from the base.

    • There is a small amount of glue holding the two components together in the top corner, which may require the user to apply more force when separating.

    • Don't yank the display off as it is connected by a cable.

  3. Amazon Echo Show 10 3rd Gen Camera Replacement: 步骤 3 中的图像 1,2 Amazon Echo Show 10 3rd Gen Camera Replacement: 步骤 3 中的图像 2,2
    • Hold the display away from the board at an angle to ensure a clear view while keeping the ribbon cable slack.

    • Place the tip of your opening tool under the edge of the display connector, and pry the connector straight up from its socket.

    • Be very careful to pry only under the edge of the connector, and not under the socket itself. If you pry under the socket, you will separate it from the circuit board, which requires specialized microsoldering skills and equipment to repair.

    • Set aside the display.

  4. Amazon Echo Show 10 3rd Gen Camera Replacement: 步骤 4 中的图像 1,1
    • Place the tip of your opening tool under the edge of the orange connector, and pry it straight up from its socket.

    • To reconnect, align the connector carefully over its socket and press down with your fingertip—first at one side, then the other—until it clicks into place.

  5. Amazon Echo Show 10 3rd Gen Camera Replacement: 步骤 5 中的图像 1,1
    • Use the T5 Torx screwdriver to remove the two 4 mm screws from the bracket covering the microphone board and the one 4 mm screw holding down the board itself.

  6. Amazon Echo Show 10 3rd Gen Camera Replacement: 步骤 6 中的图像 1,3 Amazon Echo Show 10 3rd Gen Camera Replacement: 步骤 6 中的图像 2,3 Amazon Echo Show 10 3rd Gen Camera Replacement: 步骤 6 中的图像 3,3
    • Use a spudger to pry under the microphone board. and gently wear away at the connecting glue.

    • The board is glued on so use the spudger to release the glue. It may take some time but be patient to avoid damaging the device.

    • The microphone component is delicate and relatively flimsy, so a gentle approach to breaking the adhesive is recommended.

    • After the adhesive seal has been broken, gently lift and remove the microphone board.

  7. Amazon Echo Show 10 3rd Gen Camera Replacement, Camera: 步骤 7 中的图像 1,1
    • Take out 8 black (7.84mm) screws from silver panel using T5 bit.

  8. Amazon Echo Show 10 3rd Gen Camera Replacement: 步骤 8 中的图像 1,1
    • Take out 4 mounting screws on clip (7.73mm) using T10 bit.

  9. Amazon Echo Show 10 3rd Gen Camera Replacement: 步骤 9 中的图像 1,1
    • Take out three silver shorter screws in the board (3.9mm) using T5 bit.

  10. Amazon Echo Show 10 3rd Gen Camera Replacement: 步骤 10 中的图像 1,1
    • Take out silver screws (5.57 mm) with T5 bit (17 screws).

  11. Amazon Echo Show 10 3rd Gen Camera Replacement: 步骤 11 中的图像 1,1
    • Disconnect ribbon cables.

  12. Amazon Echo Show 10 3rd Gen Camera Replacement: 步骤 12 中的图像 1,1
    • Unscrew three gold screws (6.9mm) with T5 bit.

  13. Amazon Echo Show 10 3rd Gen Camera Replacement: 步骤 13 中的图像 1,1
    • Take off gray backing layer and any PCBs that are now unscrewed. You now have access to camera.

结论

To reassemble your device, follow these instructions in reverse order.

Justin Abney

于04/01/24注册

145 声望

撰写一个指南

团队

IUPUI, Team 1-3, Harley Spring 2024 IUPUI, Team 1-3, Harley Spring 2024 的会员

IUPUI-HARLEY-S24S1G3

4 名成员

创作了4篇指南

0条评论

添加评论

浏览统计数据:

过去 24 小时: 0

过去 7 天: 12

过去 30 天: 15

总计 25