跳转到主内容

Acer Predator 17 G9-791 Fan Assembly Replacement

你所需要的

  1. Acer Predator 17 G9-791 Fan Assembly Replacement, Service Panel: 步骤 1 中的图像 1,1
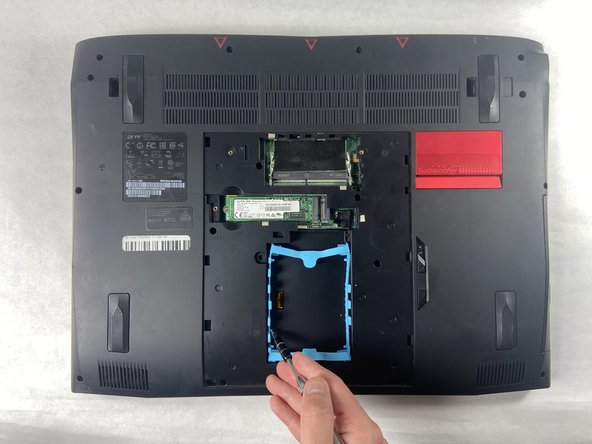
    • The service panel can be located on the bottom of the device. It is shown here as the panel located in the middle of the device, going from the upper vents to the bottom of the device.

  2. Acer Predator 17 G9-791 Fan Assembly Replacement: 步骤 2 中的图像 1,2 Acer Predator 17 G9-791 Fan Assembly Replacement: 步骤 2 中的图像 2,2
    • Loosen the two Phillips #0 screws.

    • Pull up slightly on the top of the panel to help fully separate the screws from the rest of the device.

  3. Acer Predator 17 G9-791 Fan Assembly Replacement: 步骤 3 中的图像 1,1
    • Continue pulling up on the panel to separate it from the laptop and remove it.

  4. Acer Predator 17 G9-791 Fan Assembly Replacement, Bottom Case: 步骤 4 中的图像 1,3 Acer Predator 17 G9-791 Fan Assembly Replacement, Bottom Case: 步骤 4 中的图像 2,3 Acer Predator 17 G9-791 Fan Assembly Replacement, Bottom Case: 步骤 4 中的图像 3,3
    • Remove the nine 4.5 mm Phillips #0 screws from the panel.

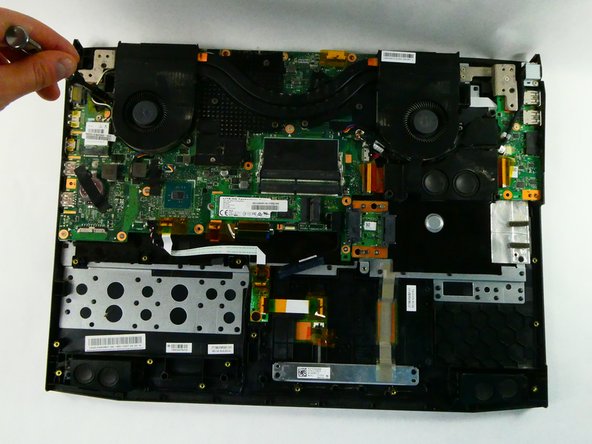
    • Remove four 14 mm Phillips #0 screws.

    • Remove six 7 mm Phillips #0 screws.

  5. Acer Predator 17 G9-791 Fan Assembly Replacement: 步骤 5 中的图像 1,1
    • Slide the "unlock" slider up located to the right of the service panel and pull the disc tray out.

  6. Acer Predator 17 G9-791 Fan Assembly Replacement: 步骤 6 中的图像 1,1
    • Remove the two 4.5 mm Phillips #0 screws located underneath the removed optical drive.

  7. Acer Predator 17 G9-791 Fan Assembly Replacement: 步骤 7 中的图像 1,2 Acer Predator 17 G9-791 Fan Assembly Replacement: 步骤 7 中的图像 2,2
    • Pry up on the edges of the bottom cover and lift the bottom case off of the device.

  8. Acer Predator 17 G9-791 Fan Assembly Replacement, Battery: 步骤 8 中的图像 1,1
    • Remove the six 4 mm Phillips #0 screws from the battery.

  9. Acer Predator 17 G9-791 Fan Assembly Replacement: 步骤 9 中的图像 1,2 Acer Predator 17 G9-791 Fan Assembly Replacement: 步骤 9 中的图像 2,2
    • Disconnect the battery connector from the motherboard.

  10. Acer Predator 17 G9-791 Fan Assembly Replacement: 步骤 10 中的图像 1,1
    • Gently lift the battery and remove it from the device.

  11. Acer Predator 17 G9-791 Fan Assembly Replacement, Fan Assembly: 步骤 11 中的图像 1,2 Acer Predator 17 G9-791 Fan Assembly Replacement, Fan Assembly: 步骤 11 中的图像 2,2
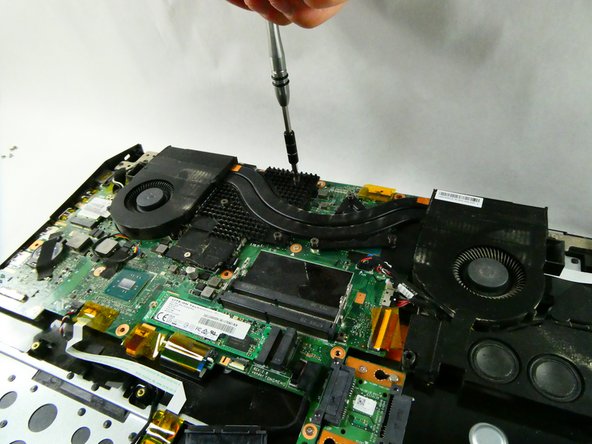
    • Remove the five 4.5 mm Phillips #0 screws located on the perimeter of the fans.

  12. Acer Predator 17 G9-791 Fan Assembly Replacement: 步骤 12 中的图像 1,2 Acer Predator 17 G9-791 Fan Assembly Replacement: 步骤 12 中的图像 2,2
    • Unscrew the six Phillips #0 screws enough to loosen the assembly from the motherboard.

  13. Acer Predator 17 G9-791 Fan Assembly Replacement: 步骤 13 中的图像 1,3 Acer Predator 17 G9-791 Fan Assembly Replacement: 步骤 13 中的图像 2,3 Acer Predator 17 G9-791 Fan Assembly Replacement: 步骤 13 中的图像 3,3
    • Detach the left fan's cord from the motherboard.

  14. Acer Predator 17 G9-791 Fan Assembly Replacement: 步骤 14 中的图像 1,3 Acer Predator 17 G9-791 Fan Assembly Replacement: 步骤 14 中的图像 2,3 Acer Predator 17 G9-791 Fan Assembly Replacement: 步骤 14 中的图像 3,3
    • Detach the right fan's cord from the motherboard.

  15. Acer Predator 17 G9-791 Fan Assembly Replacement: 步骤 15 中的图像 1,3 Acer Predator 17 G9-791 Fan Assembly Replacement: 步骤 15 中的图像 2,3 Acer Predator 17 G9-791 Fan Assembly Replacement: 步骤 15 中的图像 3,3
    • Lift the fan assembly up and out.

结论

To reassemble your device, follow these instructions in reverse order.

Grant Maffei

于10/25/22注册

121 声望

撰写一个指南

团队

UMass Dartmouth, Team 5-1, Sinclaire Fall 2022 UMass Dartmouth, Team 5-1, Sinclaire Fall 2022 的会员

UMASSD-SINCLAIRE-F22S5G1

5 名成员

创作了7篇指南

0条评论

添加评论

浏览统计数据:

过去 24 小时: 0

过去 7 天: 4

过去 30 天: 16

总计 493