跳转到主内容

Acer Aspire Switch 10 SW5-012-18MY Display Replacement

你所需要的

  1. Acer Aspire Switch 10 SW5-012-18MY Display Replacement, Battery: 步骤 1 中的图像 1,2 Acer Aspire Switch 10 SW5-012-18MY Display Replacement, Battery: 步骤 1 中的图像 2,2
    • Remove the tablet from the keyboard.

    • You will not be needing the keyboard for this guide.

  2. Acer Aspire Switch 10 SW5-012-18MY Display Replacement: 步骤 2 中的图像 1,3 Acer Aspire Switch 10 SW5-012-18MY Display Replacement: 步骤 2 中的图像 2,3 Acer Aspire Switch 10 SW5-012-18MY Display Replacement: 步骤 2 中的图像 3,3
    • Use the opening tool to open the back cover. The opening tool should fit under the cover if you place it above the power button.

    • Lift this side of the back cover once the opening tool is inside the device.

    • Use the opening tool and your hands to gradually work around the edges of the cover.

  3. Acer Aspire Switch 10 SW5-012-18MY Display Replacement: 步骤 3 中的图像 1,2 Acer Aspire Switch 10 SW5-012-18MY Display Replacement: 步骤 3 中的图像 2,2
    • Lift the back cover off of the device with your hands.

    • You will need to use some force to pull off the back cover.

  4. Acer Aspire Switch 10 SW5-012-18MY Display Replacement: 步骤 4 中的图像 1,2 Acer Aspire Switch 10 SW5-012-18MY Display Replacement: 步骤 4 中的图像 2,2
    • Remove the piece of black, thin tape that is attached to the circuit board closest to the power button.

  5. Acer Aspire Switch 10 SW5-012-18MY Display Replacement: 步骤 5 中的图像 1,3 Acer Aspire Switch 10 SW5-012-18MY Display Replacement: 步骤 5 中的图像 2,3 Acer Aspire Switch 10 SW5-012-18MY Display Replacement: 步骤 5 中的图像 3,3
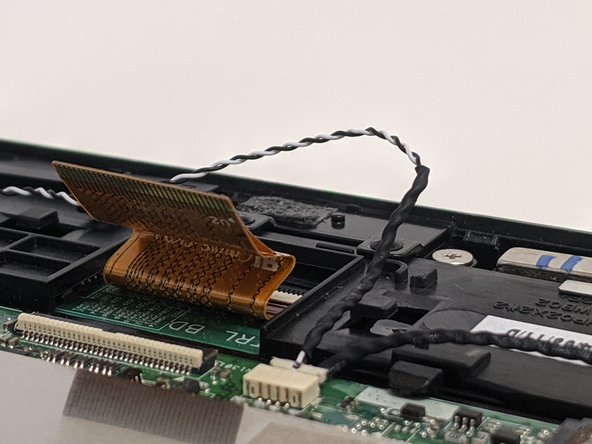
    • Use the opening tool to lift the ZIF connector holding the ribbon cable in place on the circuit board.

    • Pull out the ribbon cable from the circuit board. This cable should have the word "Audio" on it.

  6. Acer Aspire Switch 10 SW5-012-18MY Display Replacement: 步骤 6 中的图像 1,3 Acer Aspire Switch 10 SW5-012-18MY Display Replacement: 步骤 6 中的图像 2,3 Acer Aspire Switch 10 SW5-012-18MY Display Replacement: 步骤 6 中的图像 3,3
    • Remove the piece of thin, black tape that is attached to the circuit board on the other side of the battery.

    • Use the opening tool to lift the black ZIF connector holding the ribbon cable in place.

    • Pull out the ribbon cable from the circuit board.

  7. Acer Aspire Switch 10 SW5-012-18MY Display Replacement: 步骤 7 中的图像 1,2 Acer Aspire Switch 10 SW5-012-18MY Display Replacement: 步骤 7 中的图像 2,2
    • Partially remove the piece of black tape that is holding the bundled cable connector to the battery in place.

    • Pull on the battery's bundled cable connector to unplug it from the circuit board.

  8. Acer Aspire Switch 10 SW5-012-18MY Display Replacement: 步骤 8 中的图像 1,1
    • Using the Phillips #000 screwdriver, remove the 3 mm screw that is holding the battery in place.

  9. Acer Aspire Switch 10 SW5-012-18MY Display Replacement: 步骤 9 中的图像 1,1
    • Gently remove the ribbon cable from the battery.

  10. Acer Aspire Switch 10 SW5-012-18MY Display Replacement: 步骤 10 中的图像 1,2 Acer Aspire Switch 10 SW5-012-18MY Display Replacement: 步骤 10 中的图像 2,2
    • Carefully remove the battery from the device by lifting it up.

  11. Acer Aspire Switch 10 SW5-012-18MY Display Replacement, Motherboard: 步骤 11 中的图像 1,1
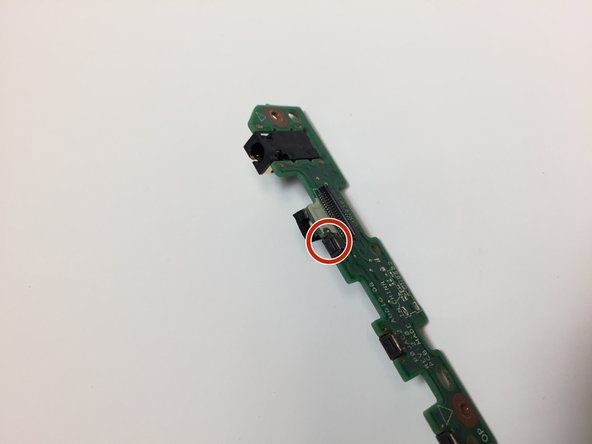
    • Now that the battery is removed, it is time to remove the remaining ribbon cables and connectors (marked in red) from the motherboard.

  12. Acer Aspire Switch 10 SW5-012-18MY Display Replacement: 步骤 12 中的图像 1,2 Acer Aspire Switch 10 SW5-012-18MY Display Replacement: 步骤 12 中的图像 2,2
    • Remove motherboard ribbon cable and slide the opening tool under the cable lock.

    • Flip the cable lock up.

  13. Acer Aspire Switch 10 SW5-012-18MY Display Replacement: 步骤 13 中的图像 1,2 Acer Aspire Switch 10 SW5-012-18MY Display Replacement: 步骤 13 中的图像 2,2
    • Pinch the ribbon cable and slowly remove it from the port.

  14. Acer Aspire Switch 10 SW5-012-18MY Display Replacement: 步骤 14 中的图像 1,1
    • Remove the charging port cable from the motherboard using the opening tool. Remove them in the same fashion you removed the other cables.

  15. Acer Aspire Switch 10 SW5-012-18MY Display Replacement: 步骤 15 中的图像 1,2 Acer Aspire Switch 10 SW5-012-18MY Display Replacement: 步骤 15 中的图像 2,2
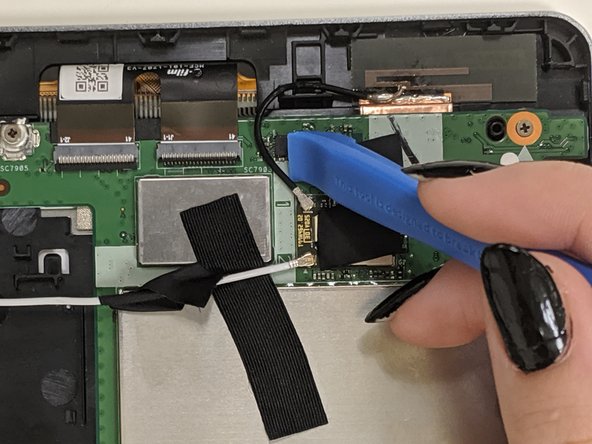
    • Remove the Wifi cables.

    • Slide the opening tool under the cables and pop them out of their connectors.

  16. Acer Aspire Switch 10 SW5-012-18MY Display Replacement: 步骤 16 中的图像 1,2 Acer Aspire Switch 10 SW5-012-18MY Display Replacement: 步骤 16 中的图像 2,2
    • Remove the webcam ribbon cable.

    • Slide the opening tool underneath the port lock and pop it upward.

    • Remove the webcam, if possible, putting it safely aside.

  17. Acer Aspire Switch 10 SW5-012-18MY Display Replacement: 步骤 17 中的图像 1,2 Acer Aspire Switch 10 SW5-012-18MY Display Replacement: 步骤 17 中的图像 2,2
    • Using the Phillips #000 screwdriver remove the three 3 mm screws, circled in red, on the motherboard.

  18. Acer Aspire Switch 10 SW5-012-18MY Display Replacement: 步骤 18 中的图像 1,1
    • With all screws and ribbon cables removed, it is now possible to remove the motherboard from the tray.

    • Slide the opening tool under the motherboard.

    • Lift up to remove.

  19. Acer Aspire Switch 10 SW5-012-18MY Display Replacement: 步骤 19 中的图像 1,1
    • You have removed the motherboard from the laptop.

  20. Acer Aspire Switch 10 SW5-012-18MY Display Replacement, Display: 步骤 20 中的图像 1,3 Acer Aspire Switch 10 SW5-012-18MY Display Replacement, Display: 步骤 20 中的图像 2,3 Acer Aspire Switch 10 SW5-012-18MY Display Replacement, Display: 步骤 20 中的图像 3,3
    • Use the Phillips #000 screwdriver to remove the three 3 mm screws on the circuit board.

    • Disregard the battery in the pictures since the battery is already removed at this point in this guide.

  21. Acer Aspire Switch 10 SW5-012-18MY Display Replacement: 步骤 21 中的图像 1,2 Acer Aspire Switch 10 SW5-012-18MY Display Replacement: 步骤 21 中的图像 2,2
  22. Acer Aspire Switch 10 SW5-012-18MY Display Replacement: 步骤 22 中的图像 1,1
    • Since the display assembly is part of the motherboard tray, you will need to source a new display and do the steps within this guide in reverse to reassemble.

结论

To reassemble your device, follow these instructions in reverse order.

4等其他人完成本指南。

一条评论

Where exactly is the display on the motherboard?

Ashley Thurston - 回复

添加评论

浏览统计数据:

过去 24 小时: 0

过去 7 天: 7

过去 30 天: 24

总计 2,577