简介
使用本指南更换 2020 年初 MacBook Air 的显示屏。
你所需要的
-
-
如果你的 MacBook 运行的是 Big Sur v11.1 或更高版本,则禁用自动启动可能不起作用。你可以正常进行,但请确保在你进入后立即断开电池连接。
-
使用 P5 螺丝刀卸下以下螺丝:
-
两颗 7.9 毫米螺丝
-
两颗 7.1 毫米螺丝
-
六颗 2.6 毫米螺丝
-
-
-
将手指夹在显示屏和下壳之间,然后向上拉以将底壳从 Air 中弹出。
-
取下底壳。
-
将其固定到位并用力按压以接合下方的两个隐藏夹子。你应该感觉到并听到它们卡入到位。
When reassembling, the “snaps” are in the middle of the laptop (from top to bottom), and just to the left and right of center. I assumed it was near the hinge so it took a bit for me to hear the snaps.
Laurie, the two clips are outlined in the third photo of step two. Hope this helps—happy fixing!
-
-
-
剥开覆盖电池接口的胶带,足以露出下面的接口。
This image is incorrect correct for the A2179 EMC 3302 model, also doesn’t match the next image in this guide
There is other guide for the model you reffer to, I was using that one until i realize it was different, this is the one you are looking for: MacBook Air 13" Retina Late 2020
I initially thought the image was incorrect, but I was just looking for the connector in the wrong place. This picture IS correct for the A2179 EMC 3302. Note that the connector is on the left side of the heat sink (the black thing with parallel ridges in the picture and on the computer), and the connector wires gather together towards the left the side of the computer, not the back. Note that "left side" assumes the Air is upside-down, with the hinge on the side farthest away from you (I'm not doing the "right speaker is on the left side because it's upside-down" thing that iFixit does in step 5).
-
-
-
-
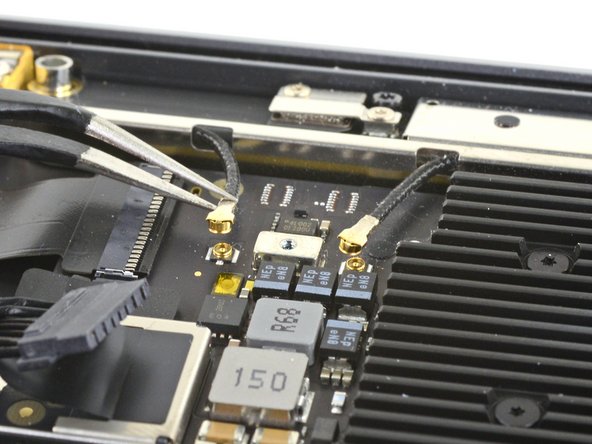
使用一把镊子夹住靠近底座的天线接口。
-
直接向上拉以断开电缆。
-
对第二根天线电缆重复此操作。
This connector is extremely fragile! I always apply a very fine flat screwdriver head to the connector on the system board so it does not pull out!
-
-
-
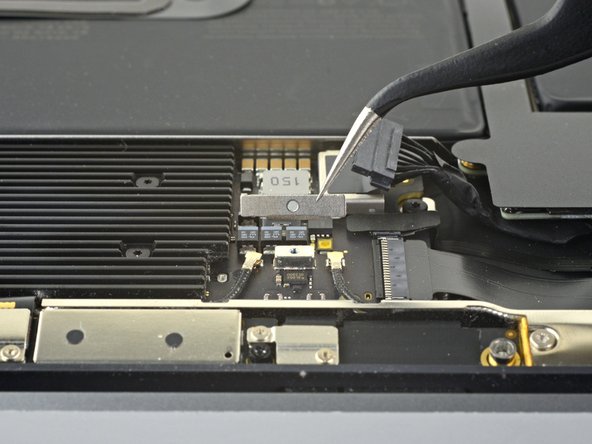
使用 T3 Torx 螺丝刀卸下用于固定显示屏电缆接口盖的两颗 1.5 毫米螺丝。
-
卸下显示屏电缆接口盖。
There are two smaller connector covers that cover a narrow ribbon connector. (One of them is visible in the Step 7 photo to the right of the display cable connector cover.) These covers don't have to be removed for disassembly. But my replacement display didn't include them, so I salvaged the covers from the broken display when I reassembled.
-
-
-
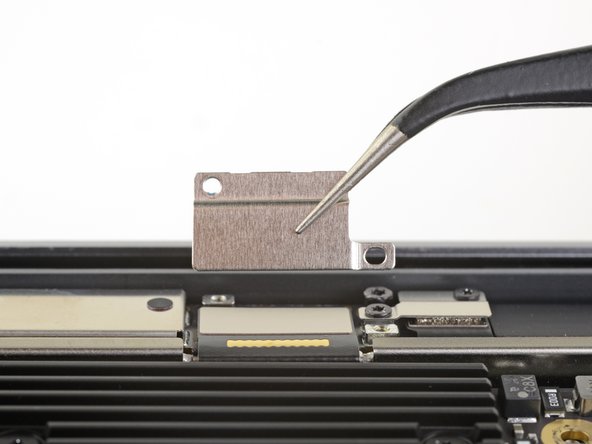
使用撬棒扁平的一端直接从天线板上撬下显示屏电缆接口以断开它。
I have noticed that replacement assemblies from Ifixit and perhaps other suppliers do not have the smaller covers for the side cables to the left and right of the main display cable installed! Remember to transfer them from your old display to the new or you will have a POF waiting to happen!
Thank you for you advisory on the connector covers. Please tell me what POF stands for?
I'm guessing POF=point of failure.
maccentric - 回复
-
-
-
用手指将天线杆垂直向上撬离外壳。
-
将天线板穿过天线条中间的开口。
-
取下天线杆。
this is a bit tricky - the last one i worked on was held tight by a thin black tape, similar to the stretchy tape underneath batteries. this tape is near the motherboard underneath the path of the ribbon cables to the lcd. underneath this tape is a groove cut that the antenna slips into. actually 3 grooves, the 2 underneath the black tape and a longer channel in between. this channel grabs onto a thin part of the antenna that slips into these channels and some bumps help to “wedge” it into place by a pressure type fitting. kind of reminds me of edge of the shield on some ipads and older iphones. the bumps fit into areas and “grab” onto the area next to them. trying to create a word picture. maybe ifixit can add a real picture. definitely slows you down when you encounter resistance - don’t want to force anything. saw some dude on youtube yanking and pulling and i started yelling at him.
Thanks for your advisory, Greg. I can confirm the sticky tape about 1/2" long. It's to the left of the LVDS cable and attached to board. Looks like antennae wall sticks on vertically. Gentle prodding with spudgers from all angles finally frees it. Be patient with it.
-
-
-
使用 T8 Torx 螺丝刀从每个铰链上卸下三颗 4.9 毫米螺丝(总共六颗螺丝)。
The hinge screws were a T9 on mine
Kirk Heppe - 回复
It's actually easier to remove 2 of the 3 screws on each hinge and then open the laptop before then removing the final screw. This prevents the display from shifting while opening and accidentally damaging other components on the logic board. As we all know, a few mm in the wrong direction on a MacBook can cause a world of trouble.
-
-
-
提起 MacBook 并小心地开始合上显示屏,直到它与上壳成约 90 度角。
-
保持显示器与外壳成 90 度角,在保持外壳静止的同时笔直向下移动显示器,以便铰链从外壳底部滑出。
-
取下显示器。
Great instructions. One note is that on re-assembly, slide base onto hinges and reattach hinge screws before closing down base onto screen.
-


将你的新更换零件与原始零件进行比较——你可能需要在安装前转移剩余的组件或去除新零件上的背胶。
要重新组装你的设备,请按逆序执行上述步骤。
将你的电子垃圾送到 R2 或 e-Stewards 认证回收商。
维修没有按计划进行?查看我们的 [链接|https://www.ifixit.com/Answers/Device/Ma...|论坛] 以获取故障排除帮助。
将你的新更换零件与原始零件进行比较——你可能需要在安装前转移剩余的组件或去除新零件上的背胶。
要重新组装你的设备,请按逆序执行上述步骤。
将你的电子垃圾送到 R2 或 e-Stewards 认证回收商。
维修没有按计划进行?查看我们的 [链接|https://www.ifixit.com/Answers/Device/Ma...|论坛] 以获取故障排除帮助。
38等其他人完成本指南。


11条评论
Thank you so much for this awesome walkthrough! I can’t believe how much I saved doing this myself. Works beautifully! If I could only suggest a more comprehensive “reassembly” page. There are a couple of missteps I made (eg. trying to install the antenna bar and accidentally leaving the display cable connector under it) that would have helped. In any event, thank you so much!
Thanks for the tip! I’ve added a reminder to that step.
when starting the process of installation, make sure that at least the inside hinge screw is installed and mostly tightened. once the antenna is installed, there is almost no room for that screw to be inserted without a tight scrape against the end of the antenna. a very tight fit. i sometimes only install one hinge screw, usually the center ones, and then align the lid before adding the others and tightening everything up. in this case, would save you some concern to address this beforehand.
Definitely not. Also, there is no such thing, perhaps you meant 2020? Also no.
Have never needed to repair a Mac, but when a pen was slammed in the lid of my wife’s MBA, the screen was completely gone. So I decided to have a go myself, having followed iFixit for a number of years. So a massive thank you for a simple, clear guide, with tool specs that I can’t fault. (I bought your magnetic pad, excellent!)
The new screen is in place, the system functions perfectly. You saved me money and I had real fun and confidence doing the geeking!
Thank you for this guide. I was able to complete things as described. One thing to note: I didn't see any sign of adhesive holding down the antenna bar, but there are metal ridges/dimples on a portion of the folded edge that have to be pressed into the top case in order to prevent the antenna bar from simply springing back up. I found it fiddly to find a suitable tool and generate enough force to push this folded edge fully home, but eventually managed it with careful use of a flathead screwdriver.
Screen turns on but only Apple logo loads, nothing else happens. Thoughts?
Also how to I get the 2 small metal plates on each side of antenna? Thanks
Just executed this procedure on a friends machine (using a new screen bought from AliExpress) and it was ridiculously easy to complete.
However, upon restarting, the machine took a little while to show signs of life. A few mins in fact, therefore I'd recommend exercising extra patience before pulling it apart again to check for assembly errors.
Much gratitude to @carsten for putting this together! Thank you!
P5 is also a PL4 (so confusing) - i like the wiha 26764 thanks to @mayer for this post. P5 pentalobe and 1.2 pentalobe screwdriver
greg - 回复