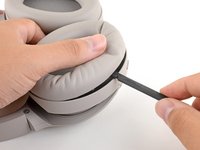
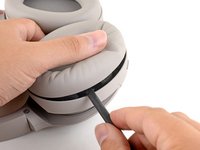
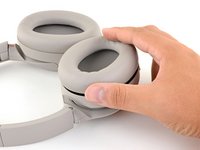
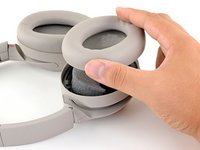
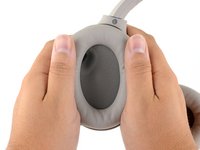
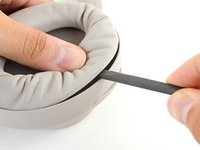
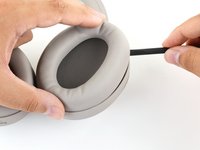
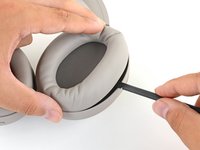
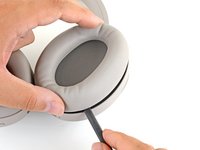
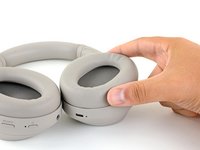
跳转到主内容

索尼 WH-1000XM4 耳墊更換

你所需要的

  1. 索尼 WH-1000XM4 耳墊更換, 將耳機揚聲器朝上: 步骤 1 中的图像 1,1
    • 在開始任何維修之前,請按住左耳罩上的電源按鈕約 2 秒鐘,直到藍燈熄滅。

    • 將耳機放在工作檯面上,耳墊朝上。

  2. 索尼 WH-1000XM4 耳墊更換, 創造一個間隙: 步骤 2 中的图像 1,2 索尼 WH-1000XM4 耳墊更換, 創造一個間隙: 步骤 2 中的图像 2,2
    • 用拇指壓下靠近長外緣的耳墊,在耳墊和框架之間形成間隙。

  3. 索尼 WH-1000XM4 耳墊更換, 鬆開耳罩: 步骤 3 中的图像 1,2 索尼 WH-1000XM4 耳墊更換, 鬆開耳罩: 步骤 3 中的图像 2,2
    • 將撬棒的扁平端插入墊子邊緣和框架之間所形成的間隙中。

    • 向下旋轉撬棒,鬆開耳墊的長邊。

    • 這可能需要相當大的力量。如果墊子不會卡錯位,請將撬棒沿著長邊移動到不同的點。

  4. 索尼 WH-1000XM4 耳墊更換: 步骤 4 中的图像 1,3 索尼 WH-1000XM4 耳墊更換: 步骤 4 中的图像 2,3 索尼 WH-1000XM4 耳墊更換: 步骤 4 中的图像 3,3
    • 在耳罩週邊重複上一步,斷開剩餘的夾子。

  5. 索尼 WH-1000XM4 耳墊更換, 取下耳墊: 步骤 5 中的图像 1,2 索尼 WH-1000XM4 耳墊更換, 取下耳墊: 步骤 5 中的图像 2,2
    • 取下左耳墊。

  6. 索尼 WH-1000XM4 耳墊更換, 重新組裝技巧: 步骤 6 中的图像 1,2 索尼 WH-1000XM4 耳墊更換, 重新組裝技巧: 步骤 6 中的图像 2,2
    • 安裝替換左耳墊時:

    • 將墊子與揚聲器對齊,然後用力將它們壓在一起,將其卡入到位。

    • 按壓坐墊的整個邊緣,確保所有夾子都已接合。

  7. 索尼 WH-1000XM4 耳墊更換, 創造一個間隙: 步骤 7 中的图像 1,2 索尼 WH-1000XM4 耳墊更換, 創造一個間隙: 步骤 7 中的图像 2,2
    • 用拇指壓下長外緣附近的耳墊,在耳墊和框架之間形成間隙。

  8. 索尼 WH-1000XM4 耳墊更換, 鬆開耳罩: 步骤 8 中的图像 1,3 索尼 WH-1000XM4 耳墊更換, 鬆開耳罩: 步骤 8 中的图像 2,3 索尼 WH-1000XM4 耳墊更換, 鬆開耳罩: 步骤 8 中的图像 3,3
    • 將撬棒的扁平端插入墊子邊緣和框架之間所形成的間隙中。

    • 向下旋轉撬棒,鬆開耳墊的長邊。

    • 當第一個夾子斷開連接時,您會聽到咔噠聲。

    • 這可能需要相當大的力量。如果墊子不會卡錯位,請將撬棒沿著長邊移動到不同的點。

  9. 索尼 WH-1000XM4 耳墊更換: 步骤 9 中的图像 1,3 索尼 WH-1000XM4 耳墊更換: 步骤 9 中的图像 2,3 索尼 WH-1000XM4 耳墊更換: 步骤 9 中的图像 3,3
    • 在耳罩週邊重複上一步,斷開剩餘的夾子。

  10. 索尼 WH-1000XM4 耳墊更換, 取下耳墊: 步骤 10 中的图像 1,2 索尼 WH-1000XM4 耳墊更換, 取下耳墊: 步骤 10 中的图像 2,2
    • 取下右耳墊。

  11. 索尼 WH-1000XM4 耳墊更換, 重新組裝技巧: 步骤 11 中的图像 1,2 索尼 WH-1000XM4 耳墊更換, 重新組裝技巧: 步骤 11 中的图像 2,2
    • 安裝替換右耳墊時:

    • 將墊子與揚聲器對齊,然後用力將它們壓在一起,將其卡入到位。

    • 按壓坐墊的整個邊緣,確保所有夾子都已接合。

结论

將新的替換零件與原始零件進行比較 - 在安裝之前,您可能需要轉移剩餘的組件或移除新零件上的背膠。

要重新組裝您的設備,請以相反順序執行上述步驟。

修復沒有按計劃進行?嘗試一些基本的故障排除 或搜尋我們的社群 尋求幫助。

31等其他人完成本指南。

由衷感谢以下译者:

en zh

100%

这些译者帮助我们修补全世界! 您也想加入吗?
开始翻译 ›

Carsten Frauenheim

于03/10/20注册

135,488 声望

创作了371篇指南

团队

iFixit iFixit 的会员

Staff

118 名成员

创作了19,410篇指南

16条评论

This is a great guide!

it is also the solution to the ticking problem on the left ear cup!

there is a small cable linking the microphone to the headset that is beneath the earcup. it has a small holder that should prevent it from moving.

if it’s not attached properly, the noise canceling will start ticking every few seconds in a very annoying way.

removing the earcup and cleaning there is the best solution I found!

Thanks a lot for the amazing guide!!

Sapir Havusha-Laufer - 回复

I was having a similar issue where the right ear cup was making an annoying scratching sound. Turned out to be a hair that was stuck in and brushing against the speaker. Fixed by opening and removing with tweezers!

spencer -

Very comprehensible instructions, thank you! I have rather the problem that the original ear pads are not available anywhere and are not shipped to Germany by Sony. Does anyone have a tip on how to get the replacement pads or any idea which third-party pads can be recommendet?

Larkus Manz - 回复

Where can I buy official replacement earpads?

Arne Vandervorst - 回复

i also need to know that, i found some OEM on amazon, but i don't trust any of them

Nicolas Silva A. -

添加评论

浏览统计数据:

过去 24 小时: 104

过去 7 天: 720

过去 30 天: 2,895

总计 108,370