简介
以防你没听过,Switch的产品线出新了:它就是任天堂Switch Lite,而且它的价格更低,因此您的花费更少。 它还有热门的新颜色-仅仅在我们忘记我们是来拆解的之前短暂的分散了我们的注意力。拿起你的工具,让我们把新的Switch Lite拆开吧。
YouTube? Instagram? Twitter? Facebook? Take your pick and give us a click, and let’s keep in touch on all future teardowns. And if a newsletter is more your style, we do that too.
你所需要的
视频概述
-
-
一个野生的Switch出现了!Nintendex对此有何评价?
-
定制的英伟达Tegra处理器
-
内置5.5英寸电容触控LCD屏幕,具有1280 × 720的分辨率。
-
32GB内置存储空间(可通过microSDHC 或microSDXC拓展至高达2TB)
-
802.11 a/b/g/n/ac Wi-Fi, 蓝牙 4.1, NFC, USB Type-C 接口 (仅供充电), 以及 3.5 mm 音频接口
-
内置加速度计和陀螺仪
-
可充电锂离子电池,可提供3.0至7.0小时的续航时间
-
配有不可拆卸的控制器
-
-
-
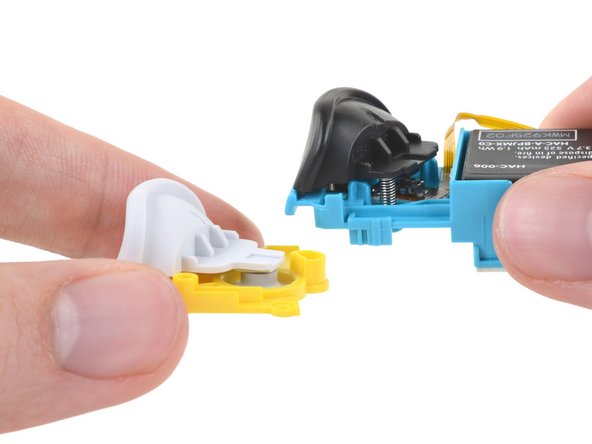
我们猛拉了一下控制器,希望能够得到两个新的黄色Joy-Cons,但是并没有成功。
-
看来我们需要使用更传统的拆解方式。
-
但是,集成的控制器确实包含了一个诚实至善的十字形按键。
-
其他的外部变化:左侧Joy-Con的红外发射器被砍掉了,而且扬声器被从前部(原版Switch)移动到了背后(Switch Lite)。
-
Lite还缺少原版Switch的支撑架,使得其成为具有“最佳气动外形”的Switch。
-
-
-
-
这里我们花了点时间把老的2019版的switch的后盖用热风枪吹了下来,来做些小小的(英语中与Lite这个型号是同一个单词)比较。
-
最重要的变化:Lite中的电池不再是上下颠倒的。仅仅这一点就使得我们的拆解变得很值得。
-
其他的变化还包括:两个事实,一个谎言。他们是:(1)电池的尺寸变小了,并且它旁边换成了一个较轻规格的热管。(2)耳机接口完全变成了模块化的组件。(3)现在固定散热鳍片的泡泡糖变成了樱桃味。
-
抬起电池,我们发现...一张湿纸巾?或许有人曾试图擦掉这一坨电池粘合剂。
-
据任天堂说,这个13.6瓦时的电池能为你提供3-7小时的续航。这远远高于原版switch的16瓦时电池(但是比续航增强版的能续航9小时的电池要小)。
You should add the dimension of the battery among other parts. I am finding it very hard to find this information.
I don’t know how you removed the battery on this thing, but I destroyed a few tools prying the bigger off. Plus the battery itself got bent beyond repair where I had to order a new one. Whether the water made the adhesive extra sticky I don’t know. (When I found the Switch, it had water damage)
The battery is definitely pretty difficult to remove. It just takes time and patience! Our guide details the process: 任天堂 Switch Lite 电池更换
-
-
-
拉开单独的迷你joycon电路板,我们来到了Switch中最近饱受争议的摇杆。
-
最开始当我们吧外壳打开时,这些摇杆看起来跟2019版Switch挺像-但是钳合边缘的卡扣的设计有点不同,而且整体也比较容易打开。
-
我们把Switch Lite(上)和2019版Switch(下)的摇杆都打开了,把他们并排放置,希望能够找到关于摇杆漂移问题的改进。
-
内部零件乍一看没有什么不同,但细看之下我们发现电路板的走线稍有不同,按压开关表笑了,而金属滑块看起来大了一些。
Ich habe die neue Version der analog sticks genauer unter die Lupe genommen, sie mit meinem problembehafteten verglichen und dabei etwas festgestellt. Ich habe es in einem Tweet zusammengefasst
Just replaced my left joystick, I didn’t even take off the main heatshield to disconnect the battery (had been dead for awhile). The ribbon cables went back in easily with a drop of de-oxit for lubrication. This is a smart design because the left joystick gets much more abuse than the right. PROTIP: The ribbon cables are all fixed in place via a clasp that must be lifted up first. Failure to do so will damage the ribbon cables and your board. The riskiest part of this repair is losing screws. PH000 and Y00 drivers are needed. About a 30 minute repair for a first timer.
-
-
-
移开主板,我们发现之前模块化的闪存这次也被固定住了。(DIY的储存模块虽然在上一个版本的Switch里无法工作,但至少他们物理上兼容)。
-
“硅水豚”A面
-
英伟达ODNX10-A1 (基于Tegra X1-的SoC, 大概是T210B01的一个客制化变体 )
-
2x 三星 K4U6E3S4AM-MGCJ LPDDR4X DRAM 16 Gb (总共4 GB)
-
三星 KLMBG2JETD-B041 32 GB eMMC 闪存
-
意法半导体ST21NFCD NFC控制器,以及多点触控屏幕控制器。
-
Realtek ALC5639 音频编码器
-
Cypress CYW4356X 802.11ac Wi-Fi + 蓝牙 5.0 SoC
You mention the Cypress chip to be Bluetooth 5.0, but list in the tech specs as Bluetooth 4.1. Which is it?
skatendo16 - 回复
Nintendo’s official specs for the Switch Lite say BT 4.1. The Cypress chip is an off-the-shelf design that may have some un-utilized capabilities.
Is it possible to resolder ram chips with highrler capacity to boost a performance?
-
-
-
让我们把“硅水豚”翻个面,以看到更多的芯片:
-
意法半导体STM32F038C6 32位微控制器,具有32KB的闪存。
-
B1913 GCBRG HAC STD T1056719A1安全微控制单元(也许是)
-
美信半导体MAX77620HEWJ,为电源管理IC芯片。
-
罗姆半导体BM92T10MWV-Z,为USB-C PD充电控制芯片。
-
德州仪器 BQ24193 充电管理芯片
-
-
-
所以这个Switch Lite咋样呢?
-
一点点热量加上轻轻一撬就能让屏幕总成离开框架-目前为止很好。
-
再轻轻一划,这个数字转换器/屏幕就从显示屏上脱离下来了。成功 !Switch的排线完好无损。
I’d say IPS would made sense since in whatever posture the Switch Lite fell to ground the screen won’t be directly contacted (joysticks and buttons acts like a cushion layer), it does not appear often to encounter a fractured screen so swapping to IPS gives better visual experience and more chassis space(for batteries?)
Given that the majority of replacements are screen-related, this is a really poor explanation. What about the gasket? The adhesive? You didn’t touch on that at all - and it’s SUPER important to get right.
As stated in the banner at the top of the page, these are not instructions. Our hardware teardowns are intended to give a first look at the device and assess it for repairability, and that’s all. Step-by-step repair guides will come later! You can use this document for reference, but it’s not meant to be exhaustive.
la verdad es que en el desmontaje y separacion no os habeis esmerado pero nada de nada, una foto de un despiece que ademas no tiene ni un resto de pagamento y creo que no va aser tan facil como decis y menos el volver a montar, como se monta? que adhesivo? no queda nada nada claro nada.
I agree with the posters above - it’s the most important and dangerous step (separating the screen from the digitizer) and they choose to go with “something magic happens here”! Disappointing and frustrating.
Looking at replacing a LCD, is the LCD glued to the glass or just adhesive around the edge?
It’s just a strip of black adhesive all the way around - not glue. Just warm it up with a heat gun or hair dryer and carefully peel apart the LCD and digitizer. That said, if you’re replacing a broken LCD it might be easier just to get the complete LCD+digitizer assembly (the digitizer is cheap).
-


34条评论
Ethan…..first of all why is it important that you posted first? Second of all, you said, “Looks like the Switch Lite is based off of the original Switch.” Really, Ethan? You think? Sorry for the sarcasm but c’mon man, how is your comment helping?
You are getting waeker and weaker. No exact descripton or OEM of the fan. Boy that’s weak for because the bearing of the fan can be an issue over time too. Sleevebearings would be horror for a unit like this. I hope it is ball or hydrodynamic. This fan has to run high speeds becaus of its small diameter.
TheLOD2010 - 回复
So now this begs the question, can you reuse the joycons from the OG switch, remove the buttons and place them into the lite?
Say if you wanted a different color for your buttons, seems the triggers are a nono since they use a different button system but what about a,b,x,y,+,- ect?
awful teardown guide, please give better details regarding screw placement, etc
The top of the teardown explicitly says it’s not a service guide. iFixit does have separate guides on Switch repair.
You might find the repair guides more helpful, they highlight all the screws and everything :)
Probably -
Just bought a turquoise lite and it comes with standard phillips screws
The four screws on the top and bottom of the switch lite’s case are PH000, while the 4 on the back are Y00. Look again. The screws inside are all PH000 as well.
walczyk -
Would anyone know where one could source the ‘dedicated mini-joycon board’? They seem to be the one part you cannot find anywhere.
How easy would it be for a total novice to take this apart for the purposes of re-painting the switch? I was thinking about taking it apart and doing a custom paint job on it but wanted to see if anyone else has tried it before I give it a go.
I'm a total novice and did this its very straight forward just don't get the screws mixed up and be mindful of ribbon cables also have the right tools otherwise you will strip the
Does anyone know where to get a replacement fan for the lite (in the UK). Mine sounds like its grating rocks most of the time.
Can someone point me in the direction of which ribbon connectors/sockets are for which function?
I took my boys apart to replace a snapped analogue stick and now it has sound and come on but the screen is blank, not even back-lit, and I'm not sure where I need to go next to troubleshoot it.
Took mine apart today and there are three ribbon cables that come from the screen two are under the gamecard slot those are for picture and backlight the power runs to the otherside near the battery
I’m just curious in respect to future repairability of my own switch lite - if I was to theoretically crack it open and replace the right stick (since that’s the only one that’s shown any issues whatsoever with my original set of joycons, also very pleased to see that one at least looks reasonably easy to get at) - would I need to replace the thermal compound? Or would it be fine if I just put it all back together as is?
I think it might be fine/preferable to leave/reuse the purple goop between the heatpipe and the topmost shield, as that seems to be quite a bit more spreadable than usual thermal paste used on computers.
For the blue/greyish goop between the heatsink and the SoC shield, and between the SoC shield and the SoC, you might be able to scoop up some of the excess goop that seeped out that are still kinda liquid, and slap it back on to the chip die and copper part of the shield. Though decent thermal paste aren’t all that expensive.
If you were to break a corner of the game card reader (brother decided to rip instead of gently unscrew a stripped screw), where could we get a replacement card reader? My understanding is that the switch lite and switch have different game card reader parts.
I for one disagree with this repairability score. If you’re fixing any handheld electronic and you don’t have access to a tri-wing screwdriver, you are probably just new to fixing these things. Every Nintendo handheld since the original gameboy has had them and apple adopted the use of the same bit in their very popular iPhone 7 (albeit a tad smaller). Also the adhesive on the digitizer comes off like butter with a guitar pick and some heat. Getting a new digi on without taking out the MB is an exercise in futility so that is a bit annoying, but overall I think this handheld is pretty easy to work on all things considered.
agreed regarding the Y0 driver bits, your toolkit should have them and if they don’t then you are gonna be ordering replacement parts anyway…
walczyk -
Broke my power/volume flex cable trying to put it back into the connector, anyone know when i can get a replacement, if at all?
omg that sucks, how would you break it putting it back in? I don’t know if mine is fully inserted, but de-oxit helped. BTW I found them on ebay for $7 just google something “Nintendo “Switch Lite” Power Volume Button Ribbon Flex Cable” and do not buy the non switch-lite version since they are different.
walczyk -
Why are there NO videos or howtos that show the trick in separating the digitizer from the LCD? I’ve disassembled everything but I’m stuck at that point. My LCD is good - just the digitizer is scratched and I don’t want to crack the LCD separating it from the digitizer. What’s the trick? Just a heat gun and careful prying? Note the Switch is different from the Lite - in the Switch the LCD and digitizer are not glued together, so it’s simple to replace just one. Not in the Lite tho. Any suggestions?
Okay, I took the plunge and tried separating the LCD and digitizer - it worked! The trick is to use a heat gun to heat one end of the digitizer side and then very carefully and slowly bend/peel it back from the LCD. There is a thin frame (about 2 mm wide) of black adhesive that goes all the way around. Once you’ve pulled them apart you’ll need to peel off that adhesive strip and move it to the new digitizer (if that’s what you’re replacing). Reattach the digitizer to the Switch Lite frame (reuse or use new clear adhesive if necessary), and then carefully align and stick the LCD to the backside of the digitizer. Then just reassemble everything and you’re good to ho.
¿sonde podré encontrar la tarjeta del joycon, la que aparece en la imagen uno del paso 7? vivo en Guatemala, de preferencia si la puedo conseguir en Latino américa, muchas gracias por su respuesta
japanese versions have only phillips screws
I’m interested in whether or not it is possible to add some kind of rumble motors (small, slim profile, like used in mobile phones) to the Switch Lite, there seems to be space inside the casing but does anyone know if there is an output on the board that could be used? Tied into the speakers somehow perhaps?
Also, I can’t see a NFC antenna anywhere in this tear down, yet it’s on the right stick as per the joy-cons. Is it just missing from the tear down or is it physically built into the right stick this time around?
Ian Brooks - 回复
What chip can I replace to restore video? I get audio, but no video. And No, its NOT the backlight or backlight cable/connector.
Does anyone know where exactly the NFC touch point is? I couldn’t see it in any of the pictures.
E. Serrano - 回复
I would love it if there was an update to this video to replace the wifi antenna, as I can see the connections, but it glanced over on the video. Because this is essential to it's operation, that would be a great thing to inclue.
Is there a guide without all the cringe pokemon references? Preferably one where the first two steps are actually steps.
Harley Stout - 回复
This isn’t a guide, this is a teardown.
Duck -