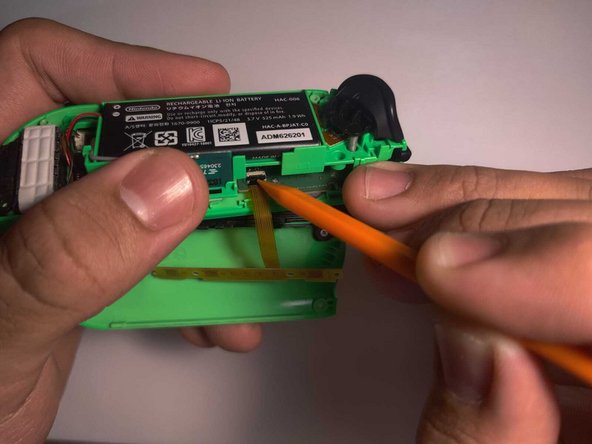
跳转到主内容

任天堂Switch 右 joy-con SL/SR 排线更换

你所需要的

  1. 任天堂Switch 右 joy-con SL/SR 排线更换, SL/SR 排线: 步骤 1 中的图像 1,3 任天堂Switch 右 joy-con SL/SR 排线更换, SL/SR 排线: 步骤 1 中的图像 2,3 任天堂Switch 右 joy-con SL/SR 排线更换, SL/SR 排线: 步骤 1 中的图像 3,3
    • 用Y00 三点式螺丝刀拆卸背板的4颗螺丝

    • 在拆卸的时候,请小心放置螺丝,谨防遗失或者损坏

  2. 任天堂Switch 右 joy-con SL/SR 排线更换: 步骤 2 中的图像 1,3 任天堂Switch 右 joy-con SL/SR 排线更换: 步骤 2 中的图像 2,3 任天堂Switch 右 joy-con SL/SR 排线更换: 步骤 2 中的图像 3,3
    • 用三角撬片从底部小心分开上下壳

    • 分离上下壳的时候一定要小心,轻轻分离上下壳,不要扯断连接的排线

    • 排线很脆弱。太用力可能会导致排线损坏

  3. 任天堂Switch 右 joy-con SL/SR 排线更换: 步骤 3 中的图像 1,3 任天堂Switch 右 joy-con SL/SR 排线更换: 步骤 3 中的图像 2,3 任天堂Switch 右 joy-con SL/SR 排线更换: 步骤 3 中的图像 3,3
    • 使用 00 号十字螺丝刀卸下充电导轨上的两颗 3 毫米螺丝。

    • 需要更换的部分是这两颗螺丝正下方的按钮板。

  4. 任天堂Switch 右 joy-con SL/SR 排线更换: 步骤 4 中的图像 1,3 任天堂Switch 右 joy-con SL/SR 排线更换: 步骤 4 中的图像 2,3 任天堂Switch 右 joy-con SL/SR 排线更换: 步骤 4 中的图像 3,3
    • 使用 00 号十字螺丝刀卸下电池盒上的三颗 3 毫米螺丝。

    • 拆卸电池模组边上的螺丝之后,更换SL/SR排线会更方便

  5. 任天堂Switch 右 joy-con SL/SR 排线更换: 步骤 5 中的图像 1,3 任天堂Switch 右 joy-con SL/SR 排线更换: 步骤 5 中的图像 2,3 任天堂Switch 右 joy-con SL/SR 排线更换: 步骤 5 中的图像 3,3
    • 用塑料撬棒打开插排座子的卡扣。 轻抬电池模块,使得有更多空间操作SL/SR排线的拆卸

    • 打开卡扣后,取下弯曲的排线。

  6. 任天堂Switch 右 joy-con SL/SR 排线更换: 步骤 6 中的图像 1,3 任天堂Switch 右 joy-con SL/SR 排线更换: 步骤 6 中的图像 2,3 任天堂Switch 右 joy-con SL/SR 排线更换: 步骤 6 中的图像 3,3
    • 将新的SL/SR排线插入插座

    • 用塑料撬棒协助插入之后,重新锁上卡扣

  7. 任天堂Switch 右 joy-con SL/SR 排线更换: 步骤 7 中的图像 1,3 任天堂Switch 右 joy-con SL/SR 排线更换: 步骤 7 中的图像 2,3 任天堂Switch 右 joy-con SL/SR 排线更换: 步骤 7 中的图像 3,3
    • 为了防止以后出现相同的问题,确保排线正确并且牢固的弯曲的组装在电池模组下面

    • 轻轻提起电池模组,以便于在其下方弯曲新的按钮板排线。

    • joy—con的电池模组和背板之间的组装很紧密,没有多余的空间,这导致SR/SL排线很容易扭折和损坏。相比下,将排线放置在电池模组之下会有更多的活动空间

结论

需要重新组装设备,请从第4步开始,按照相反的说明顺序进行操作

43等其他人完成本指南。

由衷感谢以下译者:

en zh

100%

这些译者帮助我们修补全世界! 您也想加入吗?
开始翻译 ›

11条评论

Valuable step-by-step guide plus pictorial samples. Keep writing your good stuff, Javier!

Rudi Lim - 回复

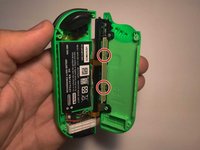
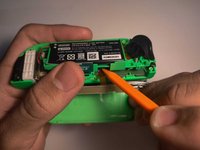
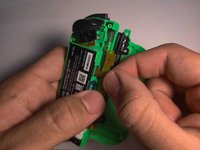
Nice guide. To loosen the battery compartment on my controller I had to remove te battery first. I couldn't see te top 2 screws in step 4. The battery was sticked to the bracket with some tape but removes easily. Underneath the battery were two screws.

Edit: maybe its different because I had to change the button board on the left JoyCon.

Stefan Haarman - 回复

Yes! This Guide above shows the right Joycon. As for the left one there are two screws below the battery as you said!

Paul Stachowiak -

Very helpful step-by-step guide. Thank you.

Had to change the Button Board on the left Joy-con. The screws were also located under the battery in my case. Attention: there 4 screws under the battery, two of which diagonal to each other that hold the battery compartment in place. No need to unscrew all 4.

Tone - 回复

I’ve replaced the board, but SL and SR still not working, also two lights not working. What to do?

Mike - 回复

添加评论

浏览统计数据:

过去 24 小时: 140

过去 7 天: 927

过去 30 天: 3,657

总计 67,173