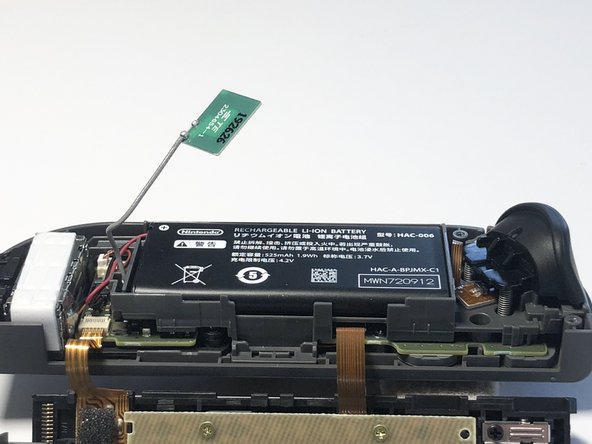
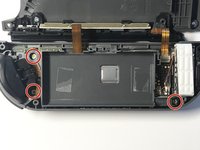
跳转到主内容

任天堂Switch右Joy-Con按钮更换

你所需要的

  1. 任天堂Switch右Joy-Con按钮更换, 右 Joy-Con 按钮: 步骤 1 中的图像 1,3 任天堂Switch右Joy-Con按钮更换, 右 Joy-Con 按钮: 步骤 1 中的图像 2,3 任天堂Switch右Joy-Con按钮更换, 右 Joy-Con 按钮: 步骤 1 中的图像 3,3
    • 使用三翼 Y00 螺丝刀卸下将后面板固定后背板的四颗 5mm 螺丝。

  2. 任天堂Switch右Joy-Con按钮更换: 步骤 2 中的图像 1,3 任天堂Switch右Joy-Con按钮更换: 步骤 2 中的图像 2,3 任天堂Switch右Joy-Con按钮更换: 步骤 2 中的图像 3,3
    • 准备一个塑料三角撬片 在红外传感器和后面板之间插入三角撬片的尖头

    • 沿着边缘移动撬片,轻轻向下施加压力,使背板从固定它的卡扣中释放出来。

    • 请勿在此步骤中使用任何金属工具,否则可能会损坏后面板的塑料夹。

    • 像翻书一样打开Joy-Con,围绕黑色转轴旋转打开。

  3. 任天堂Switch右Joy-Con按钮更换: 步骤 3 中的图像 1,3 任天堂Switch右Joy-Con按钮更换: 步骤 3 中的图像 2,3 任天堂Switch右Joy-Con按钮更换: 步骤 3 中的图像 3,3
    • 把蓝牙天线从其隔间里拉出来,防止拿出电池时拉断天线。

    • 使用塑料打开工具,将电池从右边缘向上提起并从电池盒中取出。

    • 电池用胶带固定,可能需要一点力才能取下。

    • 小心不要将电池或天线完全拉出来,因为它们仍然连接在主板上。

  4. 任天堂Switch右Joy-Con按钮更换: 步骤 4 中的图像 1,2 任天堂Switch右Joy-Con按钮更换: 步骤 4 中的图像 2,2
    • 使用塑料撬棒轻轻向连接器底部施加向上压力,断开电池连接。

    • 对蓝牙天线连接器重复相同的过程。

  5. 任天堂Switch右Joy-Con按钮更换: 步骤 5 中的图像 1,3 任天堂Switch右Joy-Con按钮更换: 步骤 5 中的图像 2,3 任天堂Switch右Joy-Con按钮更换: 步骤 5 中的图像 3,3
    • 用一把00号十字螺丝刀,卸下固定电池盒的三个2mm螺丝。

    • 提起并旋转电池盒,使其远离主板。

    • 要非常小心连接隔间和主板的脆弱的排线

  6. 任天堂Switch右Joy-Con按钮更换: 步骤 6 中的图像 1,1
    在这个步骤中使用的工具:
    Tweezers
    $4.99
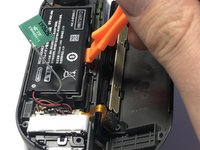
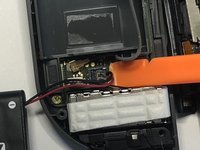
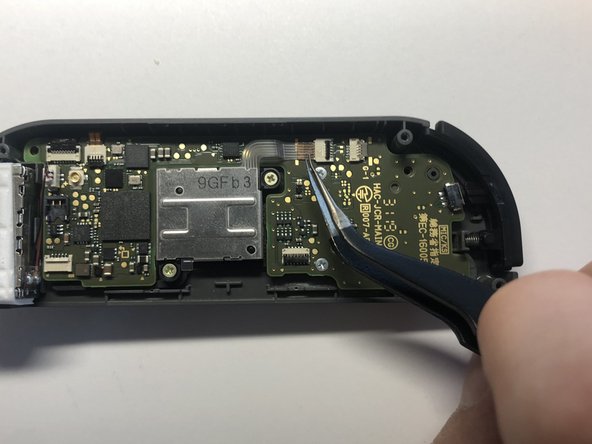
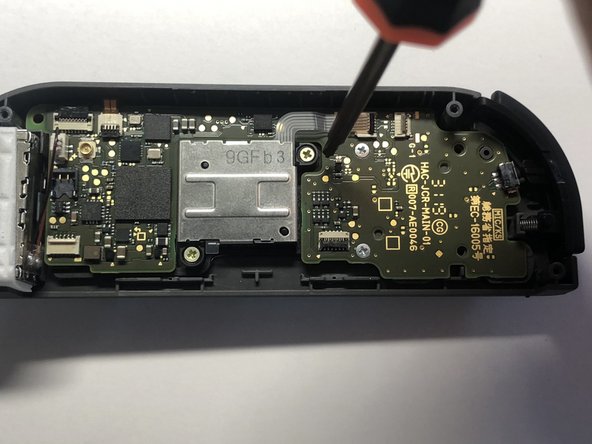
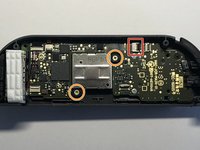
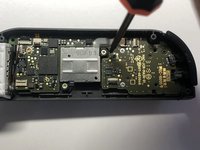
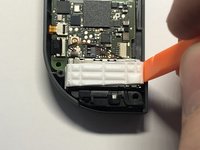
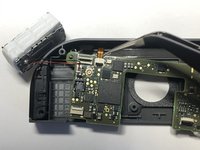
    • 用一对镊子,轻轻掀起压住排线的灰色卡扣,将排线从插座中抽出。

    Connecting this ribbon cable back was the hardest part for me :) I think it's worth mentioning that this ribbon cable's contact points should be facing the bottom when connecting it.

    Tomasz Telepko - 回复

    This is the hardest part during reassemble. The gold contacts need to face "down" with a half-twist of the ribbon cable. It's very easy to break. I got it upside down the first time and broke it the second time requiring replacement of the ZR button assembly.

    mkeehnel - 回复

  7. 任天堂Switch右Joy-Con按钮更换: 步骤 7 中的图像 1,1
    • 用镊子轻轻提起固定两根排线的黑色和白色扣子。

    • 将两条排线从其接头中滑出,以释放背板和导轨组件。

    This really isn't a necessary step and it's be nice if you could mention so. Might make things easier for some people but for others harder.

    Anrei - 回复

  8. 任天堂Switch右Joy-Con按钮更换: 步骤 8 中的图像 1,3 任天堂Switch右Joy-Con按钮更换: 步骤 8 中的图像 2,3 任天堂Switch右Joy-Con按钮更换: 步骤 8 中的图像 3,3
    • 使用镊子,轻轻提起固定操纵杆排线的黑色扣子。

    • 将排线从接头处滑出。

    • 用一把00号十字螺丝刀,卸下固定操纵杆组件的两个螺丝。

  9. 任天堂Switch右Joy-Con按钮更换: 步骤 9 中的图像 1,1
    • 轻轻地把操纵杆抬起来,并从其支架中取出。

  10. 任天堂Switch右Joy-Con按钮更换: 步骤 10 中的图像 1,1
    • 从支架上取下右肩按钮。

    • 请注意,该按钮上有一个弹簧,在重新安装时需要装回原位。

  11. 任天堂Switch右Joy-Con按钮更换: 步骤 11 中的图像 1,2 任天堂Switch右Joy-Con按钮更换: 步骤 11 中的图像 2,2
    • 用撬棒轻轻地向上撬动振动器的左右两边。

    • 振动器是用粘合剂固定的,所以可能需要用点力气才能取下。

    • 一旦振动器从其支架上取下,不要断开排线的连接。只需将它移到旁边。

  12. 任天堂Switch右Joy-Con按钮更换: 步骤 12 中的图像 1,2 任天堂Switch右Joy-Con按钮更换: 步骤 12 中的图像 2,2
    • 用一把2号十字螺丝刀,卸下固定主板的两颗1.5mm的螺丝。

    • 要小心,因为这是固定按钮的唯一东西,一旦螺丝被卸下,它们就会变得松动。

  13. 任天堂Switch右Joy-Con按钮更换: 步骤 13 中的图像 1,2 任天堂Switch右Joy-Con按钮更换: 步骤 13 中的图像 2,2
    • 小心地把主板抬起来,慢慢离开外壳。

    • 对剩下的两根排线要小心谨慎。如果你拉得太用力,将有损坏排线的危险。

    • 用镊子轻轻提起固定带状排线的扣子。

    • 将排线从接头中滑出,使主板脱离外壳。

  14. 任天堂Switch右Joy-Con按钮更换: 步骤 14 中的图像 1,1
    • 取下按钮上的橡胶套。

  15. 任天堂Switch右Joy-Con按钮更换: 步骤 15 中的图像 1,1
    • 使用镊子,将按钮从其支架中取出。

    • 请注意,按钮有槽口以确保更换时方向正确。如果您没有正确对齐槽口,按钮可能没有反应。

结论

要重新组装您的设备,请按相反顺序按照这些说明进行操作。确保不要将主板拧得太紧,因为这可能会影响按钮按下。重新安装组件时,保持对螺丝施加均匀的压力,一侧螺丝不应比另一侧螺丝紧。

40等其他人完成本指南。

由衷感谢以下译者:

en zh

100%

这些译者帮助我们修补全世界! 您也想加入吗?
开始翻译 ›

Michael Lowden

于05/12/20注册

1,365 声望

撰写一个指南

团队

9条评论

Thank you. The guide from the company I bought the replacement buttons from on Amazon was extremely lacking. This was on point.

Drew B - 回复

How do I take the black inner part of the home button out of it’s holding thing?

Martin Drkoš - 回复

I need help with this as well. In the last picture you can see how the home button sits in a clear plastic ring and I cant get it out of there to place my new colorful home button

Zachary Reeves -

Doesn’t include how to change the trigger button…. :/

Harmony Petersen - 回复

Super guide as always. Succesfully replaced the sl and sr buttons. Thanks!!

Richard Kroon - 回复

Thanks, I had a problem with the A button sometimes not registering, but after following this guide and simply cleaning both contact points and rubber pad, the button works as new again :)

Tomasz Telepko - 回复

Would it be possible for a lot more of these steps to have before and after pictures to better clarify with the layout of the covers and rubber bits are before taking them apart? I find myself coming to these guides for more visual indicators and many of them brush over what it's supposed to look like removing certain wires and connectors and such which I imagine is very important when you're dealing with very delicate and potentially costly to replace parts if disconnected improperly.

Jeffrey Logan Keenhold - 回复

Philips #00 screwdriver is required for this task, but it's not in the tool list at the beginning.

Homer Wang - 回复

Super guide qui m'a permis de changer les sticks par des sticks Gulikit à effet hall.

J'ai juste mal rebranché la nappe du bouton ZL, je n'avais pas fait attention au sens.

renaut pierre-yves - 回复

添加评论

浏览统计数据:

过去 24 小时: 60

过去 7 天: 344

过去 30 天: 1,687

总计 74,859