简介
使用本指南可卸下或更换三星 Galaxy Note10上的电池。如果电池膨胀,采取适当的预防措施。
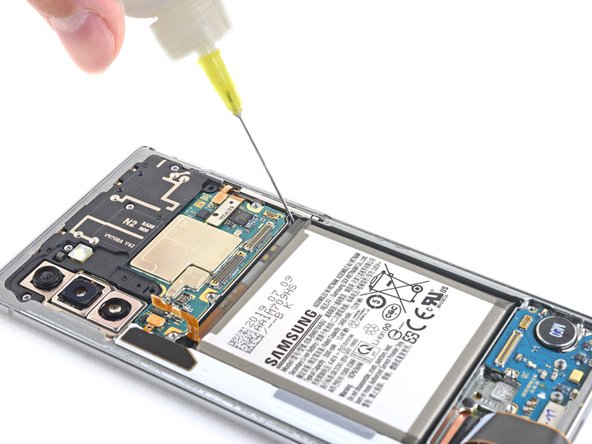
'“为安全起见,在拆卸手机前,请先将电池放电至25%以下。”'如果电池在维修过程中意外损坏,则可降低发生热危险的危险。
你所需要的


为了获得最佳性能,请在完成本指南后校准新安装的电池。
将新的替换零件与原始零件进行比较——在安装之前,你可能需要转移剩余的组件或从新零件上取下粘性衬板。
要重新组装设备,请按逆序执行上述步骤。
将你的电子垃圾带到R2或e-Stewards认证回收商。
维修没有按计划进行吗?尝试一些[[修复后的问题|基本故障排除],或向我们的社区寻求帮助。
为了获得最佳性能,请在完成本指南后校准新安装的电池。
将新的替换零件与原始零件进行比较——在安装之前,你可能需要转移剩余的组件或从新零件上取下粘性衬板。
要重新组装设备,请按逆序执行上述步骤。
将你的电子垃圾带到R2或e-Stewards认证回收商。
维修没有按计划进行吗?尝试一些[[修复后的问题|基本故障排除],或向我们的社区寻求帮助。
13等其他人完成本指南。


6条评论
Here is the Galaxy Note 10+ battery replacement guide!
I just wanted to add that after swapping in the new battery, apparently the only way to reset the battery cycle count is by rooting the phone. There doesn't seem to be any way to get the phone to recognize the new battery as new, otherwise.
Are you sure about that? I mean, can't just we use the classic calibration with Samsung ?
Federico -
Good instructions. Per iFixit, I am supposed to do "Battery Calibration" which consists of charging and keeping on charger for +2 hours, then using it until it dies, then recharging to 100%. Simple.
Apparently, I messed up the fingerprint sensor because it wouldn't work, but the phone was working great. Chaulk that up to learning experience. Was looking for a reason to upgrade anyway.
I set it up to play YouTube shorts, which loop until the phone dies. The phone dies while I'm asleep. I wake up. I plug it in. NOTHING. I flip the charger. NOTHING. I try a different charger. NOTHING. GREAT.
I swap back to my old battery in hopes I got a bad NEW battery. Get that all swapped and still nothing, but SOMETHING. It vibes when I plug it in but the screen is totally black. Try soft reset. Try reversing through all the steps to see if I forgot a cable or had one unseated. No problems at all.
Something happened to the SCREEN when the BATTERY DIED during recalibration. PROCEED WITH CAUTION