跳转到主内容

此翻译可能不反映源指南的最新更新。 帮助更新翻译查看源指南

三星 Galaxy A70 电池更换

你所需要的

  1. 三星 Galaxy A70 电池更换, 弹出 SIM 卡托盘: 步骤 1 中的图像 1,3 三星 Galaxy A70 电池更换, 弹出 SIM 卡托盘: 步骤 1 中的图像 2,3 三星 Galaxy A70 电池更换, 弹出 SIM 卡托盘: 步骤 1 中的图像 3,3
    • 将 SIM 卡弹出工具、SIM 弹出钻头或拉直的回形针插入位于手机左侧边缘的 SIM 卡托盘上的孔中。

    • 用力按压以弹出托盘并将其取出。

  2. 三星 Galaxy A70 电池更换, 软化粘合剂: 步骤 2 中的图像 1,1
    • 关闭你的 Galaxy A70。

    • 加热 iOpener 并用它软化后玻璃下方的粘合剂。应用 iOpener 至少两分钟。在拆卸后玻璃时,你可能需要多次重复此步骤。

    • 也可以使用吹风机、热风枪或热板,但注意不要让手机过热——AMOLED 显示屏和内部电池都容易受到热损坏。

  3. 三星 Galaxy A70 电池更换, 制造间隙: 步骤 3 中的图像 1,2 三星 Galaxy A70 电池更换, 制造间隙: 步骤 3 中的图像 2,2
    • 将吸盘放在手机背面,尽可能靠近右边缘的中心。

    • 拉动吸盘,在后玻璃和框架之间形成间隙。

    • 将撬片插入缝隙中。

  4. 三星 Galaxy A70 电池更换, 将粘合剂划开: 步骤 4 中的图像 1,3 三星 Galaxy A70 电池更换, 将粘合剂划开: 步骤 4 中的图像 2,3 三星 Galaxy A70 电池更换, 将粘合剂划开: 步骤 4 中的图像 3,3
    • 沿着边缘将三角撬片滑到右下角。

    • 将撬片留在原位以防止粘合剂重新密封。

    • 插入撬片后,请随时取下吸盘或继续使用它,以便在取下过程中更好地抓握。

  5. 三星 Galaxy A70 电池更换: 步骤 5 中的图像 1,3 三星 Galaxy A70 电池更换: 步骤 5 中的图像 2,3 三星 Galaxy A70 电池更换: 步骤 5 中的图像 3,3
    • 在后盖右下角下方插入第二个三角撬片。

    • 沿着边缘将三角撬片滑到右上角。

    • 如果在切割时遇到问题,可以再次使用 iOpener 软化粘合剂。

    • 将撬片留在原位以防止粘合剂重新密封。

  6. 三星 Galaxy A70 电池更换: 步骤 6 中的图像 1,2 三星 Galaxy A70 电池更换: 步骤 6 中的图像 2,2
    • 在后盖右上角下方插入第三个三角撬片。

    • 沿着手机的顶部边缘滑动三角撬片的尖端以切割粘合剂。

    • 将撬片留在左上角以防止粘合剂重新密封。

  7. 三星 Galaxy A70 电池更换: 步骤 7 中的图像 1,3 三星 Galaxy A70 电池更换: 步骤 7 中的图像 2,3 三星 Galaxy A70 电池更换: 步骤 7 中的图像 3,3
    • 在左上角下方插入第四个三角撬片。

    • 沿着手机的左边缘滑动撬片以切断粘合剂。

    • 将撬片留在原位以防止粘合剂重新密封。

  8. 三星 Galaxy A70 电池更换: 步骤 8 中的图像 1,2 三星 Galaxy A70 电池更换: 步骤 8 中的图像 2,2
    • 在左下角下方插入第五个三角撬片。

    • 沿底部边缘滑动以切割剩余的粘合剂。

  9. 三星 Galaxy A70 电池更换, 取下后玻璃: 步骤 9 中的图像 1,1
    • 取下后玻璃。

    • 安装后盖后,对手机施加稳定的强力压力几分钟,以帮助粘合剂形成良好的粘合 - 一叠厚书效果很好。

  10. 三星 Galaxy A70 电池更换, 拧开中框: 步骤 10 中的图像 1,1
    • 使用十字螺丝刀卸下固定中框的十四颗 4.0 毫米长的螺丝。

  11. 三星 Galaxy A70 电池更换, 插入撬片: 步骤 11 中的图像 1,2 三星 Galaxy A70 电池更换, 插入撬片: 步骤 11 中的图像 2,2
    • 中框由塑料夹固定到位。

    • 在手机右边缘靠近音量按钮的中框和前面板组件之间插入撬片。

  12. 三星 Galaxy A70 电池更换, 拆下塑料夹: 步骤 12 中的图像 1,2 三星 Galaxy A70 电池更换, 拆下塑料夹: 步骤 12 中的图像 2,2
    • 将三角撬片滑到右下角以拆下塑料夹。

  13. 三星 Galaxy A70 电池更换: 步骤 13 中的图像 1,3 三星 Galaxy A70 电池更换: 步骤 13 中的图像 2,3 三星 Galaxy A70 电池更换: 步骤 13 中的图像 3,3
    • 继续将右下角的开口滑动到左下角以拆下塑料夹。

  14. 三星 Galaxy A70 电池更换: 步骤 14 中的图像 1,3 三星 Galaxy A70 电池更换: 步骤 14 中的图像 2,3 三星 Galaxy A70 电池更换: 步骤 14 中的图像 3,3
    • 沿左边缘滑动三角撬片以拆下塑料夹。

  15. 三星 Galaxy A70 电池更换, 移除中框: 步骤 15 中的图像 1,1
    • 卸下中框。

  16. 三星 Galaxy A70 电池更换, 断开电池: 步骤 16 中的图像 1,2 三星 Galaxy A70 电池更换, 断开电池: 步骤 16 中的图像 2,2
    • 使用撬棒从插座中直接撬起接口来断开电池的连接。

  17. 三星 Galaxy A70 电池更换, 断开互连电缆: 步骤 17 中的图像 1,2 三星 Galaxy A70 电池更换, 断开互连电缆: 步骤 17 中的图像 2,2
    • 使用撬棒直接从插座中撬出接口,从而断开互连电缆与主板的连接。

  18. 三星 Galaxy A70 电池更换, 断开互连电缆: 步骤 18 中的图像 1,3 三星 Galaxy A70 电池更换, 断开互连电缆: 步骤 18 中的图像 2,3 三星 Galaxy A70 电池更换, 断开互连电缆: 步骤 18 中的图像 3,3
    • 使用撬棒直接从插座中撬出接口,从而断开互连电缆与子板的连接。

    • 卸下互连电缆

  19. 三星 Galaxy A70 电池更换, 涂抹除胶剂: 步骤 19 中的图像 1,1
    • 在使用除胶剂之前,请按照以下准备步骤进行操作。

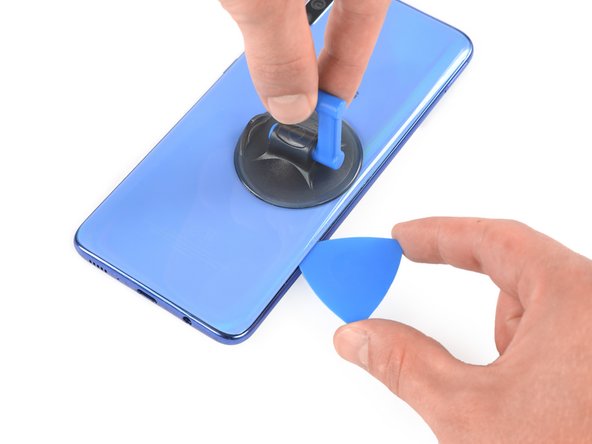
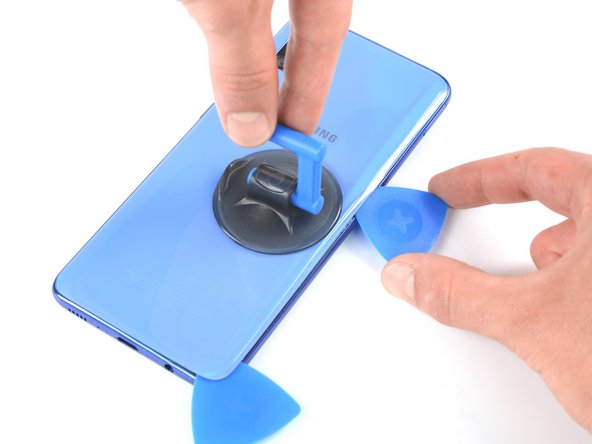
    • 在电池底部边缘的缝隙中滴几滴除胶剂或高浓度(90% 或更高)异丙醇。

    • 向上提起手机底部,使其朝后置摄像头的方向倾斜,让粘合剂去除剂在电池下方展开。

    • 让粘合剂去除剂渗透电池粘合剂至少 1 分钟。

  20. 三星 Galaxy A70 电池更换, 撬起电池: 步骤 20 中的图像 1,3 三星 Galaxy A70 电池更换, 撬起电池: 步骤 20 中的图像 2,3 三星 Galaxy A70 电池更换, 撬起电池: 步骤 20 中的图像 3,3
    • 在此过程中尽量不要使电池变形。软壳锂离子电池可能会泄漏危险化学品、着火,如果​​损坏甚至会爆炸。请勿过度用力或用金属工具撬电池。

    • 在电池底部边缘下方插入一张塑料卡。

    • 小心地将其滑到电池下方以松开粘合剂。

    • 继续滑动下方的塑料卡以从凹槽中撬起电池。

    • 电池应该很容易脱落。如果电池仍然有粘性,请重复之前的粘合剂去除程序。

  21. 三星 Galaxy A70 电池更换, 取出电池: 步骤 21 中的图像 1,1
    • 取出电池。

    • 请勿重新安装损坏或变形的电池,否则存在安全隐患。

    • 安装新电池之前,请清除手机上残留的所有粘合剂,并用异丙醇和无绒布清洁粘合区域。

结论

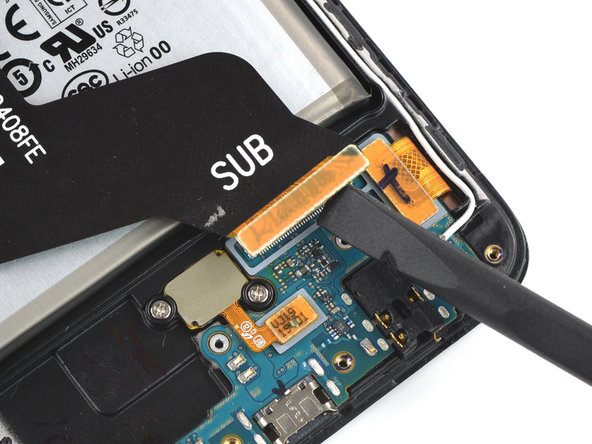
如果可能,请在安装新粘合剂和重新密封之前打开你的设备并测试你的维修情况。

使用预切胶粘剂或双面胶带固定新电池。为了正确定位,请将新粘合剂涂在旧粘合剂所在的位置,而不是直接涂在电池上。将新电池牢固地按入到位。

要重新组装你的设备,请按逆序按照这些说明进行操作。用异丙醇 (>90%) 清洁相关区域后,在必要时涂抹新的粘合剂。

为获得最佳性能,请“校准新安装的电池”:将其充电至 100% 并继续充电至少 2 小时。然后使用你的设备,直到它因电池电量不足而关闭。最后,不间断地将其充电至 100%。

将你的电子垃圾送到 R2 或 e-Stewards 认证的回收商]。

维修没有按计划进行?尝试一些 基本故障排除,或向我们的 论坛 寻求帮助.

22等其他人完成本指南。

由衷感谢以下译者:

en zh

92%

Yuting Zhao正在帮助我们修复这个世界! 您也想加入吗?
开始翻译 ›

Adriana Zwink

于12/18/19注册

48,476 声望

创作了167篇指南

团队

iFixit iFixit 的会员

Staff

135 名成员

创作了17,198篇指南

4条评论

How to remove the adhesive on the midframe ? Can I immerse it in alcohol?

Ripple Blink - 回复

Hello Ripple Blink, I'd recommend first removing adhesive remains by rolling them up on the tip of a spudger or scraping it off with the flat end of a spudger. Afterwards, you can use a lint-free cloth (or coffee filter) with a bit of isopropyl alcohol to clean the adhesion surfaces. See the first two steps of "How to Use a Pre-Cut Adhesive Sheet" for more information. Hope this helps!

Manuel Haeussermann -

My dad replaced the battery in his A70, however he didn't wait for the alcohol to dry out and instead started using the phone. This led to major issues with touch disease and a glitchy screen. Once he had the sense to wait for the phone to dry it started working, however the fingerprint sensor has stopped working. Anyone know why? Could the sensor be damaged?

Ibrahim Anser - 回复

Hello Ibrahim Anser, normally the fingerprint sensor shouldn't be impacted by the steps detailed in this guide. Have you tried deleting the fingerprint data, restarting the phone and reregistering the fingerprint or does the fingerprint sensor not accept any inputs? You could also try using the Samsung Member app for hardware diagnostics of the fingerprint sensor. If those approaches fail, you could try checking if the fingerprint sensor cable is seated correctly on the daughterboard or if there is an issue with the connector (moisture or bent pins). As a last resort, you could remove the fingerprint sensor itself to check for moisture or other issues. You would need a Phillips screwdriver for that. Hope this is helpful!

Manuel Haeussermann -

添加评论

浏览统计数据:

过去 24 小时: 10

过去 7 天: 119

过去 30 天: 533

总计 20,707