简介
使用本指南更换 OnePlus 8T 中用尽或没电的电池。
如果你的电池肿胀,采取适当的预防措施。 为了你的安全,请在拆卸手机之前将电池放电至 25% 以下。 如果电池在维修过程中意外损坏,这可以降低发生危险热事件的风险。
重新组装设备时,你需要更换粘合剂来重新连接组件。
你所需要的


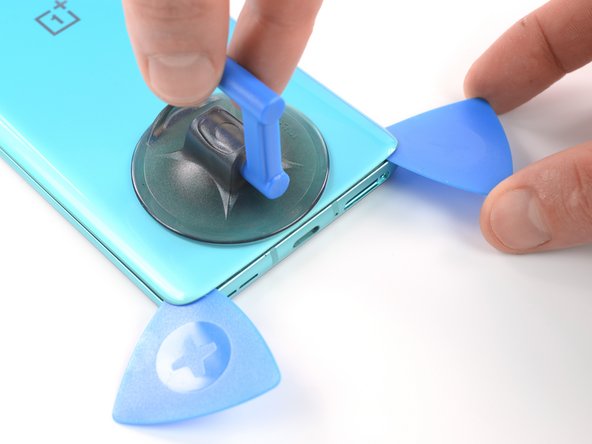


如果可能,请在安装新粘合剂和重新密封之前打开设备并测试修复情况。
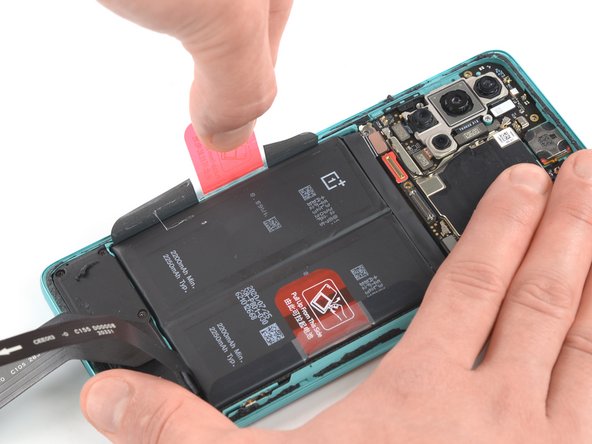
使用预先切割的粘合剂或双面胶带固定新电池。 为了正确定位,请将新粘合剂涂在设备上旧粘合剂所在的位置,而不是直接涂在电池上。 将新电池用力按入到位。
要重新组装你的设备,请按相反顺序执行这些说明。 用酒精 (>90%) 清洁相关区域后,根据需要涂抹新的粘合剂。
为了获得最佳性能,校准新安装的电池:将其充电至 100%,并继续充电至少 2 小时。 然后使用您的设备,直到设备因电池电量不足而关闭。 最后不间断充电至100%。
将您的电子垃圾送到 R2 或 e-Stewards 认证回收商。
修复没有按计划进行? 尝试一些基本故障排除,或向我们的社区寻求帮助。
如果可能,请在安装新粘合剂和重新密封之前打开设备并测试修复情况。
使用预先切割的粘合剂或双面胶带固定新电池。 为了正确定位,请将新粘合剂涂在设备上旧粘合剂所在的位置,而不是直接涂在电池上。 将新电池用力按入到位。
要重新组装你的设备,请按相反顺序执行这些说明。 用酒精 (>90%) 清洁相关区域后,根据需要涂抹新的粘合剂。
为了获得最佳性能,校准新安装的电池:将其充电至 100%,并继续充电至少 2 小时。 然后使用您的设备,直到设备因电池电量不足而关闭。 最后不间断充电至100%。
将您的电子垃圾送到 R2 或 e-Stewards 认证回收商。
修复没有按计划进行? 尝试一些基本故障排除,或向我们的社区寻求帮助。
16等其他人完成本指南。


12条评论
This doesn't look too bad. Heat the back cover enough to cut through the adhesive, then lift off the back cover. Unscrew 9 tiny #00 phillips screws and pop off the mobo cover. Lift 3 ribbon cable connectors. Pull the battery off the adhesive. Clean off all the old adhesive from under the battery and around the edge of the back cover. Then reverse the process to reassemble. You would need a new battery, and a new back cover if you broke the original one trying to remove it. You can get a new back cover from Amazon for $20, but the reviews all said it's not Gorilla Glass, and it's far less durable and crack-resistant than the OEM cover. Finding a good quality replacement battery seems to be more difficult, I don't see even one battery for sale on Amazon that says specifically that it fits this phone.
My refurbished OP8T's battery gave up randomly one day. Plugging in any charger/any attempt to boot would just briefly showed a lightning bolt icon and would fade to black.
With that said, I completed my fix yesterday evening without any issues. I used a blow-dryer to loosen the back cover rather than the iFixit heating tool, and it worked fantastically. I removed the dead stock battery and replaced it with a 4600mAh from eBay, taking care to move the sticky pull tabs from the old battery to the new for future repairs. The battery and two removed cables snapped in with an audible click.
When reseating the motherboard cover, be aware there's a little connector that needs to line up with the board, and that will click into place.
I resealed my device with gorilla glue (but there are better, more tailored glues on Amazon). I am a little worried about water and dust getting in now that I've broken the seal, so I would be very wary of that.
In total, repairs cost about $40 and 40 minutes of my time. Great guide!
Update 10/10/2023
So exactly a year later, my OnePlus 8T has given up on me. A few weeks ago, I noticed it began randomly shutting off. The screen would "fade" to black and I'd have to hold the power button down to start it back up. Today, it turned off completely and refuses to turn back on or boot into recovery.
I'm not sure if this was due to the third-party battery giving out (Generic 4600mAh battery from eBay) or if it was caused by any range of software issues. I'll be leaving it on the charger overnight and attempting another battery swap shortly, so hopefully that works.
Michael, please let us know how the next replacement goes. I’m attempting my first replacement right now. Thanks.
A question, the 8T has a battery rated at 4400mAh, while the battery in the store is 2200mAh. is this a mistake or does the replacement battery have half the battery life of the original?