跳转到主内容

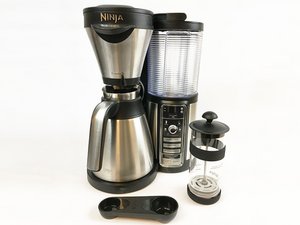
Coffee makers made by Ninja Kitchen.

32 个问题 查看全部

How can I get the control module out of our Ninja CE200?

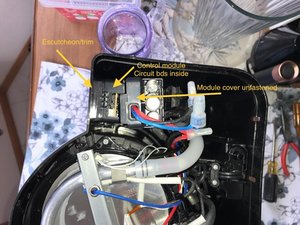
Ninja CE200 coffeemaker. Display crystals are not all functional and I want to alcohol wipe their zebra strip and contacts bar. But I can't budge the button/display module from its mounting inside. It's trim escutcheon holds it tight to the body and won't let go of the module from the rear. The back half of the module pops off easily, but that's no help. To get at the boards and crystal contacts I need to remove the whole module. How does one get it out of the machine? There's bars on either side that it seems to slide tabs into, but bending them clear of the tabs still won't allow the module to budge.

Update (06/06/2022)

Block Image

Update (06/06/2022)

Escutcheon, module, and module cap (untabbed from module but not removed yet due to restrictive wires)

Block Image

回答此问题 我也有这个问题

这是一个好问题吗?

得分 0
2条评论

Many fascia plates are snapped-in place with precision for assembly, not lending themselves for disassembly. This may require inflicting marring plastic as you pry apart the escutcheon plate if it is a separate snap-in for access to the control module. A search turned up a used Ninja CE200 for $17 on ebay. Perhaps buying this can let you experiment on disassembly, making any mistakes as a learning curve to repairing yours plus have spare parts if needed.

完成的

Sorry this is 2 months+ tardy. The Ninja’s been on the wife’s dinner table for that time while other matters took precedence. The Keurig 2.0 has earned new users in the interim. Thanks F Dyer for the input.

I reckon when time affords I’ll try prying the case open/out. Maybe I can do it without damaging the escutcheon’s appearance from the front of the machine. I don’t really want to throw any more $ at it or have a second machine laying around. A Dremel may be used to cut into part of the electronics case so I can see from its inside how it’s actually fastened in, though you are probably right; some machine parts snap in and are never designed to be removed. I might end up deliberately cutting or breaking the escutcheon, removing it all together, and glueing the case back in place.

I was kinda hoping iFixit techs might be curious enough to tear down a Ninja like ours, one of their popular models.

完成的

添加一条评论

3个答案

最有帮助的答案

“the hands down worst part of ninja is their support, it is the worst ive ever encountered. you ask them for help, & their response is 'whats your phone number, whats your address', 'whats your mothers maiden name'. their support is entirely a data gathering tool. they refuse to speak with you unless you tell them information that isnt required for trouble shooting.”

Thanks Bill. It’s good to know that I’m not the only one disenchanted with Ninja. And that’s with owning only one of their products. High ratings by consumer reviewers leaves something to be desired, doesn’t it. It might work great long enough to beat all comers, but if it crashes and burns a year or two later those reviewers aren’t going to know it. They’ve moved on. And they only test new machines. Longevity isn’t a commonly rated virtue.

这个答案有帮助吗?

得分 1
添加一条评论

Aha! I managed to figure out how the circuit board module was fitted in there. It slides into grooves via tabs on its sides, and that part was obvious. Not so much, at first, was that the “chromed” escutcheon was then pressed in from the side opening, snapping onto the outside of the module with the typical multiple tabs around its edge.

I managed to ferret a narrow blade screwdriver into the two barely visible slots on top of the module case, twisted, and forced the escutcheon back towards the side opening. Then I barely got the screwdriver into the first (and only other accessible) pockets down the case’s sides, and forced the tabs to let go. Getting those first ones loose put enough stress on the remaining ones that they finagled loose, and the escutcheon finally came out the side. Without the escutcheon holding it, the module easily slid up and out! Yayyy!

Now to expose and clean the “zebra” strips, after reviewing videos I watched about that two months ago. Hopefully someone else with the same issue, and confounded by the same control box mounting I ran into, will come across this posting and have some encouragement. The escutcheon side “tabs” are very minimalist and with patience can be overcome.]

Block Image

Block Image

Note how slim the escutcheon tabs are around its rim. Their corresponding pockets on the module case are relatively deep, but that can allow more leverage for a narrow blade flat screwdriver, or the #4 blade in the iFixit Essentials Toolkit. Thanks to iFixit for coming up with that kit, so very handy for us non-professional home repair enthusiasts!

Items needed for this job:

Block Image

Update 11/29/22

Regrettably I can’t add imagery (apparently) if I submit comments, so I have to keep you apprised here in the “Answer” mode.

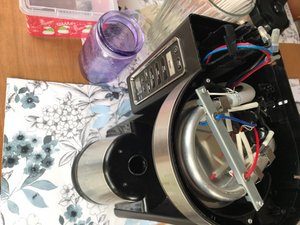
The crystal/LED device I ran into is unlike others described for repair in videos. You can see that not all the crystals/LED’s light up. There’s no obvious “zebra” strip I can clean with a cotton cloth or Kemwipe and alcohol. It has 12 pins that are soldered through the board. How the pins interact with the screen I can’t tell yet. Any idea how to get at that? There is an outer black plastic shell that has 4 round feet going thru the board, either glued or heat-melted in place; the assembly is so precise I can’t tell. Popping that off may expose the screen contact interface, but I don’t want to force the shell as it may be clipped somehow to the screen.

Has anyone dealt with this type of screen assembly before?

Unit plugged in:

Block Image

Unit unplugged:

Block Image

Block Image

Update

I thought there were more comments here before, and don’t see them now, about the cb components and testing each LED lead.

Mention was made about the “Zener” diodes, and I tested them albeit in place on the board. ZD1 allowed flow in one direction. ZD2 in both directions. And ZD3 in neither direction. Not that I know what I’m doing with it, but my fancy tweezers tester (LCR Research) read “Damage” for all three. Should I assume that ZD1 is flowing electrons in the wrong direction, ZD2 should only flow one direction like any good diode should, and ZD3 is just plain shot?
Block Image

这个答案有帮助吗?

得分 0
添加一条评论

i ended up cutting a small slit in the housing just at the bottom of the control panel, and i got it out. my CE201 stopped brewing due to some failure in the control assembly, so i simply subverted the control panel all together. now , its a good ole dumb coffee maker, with no clock, or delay , etc. i plug it in, & it brews coffee perfectly. once its done brewing, i unplug it. ive tested it, no ground faults, no issues, other than needing to plug it in & unplug it. i could fix up a switch, but i dont care.

Block Image

this picture is how its wired to work, sans the control module. im sick of appliances being built with weak points, which fail in a year or two, leaving us to replace the whole thing, its wasteful.

这个答案有帮助吗?

得分 0

2条评论:

I agree. This was probably the shortest-lived appliance I've had, and despite many grand reviews by product testers of all sorts, it may be the one and only Ninja I'll ever own. I gave up on it over the Holidays and it's still tying up my workbench. I want to desolder and properly test the Zener diodes others here have suggested. If they test bad I may try finding replacements, but if good I might go the route of a new display as linked to by IT Guy; I didn't catch a notification of his March 4th post, so this is the first I've read it. Who knows if I'll be able to remember how the darned thing goes back together ); .

完成的

@hafcanadian i found several ebay listings for just the base unit, selling right around $20 or so (food for thought), as well as a sellers offering just the control panel for CE2xx models. i have the CE201, which has brewed atleast 1-2 pots of coffee every single day , without a break for nearly 4yrs now. its been a great coffee machine. what i dont like is the cheapo, 20cent PCB/components. my clock also failed. the hands down worst part of ninja is their support, it is the worst ive ever encountered. you ask them for help, & their response is 'whats your phone number, whats your address', 'whats your mothers maiden name'. their support is entirely a data gathering tool. they refuse to speak with you unless you tell them information that isnt required for trouble shooting. Also, if you follow the wiring in the picture i posted above, you can use the coffee maker if the control panel is all thats broken, you just need to remember that when you plug it in, the water pump & hot plate will run until its unplugged. oh & remember to replace the thermal interface material betwen the heater coil & the heater surface plate. mine was super dried out anyway, but once you break that bond, its not as efficient without replacing.

完成的

添加一条评论

添加你的答案

Hafcanadian 将永远感激不已
浏览统计数据:

过去 24 小时: 3

过去 7 天: 11

过去 30 天: 55

总计 539