跳转到主内容

此翻译可能不反映源指南的最新更新。 帮助更新翻译查看源指南

iPhone 5c 电池更换

你所需要的

视频概述

  1. iPhone 5c 电池更换, 粘贴显示屏玻璃: 步骤 1 中的图像 1,3 iPhone 5c 电池更换, 粘贴显示屏玻璃: 步骤 1 中的图像 2,3 iPhone 5c 电池更换, 粘贴显示屏玻璃: 步骤 1 中的图像 3,3
    • 如果屏幕的盖板碎裂并且有玻璃的碎屑,为了保护自己请用胶带把玻璃碎屑贴住。

    • 用胶布贴住整块屏幕以固定住玻璃碎屑。

    • 这样当你撬起和取下屏幕时保护玻璃面板和屏幕支架。

    • 当你进行维修时请戴好防护眼镜保护眼睛,以避免玻璃碎屑飞溅。

  2. iPhone 5c 电池更换, 移除底部螺丝: 步骤 2 中的图像 1,1
    • 在开始之前,将手机电池电量放电至25%及以下。如果不小心捅破的话,过多电量的锂电池会起火或者爆炸。

    • 在拆解之前将手机关机。

    • 拧掉 2 颗在 Lightning 接口两侧的 3.8mm P2防撬螺丝

  3. iPhone 5c 电池更换, 使用iSclack 起屏器打开屏幕: 步骤 3 中的图像 1,3 iPhone 5c 电池更换, 使用iSclack 起屏器打开屏幕: 步骤 3 中的图像 2,3 iPhone 5c 电池更换, 使用iSclack 起屏器打开屏幕: 步骤 3 中的图像 3,3
    • 接下来两步是展示如何使用iSclack起屏器打开iPhone 5c的屏幕,也可以用于其他任何手机。如果你没使用iSclack起屏器,请跳到步骤5。

    • 合拢iSclack的手柄,打开吸盘口。

    • 把手机底部放入吸盘口,并抵在塑料深度计上。

    • 上方的吸盘口不要覆盖在Home键上。

    • 打开iSclack的手柄合拢吸盘口。按压手柄使得吸盘口贴合在手机表面和底部中线上。

  4. iPhone 5c 电池更换, 完成iSclack开屏步骤: 步骤 4 中的图像 1,2 iPhone 5c 电池更换, 完成iSclack开屏步骤: 步骤 4 中的图像 2,2
    • 握好机器合拢iSclack手柄分离吸盘口,把屏幕从后盖上拉开。

    • iSclack致力于安全的打开iPhone,仅仅是完全分离部件而不会损坏排线。

    • 取下iPhone上的两个吸盘。

    • 可以跳过接下来的3步从第8步开始。

  5. iPhone 5c 电池更换, 手工开屏方法: 步骤 5 中的图像 1,1
    • 把吸盘贴合在屏幕上,Home键的正前方。

    • 确保吸盘口紧密的贴合在屏幕上。

  6. iPhone 5c 电池更换, 抬起显示屏: 步骤 6 中的图像 1,2 iPhone 5c 电池更换, 抬起显示屏: 步骤 6 中的图像 2,2
    • 确定吸盘牢固的贴合在前置面板上。

    • 一只手用撬棒下压机器,另一只手轻轻的拉起吸盘使前置面板从后盖上分离出来。

    • 慢慢的使匀力稳当的拉起吸盘。比起大多数部件来说屏幕是装配得最紧的。

    • 当你拉起吸盘时,使用塑料撬棒轻轻的下压后盖使屏幕与机身分离。

    • 有好几个卡扣在前置面板和后盖之间,所以需要组合使用吸盘和塑料撬棒使屏幕与机身分离。

  7. iPhone 5c 电池更换: 步骤 7 中的图像 1,1
    • 拉起小点释放吸盘的真空密闭空间。

    • 从屏幕上取下吸盘。

  8. iPhone 5c 电池更换, 抬起显示屏: 步骤 8 中的图像 1,2 iPhone 5c 电池更换, 抬起显示屏: 步骤 8 中的图像 2,2
    • 打开屏幕竖起大约90°角,把屏幕竖起依靠在某些物品上。

    • 需要的话,可以使用未打开的罐装饮料支持住屏幕。

    • 用橡皮筋固定住屏幕,这样可以避免过度紧绷屏幕排线。

  9. iPhone 5c 电池更换: 步骤 9 中的图像 1,1
    • 拧掉主板上用于固定电池排线的金属屏蔽罩上的2颗1.6mm PH000号螺丝。

  10. iPhone 5c 电池更换: 步骤 10 中的图像 1,1
    • 取下电池排线的金属屏蔽罩。

  11. iPhone 5c 电池更换, 断开电池排线: 步骤 11 中的图像 1,1
    • 用撬棒或干净的手指甲挑开主板上的电池排线。

    • 请小心!仅将排线插头挑起即可,不要挑起插座。如果您挑起了主板上的插座,可能会导致插座和周围元件的损坏

  12. iPhone 5c 电池更换: 步骤 12 中的图像 1,1
    • 拧掉主板上固定前置面板排线金属屏蔽罩上十字PH000螺丝:

    • 2颗1.3mm的螺丝

    • 1颗1.7mm的螺丝

    • 1颗3.25mm的螺丝

    • 记住这些螺丝的位置是很重要的。在恢复的时候 错误的把3.25mm螺丝或者1.7mm螺丝拧在右下角会对主板造成不可修复的损伤或使得iPhone无法开机。

    • 螺丝不要拧太紧。如果拧紧螺丝时很困难可能是使用了错误规格的螺丝刀,请不要使用蛮力。

  13. iPhone 5c 电池更换: 步骤 13 中的图像 1,1
    • 从主板上取下固定前置面板排线的金属屏蔽罩。

  14. iPhone 5c 电池更换, 断开显示屏排线: 步骤 14 中的图像 1,2 iPhone 5c 电池更换, 断开显示屏排线: 步骤 14 中的图像 2,2
    • 用撬棒或干净的手指甲挑开前置摄像头排线和感应器排线。

    • 请小心!仅将排线插头挑起即可,不要挑起插座。如果您挑起了主板上的插座,可能会导致插座和周围元件的损坏

  15. iPhone 5c 电池更换: 步骤 15 中的图像 1,3 iPhone 5c 电池更换: 步骤 15 中的图像 2,3 iPhone 5c 电池更换: 步骤 15 中的图像 3,3
    • 在您进行本步骤操作需要连接或者断开线缆时请确保电池保持在断开的状态。

    • 用撬棒或干净的手指甲来断开LCD线缆链接头。

    • 显示排线和触摸排线是联在一起的,所以必须同时挑开2根排线。在取下屏幕前请再次检查2根排线是否都已经挑开。

    • 当重装机器时,显示排线可能会跑偏扣在座子上。白屏或者有条纹就是因为排线没扣好。如果出现这样的情况,重新扣排线和重启iPhone即可。最好的办法是,重置电池:挑开电池排线然后再扣上即可。

  16. iPhone 5c 电池更换, 将显示屏和后盖分离: 步骤 16 中的图像 1,1
    • 从后盖上取下显示屏。

  17. iPhone 5c 电池更换, 电池: 步骤 17 中的图像 1,3 iPhone 5c 电池更换, 电池: 步骤 17 中的图像 2,3 iPhone 5c 电池更换, 电池: 步骤 17 中的图像 3,3
    • 在电池和耳机插孔之间滑动撬棒的尖端,来展开电池胶粘片。

  18. iPhone 5c 电池更换: 步骤 18 中的图像 1,1
    • 将 电池胶带把手从手机中拉出。

  19. iPhone 5c 电池更换: 步骤 19 中的图像 1,2 iPhone 5c 电池更换: 步骤 19 中的图像 2,2
    • 切割两个白色胶带之间的黑色电池粘合片,将它们分开。

  20. iPhone 5c 电池更换: 步骤 20 中的图像 1,2 iPhone 5c 电池更换: 步骤 20 中的图像 2,2
    • 尝试在此过程中保持胶带条状平整和不皱; 皱纹条将粘在一起,破坏未拉出的胶带导致无法干净利落地拉出来。

    • 慢慢地将一块电池胶带从电池中拉出,朝向iPhone的底部。

    • 稳定地拉动,保持条带上的张力不变,因为它从电池和后壳体之间滑出。 为了获得最佳效果,请在60º角度或更小的角度拉条。

    • 小心地将胶带拉向电池的一侧。 注意不要被任何iPhone内部组件挂住。

    • 该条将延伸到其原始长度的许多倍。 如果需要,继续拉动,重新抓住电池附近的胶带,直到整个胶带完全脱离。

  21. iPhone 5c 电池更换: 步骤 21 中的图像 1,2 iPhone 5c 电池更换: 步骤 21 中的图像 2,2
    • 第二条胶带,重复上述步骤

  22. iPhone 5c 电池更换: 步骤 22 中的图像 1,1
    • 将电池从手机中移出

    • 如果一个或两个粘合带撕裂,并且您无法用镊子找到,请勿将电池从手机中撬出。 继续下一步安全取出电池。

  23. iPhone 5c 电池更换, 清除潜伏的粘合剂: 步骤 23 中的图像 1,1
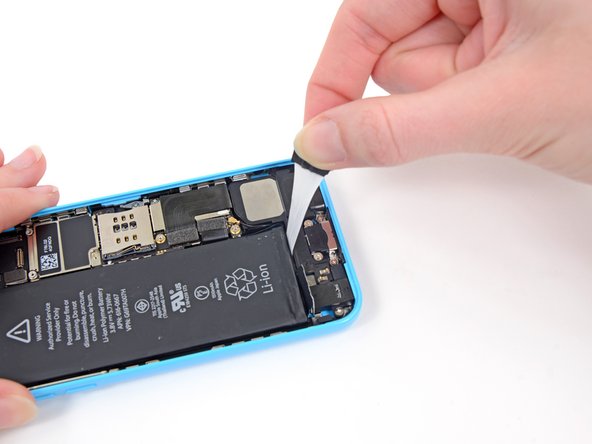
    • 根据我们的iOpener加热指导或吹风机来加热将电池粘在后壳上的粘胶。

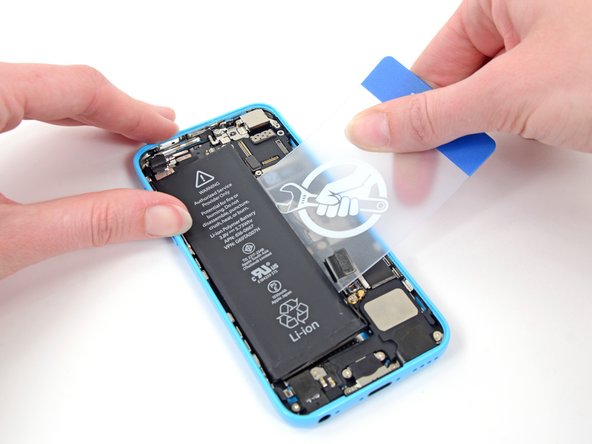
    • 将iOpener平放在iPhone背面的相机右侧。 让它平滑贴合于手机后壳,以便iPhone和iOpener之间有良好的接触。

    • 让iOpener在iPhone上放置大约90秒,然后再尝试取出电池。

    • 如果使用吹风机或加热风枪,将手机背部加热到微烫的程度。

    • 不要直接加热电池。

  24. iPhone 5c 电池更换: 步骤 24 中的图像 1,2 iPhone 5c 电池更换: 步骤 24 中的图像 2,2
    • 小心的在主板附近的电池下方楔一个塑料卡片。

    • 不要在主板对向撬开,否则可能会损坏手机。

    • 避免在电池顶部附近撬动,否则可能会损坏上部带状电缆组件

    • 将卡从电池顶部滑到底部,朝向外壳的边缘推。

    • 如果仍然有问题,请在电池下面涂上一些异丙醇(90%或更高),让它在粘合剂周围流动,以帮助减弱它。高浓度异丙醇充当溶剂并干燥而不留任何残留物,因此不会伤害你的 iPhone。

    • 如有必要,请重复动作在外壳侧的电池。

  25. iPhone 5c 电池更换: 步骤 25 中的图像 1,1
    • 从iPhone上提起并取出电池。

    • 该没有阻力。 如果电池仍然卡住,请重新加热iOpener并再次撬动。

    • 如果你的替换电池有塑料纸,在安装之前请从排线处撕除。

    • 安装电池时,请参阅本指南来更换电池的胶带。

    • 重新组装后执行强制重新启动。 这可以防止几个问题并简化故障排除。

结论

要重新组装您的设备,请按照本指南的相反顺序进行操作。为了获得最佳性能,请对新安装的电池进行校准:将电池使用到10%以下,然后不间断充电至100%。

如要组装的话, 请按逆序操作一下步骤。

将你的电子废料带到R2 或者 e-Stewards 认证的回收商

维修不像计划中一样进行?查阅问题解答论坛来排查错误。

494等其他人完成本指南。

由衷感谢以下译者:

en zh

64%

这些译者帮助我们修补全世界! 您也想加入吗?
开始翻译 ›

49条评论

I am disappointed with the guide - not up to iFixit's usual standards. I got the iPhone open and the battery out just fine, but there were *three* missing hints that would have cut a half-hour from my re-assembly:

1) The connector cover has three short screws and one long one. The video doesn't show which is the long one, so I had to farble around to get the screws back. (The long one is the top-right one, near the hinge on the right side of the phone)

2) There are no hints on the video or in the box about putting the adhesive strips back in. I was trying to get the tab to fold over, but got all wrapped up in the strips. It took a lot of time to fix it, and I still don't know if it's important to fold the tab over or not.

3) There is no information about whether to retain the clear cellophane wrapper that comes on the battery. I took it off - hope that's right.

That said, all the tools were included in the kit, they work as advertised. And the phone's back together, and we'll see how it works...

richbhanover - 回复

In reference to your #1 point, this is very good example of why a SCREW-MAT or iCracked Part Chart come in very handy!

Especially in repairs like the 5s ... some screws look the same, but are .01" different ... enough to scratch/break the trace underneath on the logic board .... adding another $100 (and a week travel time by mail, if you cannot do the repair yourself), to your repair - to have it micro-soldered.

With Screw-Mats or iCracked Part Charts, every screw is placed on it's corresponding marker, so you know exactly which screw is which.

If you are in a pinch, and do not have a Screw Mat, you can draw little diagrams on a piece of paper or a dry erase surface, and mark out where each and every screw goes, as sometimes there is that .01" difference in screw sizes, that can really screw up (no pun intended) your repair.

Cheers!

iBroke -

They did mention the screw size in the guide here by color coding the MM. I agree with point two, but that's nitpicking. Lastly (the reason I commented), you did it right. The plastic should be removed so it is just like the orig battery, if you would leave the cellophane on, the adhesive would be stuck to it instead of the battery and making for a poorly secured battery.

Overall, the parts and kit were good, but this phone is not my favorite iPhone to work on. Getting that old battery out was extremely annoying compared to the 4, 4s, 5, and 5s that I've all done in the past.

On a side note, this is the first ifixit branded battery I've received and I've ordered a lot of parts from them over the years. They used to source what looked line 100% orig batteries. I avoid non original batteries like the plague, I don't care if it's a phone, laptop, or even my APC UPS devices. Ifixit has earned my trust over the years with all the parts and tools so I went ahead and installed it, I'm sure it's good.

trssho91 - 回复

Apple doesn’t sell original batteries to outsiders.

If you are buying an Apple-branded battery, it’s either a fake or used.

toni -

添加评论

浏览统计数据:

过去 24 小时: 16

过去 7 天: 122

过去 30 天: 446

总计 359,409