简介
这是本周三个iPod拆卸之一:我们同样拆掉了新的iPod Touch和iPod Shuffle。 在我们的推特on twitter上留意我们最新的拆解。
如果你错过了,上周我们庆祝了一个重要的里程碑式的事件。 除了能够进行Apple产品的拆解,我们现在还有parts和大多数游戏机的维修手册! 我们决定通过时间旅行,分开五个复古控制台主题庆祝。
打点“不要脸”的广告:我们通过销售iPod Nano Parts来维持我们的拆卸工作! 我们还为每个iPod Nano 这一个提供免费的开源维修手册,我们正在为此努力工作。
你所需要的
-
-
我们终于有了迎来的多点触控的iPod Nano!
-
闪亮的新iPod Nano今天早上躺在我们家门口,我们迫不及待地看到里面有什么。
-
不像我们昨天拆解的第四代iPod Shuffle,iPod Nano有一个更适当大小的运输箱。
-
型号:A1366
-
-
-
当iPod Nano遇见了iPod Nano。
-
尽管与其上一代保持相同的价格(8GB和16GB机型分别为149美元和179美元),但新iPod Nano是笔一揽子交易。
-
点按式转盘,相机和视频播放的日子已经过去了。
-
现在是多点触摸屏幕的时代了!iPod Nano还具有音量控制按钮和睡眠/唤醒按钮。
-
还有一些小的形状改变。
-
第五代iPod Nano尺寸为3.6“x 1.5”x 0.24“(90.7 毫米 x 38.7 毫米 x 6.2 毫米),重1.28盎司(36.4 克)。
-
第六代纳米尺寸为1.48“x 1.61”x 0.35“(37.5 毫米 x 40.9 毫米 x 8.78 毫米),重0.74盎司(21.1 克)。
-
-
-
新的iPod Nano更像是一个带有屏幕的iPod Shuffle,而不是一个具有多点触摸的iPod Nano。 iPod的外壳设计非常类似于我们昨天拆掉的iPod Shuffle。
-
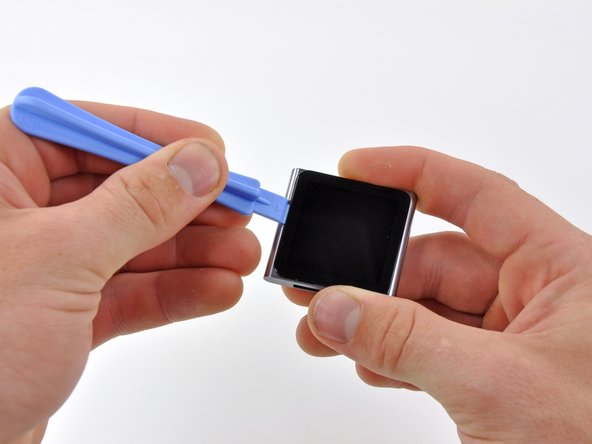
由于没有可见的螺丝,我们的第一个倾向是加热。
-
我们可爱的热风枪设法松开将显示器固定到位的胶水。
-
使用围绕周边的iPod Nano打开工具进行温柔的撬动,使我们能够将显示器与设备的其余部分分开。
After I done it, the headphone jack broke over the conector near thehold button. The screen turns on but the multitouch isnt responding. Any ideas? Its very urgent! Plzzzzzz!!!
Thats exactly what I used. A Hair dryer. But BE WARNED, in no way it will go back to what it looked like before you took it apart. Mine separated again after some months... it's just not designed to be opened by users.
-
-
-
显示屏仍然用带状电缆悬挂在侧面,我们信赖的#00十字螺丝刀很轻易的拆下了将EMI屏蔽件固定到iPod Nano的两个螺丝。
-
Nano的内部看起来与新的iPod Shuffle非常相似; 一个微小的逻辑板和电池分别占据了空间的一半。
I open the iPod but yanked it the screen out but the silver thing did not come out and still inn the device what do I do?
-
-
-
-
断掉数字转换器和显示屏数据排线后显示屏就可以被拆下了。
-
1.54英寸的液晶屏幕配备了多点触控,虽然一个人如何用超过一根手指在如此小显示屏上操作是还是一个谜。
-
该液晶显示器的分辨率为240 x 240像素。 这是一个相当无聊的1:1的宽高比。 与第五代iPod Nano的2.2英寸240 x 376像素液晶显示屏相比尺寸也大幅减少。
-
像其表兄弟iPhone 4和iPod Touch一样,触摸屏,LCD和前玻璃是一体的。
-
-
-
iPod Nano的显示器组件尺寸为2.27毫米厚。 这甚至比新的iPod Touch的3.05 mm和iPhone 4显示器上的2.93 mm显示屏更薄。
-
Nano拥有220像素每英寸(PPI)屏幕,是除了iPhone 4 和第四代iPod Touch 之外像素密度最高的苹果设备,几乎是iPad 132PPI的两倍!
-
-
-
耳机插孔,音量按钮和睡眠/唤醒按钮都位于iPod Nano内蛇形的带状电缆上。
-
像第五代iPod Nano那样,新的iPod Nano将耳机用作FM收音机天线。 任何耳机都将用作天线。
-
在外壳上添加进行基于硬件的音量控制是iPod Nano的一个新的,也很方便的功能增加。
Hello,
On the headphone audio cable, there is a small black "bubble" with small metal part near the white hole to fix the jack to the ipod case.
Do you think this small bubble can be a fuse ?
I've replace the cable with success, power and volume works, but have sound only on the right earphone. After some try, i have no more sound !
I've made some test with a multimeter to check continuity from the 4 jack pin to the motherboard connector and it's seems that there is no connection. I have done the same test on the old cable, and i found continuity for all pin (groud, mic, left and right)
Any ideas ?
There is no fuse in the headphone. I checked with a meter after my unit had sound from only one side, like yours. Apple did not want to repair it and offered a ten percent off on the 7th Gen model instead. I opened mine with a hair dryer and carefully inspected the headphone socket for damage with a circuit tester, no joy. I ordered a headphone part from eBay and replaced it carefully. No joy either, it still only has sound from one side. It's a paperweight now. I'll never get another Apple player. There are many others to choose from now.
-
-
-
让我们感兴趣的芯片:
-
东芝 TH58NVG6E2FLA4C 8GB NAND
-
苹果 33850859 C0E111022
-
Dialog D1830B(Apple 338S0783-B1 10298HLS)电源管理芯片
-
FM接收芯片 0650 D0UY 027
-
苹果 339S0104 YGC7 1031 K4X51323P1 YRF 020A3 ARM N2HXHZMP 4 1031
-
35758907 1025 A 04 629749
According to this teardown, the iPod Nano has a chip labeled: Apple 33850859. Is this the D/A conversion chip? Does it handle audio output?
According to the iPod touch 4th generation teardown: "On the far left is a 338S0859 chip. It's similar to the Cirrus Logic audio codec of the iPhone 4 (338S0589)."
Are these two chips (Nano and touch) identical even though one seems to have an S instead of a 5?
-


13条评论
I needed to perform this teardown in order to fix a volume button. It seems now that the hold button is non-functioning. Any ideas??
Karen Mann - 回复
the guide is not detailed. I damaged my headphone jack wiring while removing the board. Be careful, below the board, lies wires. While taking out board, i broke those. Its dead officially now. :(
Hi there! A teardown is meant for entertainment purposes only, it is not a guide to be followed! Be sure to read all warnings, like this one: "This teardown is not a repair guide. To repair your iPod Nano 6th Generation, use our service manual."
Why is there not a guide for replacing the battery? I understand that it involves some soldering, but surely it can still be done with a certain level of beginners skill.
This is a teardown, a fun look at the interior, not a repair guide. You can follow our logic board assembly guide to remove the logic board and battery, and with some fairly simple soldering, you can swap the battery.
when I open it!! the screen using two cables!! and one of these, come out of screen, and I realise I lose the touch!! there is any king of way to fix that problem? can I fix the cable on the screen again?
SCREEN REMOVAL
When handling the screenIe ie. folding it over out of the way, be most careful not to damage the screen cable.
This cable is made up of two pieces, the smaller of which is extremely delicate and is easily broken. GO SLOW AND CAREFULLY.
Apple came up with a poor design . The small cable should have been made much more robust.
BATTERY REPLACEMENT.
The two battery terminals are soldered to the motherboard. To disconnect the battery, the terminals at the motherboard can be heated up with a soldering iron but this must be done most delicately otherwise the red wire connection will be ruined and it will not be possible to connect the new battery terminal to the motherboard.
The red and black wires need to be carefully folded between the motherboard and the battery.
Apple came up with a poor design by using soldered wires rather than a cable type connection for the battery connection.
Sadly the charging port of my beloved 6th gen Nano has ceased connecting, for either charging or syncing. It looks like I’d have to replace the whole motherboard to get it to work again, which would probably cost as much as replacing it. Great write up, though. Thanks!
Matt Jones - 回复
Where I can buy batteries for the nano 6th generation
The iPod Nano(at least the first gen that I have) has THREE battery contacts on the logic board,and the battery itself has THREE wires: a red one, a blue one and a white one
And yes. I still have a 1st gen iPod nano
Perfect instructional