跳转到主内容

你所需要的

这个拆解是不是维修指南。 要维修你的的Waka Waka Power Plus,请使用我们的维修手册

  1. Waka Waka Power Plus Teardown, Unboxing: 步骤 1 中的图像 1,3 Waka Waka Power Plus Teardown, Unboxing: 步骤 1 中的图像 2,3 Waka Waka Power Plus Teardown, Unboxing: 步骤 1 中的图像 3,3
    • It's not just a box, it's also a use guide.

  2. Waka Waka Power Plus Teardown, Undo the screws: 步骤 2 中的图像 1,3 Waka Waka Power Plus Teardown, Undo the screws: 步骤 2 中的图像 2,3 Waka Waka Power Plus Teardown, Undo the screws: 步骤 2 中的图像 3,3
    • The Phillips screws are hidden underneath silicone covers.

  3. Waka Waka Power Plus Teardown, Pry it open and remove the front cover: 步骤 3 中的图像 1,2 Waka Waka Power Plus Teardown, Pry it open and remove the front cover: 步骤 3 中的图像 2,2
    • The cover is a pain to get open. The amount of force needed is quite high.

    • The hinges are spring loaded. They tend to fly away when tension is relieved.

  4. Waka Waka Power Plus Teardown, Remove the flip cover: 步骤 4 中的图像 1,2 Waka Waka Power Plus Teardown, Remove the flip cover: 步骤 4 中的图像 2,2
    • As said in the previous step, the springs tend to fly away!

  5. Waka Waka Power Plus Teardown, Remove the light conductor: 步骤 5 中的图像 1,1
    • This can simply be pulled out once the covers are removed.

  6. Waka Waka Power Plus Teardown, Pry out the button: 步骤 6 中的图像 1,3 Waka Waka Power Plus Teardown, Pry out the button: 步骤 6 中的图像 2,3 Waka Waka Power Plus Teardown, Pry out the button: 步骤 6 中的图像 3,3
    • A screwdriver may not be the ideal tool for this job, a less sharp object might be better to avoid damage to the silicone.

  7. Waka Waka Power Plus Teardown, Remove the lenses: 步骤 7 中的图像 1,1
    • Use the flat side of the screwdriver to avoid damage to the lens.

  8. Waka Waka Power Plus Teardown, Remove the hinges: 步骤 8 中的图像 1,2 Waka Waka Power Plus Teardown, Remove the hinges: 步骤 8 中的图像 2,2
    • You will stab yourself with the screwdriver while doing this.

    • The white parts of the hinges will very happily fly away and get lost.

  9. Waka Waka Power Plus Teardown, Remove the battery: 步骤 9 中的图像 1,3 Waka Waka Power Plus Teardown, Remove the battery: 步骤 9 中的图像 2,3 Waka Waka Power Plus Teardown, Remove the battery: 步骤 9 中的图像 3,3
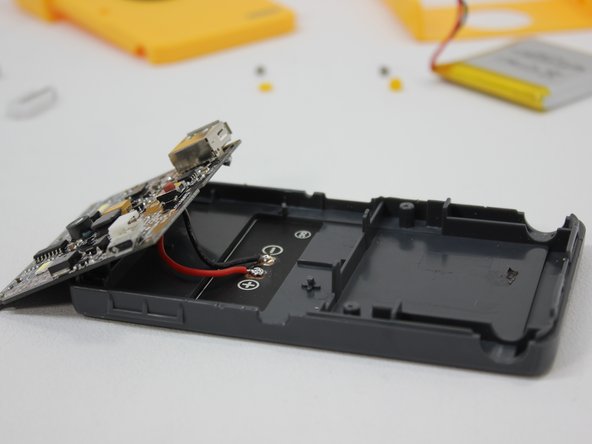
    • Pull out the connector, be careful and only pull the connector and not the wires to avoid damaging them in the process.

    • The battery is fixed in place with double sided tape. Make sure not to bend and damage the battery when taking it out.

    • Text on the battery:

    • Grand-Pro

    • - PL805050 3.7V 8.14Wh

    • GB-GP004 UN38.3 2200mAh

    • + 11-22-2014-11265

  10. Waka Waka Power Plus Teardown, Remove the PCB: 步骤 10 中的图像 1,3 Waka Waka Power Plus Teardown, Remove the PCB: 步骤 10 中的图像 2,3 Waka Waka Power Plus Teardown, Remove the PCB: 步骤 10 中的图像 3,3
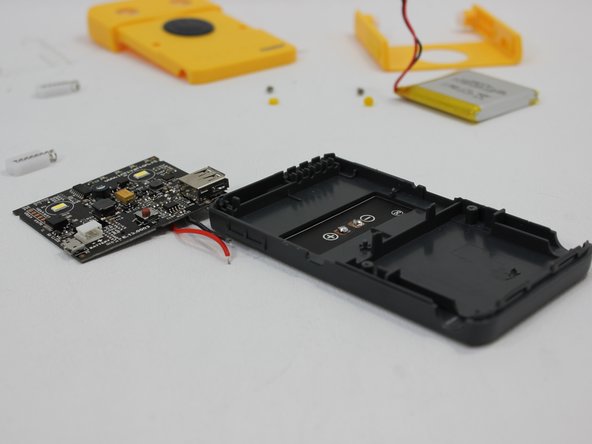
    • There are two plastic pins holding the PCB in place. You will have to break them.

    • Undo the connection between the PCB and the solar panel with a soldering iron. Do not pull the cables out, this may result in severe damage to the cables or PCB.

    • Top tip: for one time at least, you can redo the plastic pins holding the PCB by pressing a semi-hot soldering iron on the plastic.

  11. Waka Waka Power Plus Teardown, PCBA: 步骤 11 中的图像 1,2 Waka Waka Power Plus Teardown, PCBA: 步骤 11 中的图像 2,2
    • Most important silicon:

    • Texas instruments LM358 Dual opamp

    • Fairchild Semiconductors MJD210 PNP Transistor

    • NXP 74HC595 8Bit shift register

    • Intivation SNBST3 MPPT Solar charger with integrated MCU (heart of the Waka Waka)

    • Dsunsolar High efficiency PET film solar panel. Custom made for Intivation.

  12. Waka Waka Power Plus Teardown, Pry out the solar panel: 步骤 12 中的图像 1,2 Waka Waka Power Plus Teardown, Pry out the solar panel: 步骤 12 中的图像 2,2
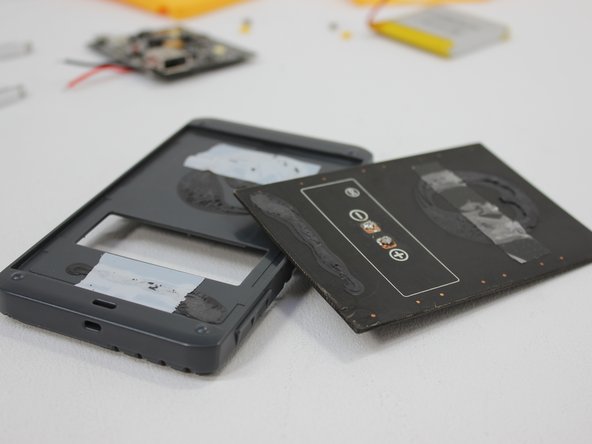
    • Use a flat object like a bank card to avoid bending the solar panel.

    • This Waka Waka has been opened up previously to this teardown. Since the solar panel was originally glued in place, the solar panel was re-attached using double sided tape. When putting your Waka Waka back together, you could either choose glue or double sided tape. Both work fine.

Harm

于02/09/15注册

152 声望

创作了3篇指南

一条评论

Hallo Harm. Geweldig om je documentatie te vinden.

Per abuis de scharnierende klepstandaard los getrokken. Maar het lukt me niet om die weer terug te duwen.Puzzle. Uitsparingen moeten in elkaar vallen? Zou het liefst natuurlijk de boel niet demonteren.

Gebruik m ook op m'n racefiets .

Graag advies.

Groeten Karel

Karel Slot - 回复

添加评论

浏览统计数据:

过去 24 小时: 0

过去 7 天: 0

过去 30 天: 8

总计 3,010