跳转到主内容

你所需要的

这个拆解是不是维修指南。 要维修你的的Super Nintendo Entertainment System Controller,请使用我们的维修手册

  1. Super Nintendo Entertainment System Controller Teardown, Super Nintendo Entertainment System Controller Teardown: 步骤 1 中的图像 1,1
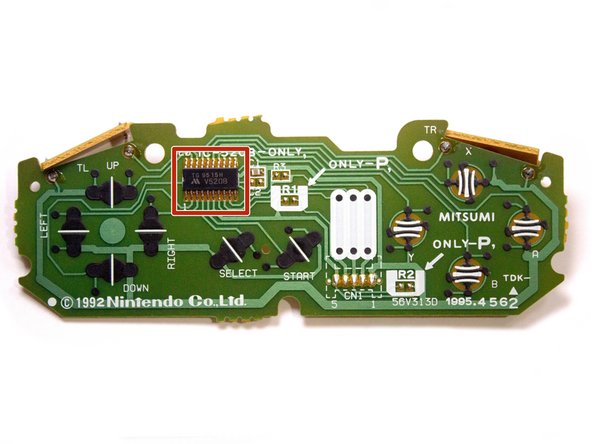
    • It's your classic Super Nintendo controller.

    • Notably, it's a wired controller (same as most of the controllers of the era), and has a very simple layout.

    • The design is often called a "dogbone", due to the shape of the lower part.

  2. Super Nintendo Entertainment System Controller Teardown: 步骤 2 中的图像 1,1
    • Nintendo, unlike the Control Deck counterpart, did not use custom screws in the controller, therefore it's very easy to open and clean.

    • We remove the 5 Phillips screws on the back of the controller.

  3. Super Nintendo Entertainment System Controller Teardown: 步骤 3 中的图像 1,2 Super Nintendo Entertainment System Controller Teardown: 步骤 3 中的图像 2,2
    • Open... the... controller.

  4. Super Nintendo Entertainment System Controller Teardown: 步骤 4 中的图像 1,3 Super Nintendo Entertainment System Controller Teardown: 步骤 4 中的图像 2,3 Super Nintendo Entertainment System Controller Teardown: 步骤 4 中的图像 3,3
    • There are two metal rods that we have to take care of before removing the rest, otherwise they might get lost.

    • We remove the two shoulder buttons.

  5. Super Nintendo Entertainment System Controller Teardown: 步骤 5 中的图像 1,3 Super Nintendo Entertainment System Controller Teardown: 步骤 5 中的图像 2,3 Super Nintendo Entertainment System Controller Teardown: 步骤 5 中的图像 3,3
    • Now we can get onto the board! We first remove the cable from the slack poles.

    • After that, it's only a matter of lifting the board out.

  6. Super Nintendo Entertainment System Controller Teardown: 步骤 6 中的图像 1,3 Super Nintendo Entertainment System Controller Teardown: 步骤 6 中的图像 2,3 Super Nintendo Entertainment System Controller Teardown: 步骤 6 中的图像 3,3
    • Onto the rubber pads that represent the buttons, we'll have to remove those too.

    • Many of these older controllers might have delicate rubber pads, they should be handled carefully.

  7. Super Nintendo Entertainment System Controller Teardown: 步骤 7 中的图像 1,3 Super Nintendo Entertainment System Controller Teardown: 步骤 7 中的图像 2,3 Super Nintendo Entertainment System Controller Teardown: 步骤 7 中的图像 3,3
    • Inching closer, we get to the shoulder button's rubber pads.

    • We can finally remove the remaining plastic buttons from the D-Pad and face button areas.

  8. Super Nintendo Entertainment System Controller Teardown: 步骤 8 中的图像 1,3 Super Nintendo Entertainment System Controller Teardown: 步骤 8 中的图像 2,3 Super Nintendo Entertainment System Controller Teardown: 步骤 8 中的图像 3,3
    • The board itself has the controller cable attached, we can remove that too.

    • Not all controllers have a removable cable. Some models, such as the SNS-102, have soldered-on cables.

    • We make sure to pull away from the connector, and not up! It might be a little difficult depending on how long it's been attached.

  9. Super Nintendo Entertainment System Controller Teardown: 步骤 9 中的图像 1,3 Super Nintendo Entertainment System Controller Teardown: 步骤 9 中的图像 2,3 Super Nintendo Entertainment System Controller Teardown: 步骤 9 中的图像 3,3
    • The SNES Controller board features a number of pads as well as a chip.

    • The chip on the board is a 12-bit shift register, used to multiplex all the button signals on the controller into a more budget-friendly connector.

  10. Super Nintendo Entertainment System Controller Teardown: 步骤 10 中的图像 1,1
    • Finally, we can see all the innards that make this little controller work.

    • Maybe we should play a few rounds of Super Mario World...

Foxlet

于05/17/10注册

601 声望

创作了3篇指南

2条评论

What is the repair ability score ?

logan - 回复

what size screws are used?

Elizabeth Ziriada - 回复

添加评论

浏览统计数据:

过去 24 小时: 7

过去 7 天: 37

过去 30 天: 225

总计 12,780