简介
Zögere nicht, mich bei Fragen zu kontaktieren!
你所需要的
-
-
Drehe die Schraube an der Seite des Handgriffs heraus.
-
-
-
Mache Notizen darüber, welche Schraube wo ist. Oder benutze eine Magnetmatte.
-
Entferne die obere Schraube im weißen Plastikteil.
-
-
-
-
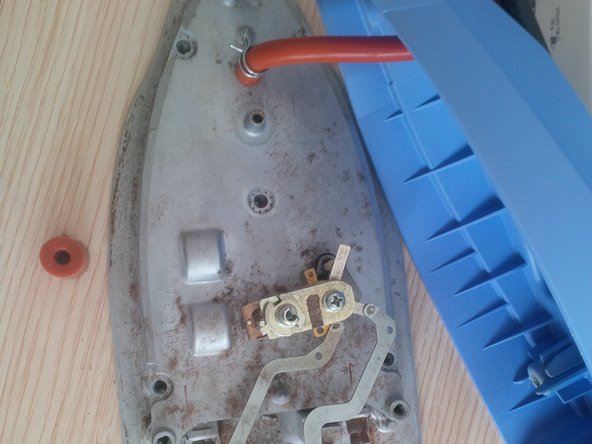
Unter der Metallplatte siehst du zwei Schläuche.
-
Ziehe die Plastikhalterung mit den beiden Schläuchen heraus.
-
Entferne die Halterung von den Schläuchen.
-
Merke dir, wo der rote und wo der schwarze Schlauch aufgesteckt ist.
I have a Phillis GC8210 Steam generator and the Tank is leaking water. The tank has two holes that fit on to the plastic plate with the two nipples shown in step 12. One of the holes in the tank has a rubber washer in it but the other doesn’t I wondered if it was mising and if that could be the reason for the leak?
Regards
Lisa
-
-
-
Entferne die Torx-Schrauben in den beiden Vertiefungen. Dafür benötigst du einen Schraubendreher mit langem Schaft.
-
Auf der Vorderseite der Maschine befinden sich an der Stelle mit dem Wasserreservoir zwei weitere Torx-Schrauben. Drehe sie heraus. (Davon kein Foto, aber die Schrauben sind gut sichtbar)
-
-
-
Jetzt bauen wir die restlichen Kabel und Schläuche ab.
-
Wir werden auch dieses blaue Teil abmontieren (Dampfventil). Benutze dazu einen Gabelschlüssel.
-
Achte dabei auf den schwarzen Schlauch.
I have the same steam iron who stops steaming while in all peripheral actions works right.
After an optical control i discovered that the float in the water tank remain at the bottom
while the water level is max.
Has anyone any idea what is wrong in order to fix the problem.
Thank you in avance
Nickos
-
-
-
Hier das letzte Teil: der Boiler. (Das teuerste Teil der ganzen Maschine, in Belgien, wo die Anleitung entstand, kostet es 83 Euro)
-
Sei bei den letzten Kabeln besonders sorgfältig. Einige (und der dicke schwarze Schlauch) sind recht schwierig zu lösen.
-
Um den Boiler zu entkalken musst du ihn mit geeignetem Entkalker füllen und einige Zeit stehen lassen.
-
Du musst beim Entkalken auch aufpassen mit einigen Anschlusskabeln, sie lassen sich nicht alle entfernen.
-


附加文件

42条评论
Thanks a lot for this, I used it as a guide to replace the soleplate and hose lead - I think I would have struggled without this very handy and well written document.
Proost!
Sean
Thanks for these instructions and clear pictures. Very helpful and excellent English.
A lot of Philips GC83xx boiler steam iron devices seem to have 'switch off' issues after about 2 years of usage. If you notice that the light around the on/off button is fading, especially when pushing the steam button, your problem might be caused by the capacitors in the power supply. Verify this by checking the power voltage (blue wire on the power board connector): it should be 24Volt dc. If this is significantly less, try replacing the big capacitor on the power board. But be carefull: the whole board carries 240Vac, and the capacitor should only be replaced by a certified safety capacitor (X2 type) with the same operating voltage and capacity.
thanks for the info
dank u voor de info :)
a lot of common problems with the machine is the brown dirty water.
to solve this , uncalc the machine and you can try to follow the steps in the link below.
Kevin D -
Hi there, by big capacitors do you mean the 2 x 47 micro Farhad 35v 125degree Celcius capacitors? I tried changing these but iron still switches off.
Thanks Paul,
We had the same issue. I replaced the X2 capacitor by 3 capacitors each 220µf (so 660 instead of 680 ) but works fine now!
by the way, the 220µf 275V I got from a bubble bath control unit :-)
Regards
Step 21: steam valve....
Philips is always a nightmare to open up...thx for the clear explanation!
I have a BC8460 unit. It has been working very well for the past two years but now we have some issues. I have taken apart the boiler unit and I have tested separately the pump, it works, the electrovalve, it works, but when it's reconnected it does the following:
1) the water does not go into the boiler but instead back into the tank. I thought that maybe the problem was the electrovalve not opening and so the pump could not push the water into the boiler, as I tried blowing into the boiler, and it's impossible unless the electovalve opens it. But as I said, I tested the EV and it works fine
2) I manually poured water into the boiler, and it powers up ok and it brings the water temperature up to steam, now when I depress the steam button on the iron itself, some steam will come out and then immediately it stops and it starts flashing to signal to wait for cold water to be pumped into the boiler and to be ready.
When I do press the steam button on the iron itself, the light on the boiler control knob fades.
Same problem that reports Michael but with the GC9245.
hello,
i have a problem with the GC 8560 , works, but makes a "clicking noise, at the same time (frequenty, the steam varies)
was repaired under warranty but problem is back .
i suspect some components on the PCB !s.
every help is welcome
greedtings:
Eddy
Dear Eddy,
Your model is different, but if it is similar to the pictures above this may help:
After ensuring there is no problem with calc. in the valve or pump; it may be the electronics. If so and the warranty is no more helpful:
A TRIAC (Z0103 or BT13x) drives the valve(It is on the power supply board). Check if its burnt. If good; check its driving signal all the way to the control board. Also make sure the power supply is stable. It the biggest capacitor and resistor and the diodes around them. its around 20~24V and the control board's supply is 5V.
Or some related component may be at fault.(all the cap and other transistors...)
The original Philips spare boards may be hard to find but;
The components on the PCB's are familiar and can be found and replaced easily(except for the uC IC) if you find the fault. Someone with electronics education can do it.
Hope it helps
Omid
Omid -
Dear Eddy, ( if you want this text in English , please notify me)
Aan je naam te zien, antwoord ik maar direct in het Nederlands :)
Het klikkend geluid ken ik en is afkomstig ( bijna 90 procent zeker) van de stoomklep of de sturing naar de stoomklep.
volgens de handleiding : "Als de stoomtank leeg of nog niet opgewarmd is, hoort u een klikkend geluid in de
stoomtank. Dit gebeurt door het openen van de stoomklep en is totaal ongevaarlijk."
Als dit blijft duren :
Ik zou eerst ( als de machine niet meer onder garantie is) open maken en de stoompomp proberen reinigen, indien dit niet werkt : Printplaat nakijken en eventueel uitmeten.
Het kan duiden op een slechte werking van de pomp, een vuiltje in de weg of een storing ( printplaat)
Probleem is dat deze onderdelen ( printplaat) moeilijk te vinden zijn.
Als je de machine nakijkt : kijk dan ook naar sporen van corrosie.
Hoop je hier mee geholpen te hebben.
Groeten
Kevin
Dag Kevin,
Ik heb intussen de generator opengemakt
De connectoren op de printplaat zaten niet al te vast, verholpen, maar geen effect op het klikken geluid, pomp en ventiel zijn ok, het valt op dat de lichtsterkte van de leds voor de standaanduiding dipt' wanneer het stoomventiel open gaat, ik verdenk de voedingsspanni g van de print, ben er nog niet helemaal uit hoe dit werkt ! Waarschijnlijk via condensator in serie met de 230 v
Ik hou je op de hoogte
Groeten
Eddy
Dear Kevin,
Thanks for the helpful guide. I joined this website to ask you a question.
I have opened mine and successfully found the source of my problem( steam function's stopped working.. ). It is the temperature sensor below the boiler unit(by the 2 thermal fuses) that is damaged. It is an NTC thermistor that looks like a glass diode and it is connected to the control board via a connector.
These thermistors don't have a any markings, And I don't have access to any Philips rep.
I have the components available but they come in a range of values (10k ... 100k); wondering which one to use.
Could you please tell me its value? If you don't already know and have access to an opened unit, It can be measured with an Ohm meter.
These values (10k ... 100k ) are at 25 C temperature. So if it is 30+ degree C where you are; it must read a bit lower than them.
I'd really appreciate it.
Omid
Hello
I added a Pdf with a service manual, maybe you find this interesting?
can you show me a picture of the NTC Thermistor? i will try to find extra info on the thermistor.
Hello;
I've seen the manual. Unfortunately it doesn't state the value of the thermistor and I don't have another unit to open and measure it.
If you have access to one; could you kindly measure its value by an Ohm Meter? just putting the probe across it terminal or in the connector on the main PCB.
I added a replacement guide detailing it with pictures. We can publish its value for others to use too.
(I used the boiler picture from your guide if it is OK. I have linked to your guide as the main teardown guide)
Best regards
Omid -
Hello Omid,
Unfortunately i don't have mine anymore.. the iron was broken and we got another iron. So i can't measure out the thermistor ...
I was looking as well for the value of the termistor but can't find anything..
I looked at your guide, no problem using my photo's , that's why we are here on ifixit :)
Hopefully we find the right value of the thermistor. I keep looking as well.
Best regards
Hello again
I found the productnumber of a thermistor from the 8... an 9... series , but it looks like the same one.
If i look further to the specs , i found several pages ( deutsch) and US with the 10 K thermistor....
Of course i'm not 100 procent sure.. but it looks like the one you need.
EAN code : 4251309204521
Product code : 902161812
Maybe this helps ?
https://www.sparkfun.com/products/250
Hello Kevin;
Thanks for the effort. I already have a lot of them: 10k 20k 30k 100k.. since I work in electronics. I don't need to buy one and I don't have access to a Philips spare parts.
My problem is I don't know which one to use; so that the iron won't overheat and break or degrade its performance.
Omid -
Different model (GC9640) - similar problem. It has only been used for just over a year (so post warranty) and the steam stopped working. I can hear the steam being produced but pressing the steam release button does nothing. Small “click” can be heard inside the steam generator but that’s it… Any clues??
Measure the resistance of the steam valve coil. If it is infinite you need to buy a new coil. I couldn’t find one. You can get the complete valve (for GC9640) here: https://shop.euras.com/artikelsuche_ma.p... (for Germany).
For model GC9640: Thermistor is 226kOhm @ 26°C
In my case steam is produced and I only hear “click” by pressing the steam button.
John Maier - 回复
Hi Kevin
Thank you so much for the detailed instructions, really helped.
I have 2 phillips steam irons 8300 and the Perfect Care Expert. The 8300 had similar problems as many describing here. The PCE doesn't take out steam.
I disassembled the 8300,as u explained but I want to ask is there anyway to separate the two metal plates after step 10 so I can see the inside of the plates and clean better?
Hallo Ik ben zelf belg, dus kan ik het hier wel in het nederlands typen.De thermistor van mijn strijkijzer is stuk (1 van de 2) het is net iets anders dan het type dat jij net hebt getoond, in mijn strijkijzer zitten er 2 thermistros vast gevezen op het stoom drukvat. Weet jij waar je deze eventueel kan bestellen? original part?
Beste Jan,
Ik heb er geen idee van.
Mss vind je het juiste type op eleshop.nl of conrad.be of wisselstukkenmagazijn.be , ik zou alavast hier eens kijken.
Ik denk voor de originele stukken dat je het beste kans maakt bij wisselstukkenmagazijn
Groetjes
Kevin
Kevin D -
Dear Kevin,
I am new in the forum and I have found out the indications of tearing down the station .
I have a GC 8220 steam ironing station, and I have the following problem :
- Button on/off : ON, red light all around, but none of the green lights which are indicating that “no steam”, “less steam”, “medium steam” …etc. are ON-> means no steam in the boiler
- Water tank is full with water
- the anti-calc button (red light) is blinking .
I have done the anti-calc procedure as described in the “directions for use” of the steam ironing station ( mechanically shaking the station many times with a little water inside and than pouring away the water) -> some calcium rests have been seen.
But the red light bling is going on, I suppose that no water in the boiler, because ??? or the pump is not pumping, or the conections “water tank” to boiler is “closed” by calc particles.
What would be your oppinion to be done ?
Thank you,
Adrian from Germany
Red lighs indicates problems.
Check the electrolytic capacitors on the control board. These are the lower down of the righ side on the photo
http://www.howtofixit.gr/forum/attachmen...
Replace them both, 47μF/35V as well as the big blue 1mF/275V category X2.
If it still does not work, then check the relays. If you can test them with a multimeter then ok, if not replace them both. All above are cheap ~ 4 USD for all.
Hi,
How the production of steam is controled ? I man how MCU on the PCB is checking the pressure inside steam tank ?
As far as I can see there is no pressure switch .
Regards,
I think the pressure is controlled by the temperature, the higher the temperature the higher the pressure.
Jan
Where can i buy the pump?
Hi. Many thanks . I have problem with my phillips cg8220 same model. Its switching on. Green lights stat flashing and than becom steady like normal. But problem is when I press the button to get steam its not giving me anything at all. Both buttons I tried. Rest of the Iron seems OK as its getting hot.
Any idea what it could be wrong.?
Thanks in advance
Where can I find a serial number and model number inside a philips iron?
I have completed the above describe steps and de-calc’d the iron. I have put it back together now as soon as I turn the temperature dial up the iron trips the house electrics. Any advise?
Thanks
was könnte denn defekt sein wenn kein Dampf mehr funktioniert