跳转到主内容

本拆机指南正在进行中 – 定期刷新以看到更新!

  1. Panasonic Lumix GX80/85 Teardown, Panasonic Lumix GX80/85 Teardown: 步骤 1 中的图像 1,3 Panasonic Lumix GX80/85 Teardown, Panasonic Lumix GX80/85 Teardown: 步骤 1 中的图像 2,3 Panasonic Lumix GX80/85 Teardown, Panasonic Lumix GX80/85 Teardown: 步骤 1 中的图像 3,3
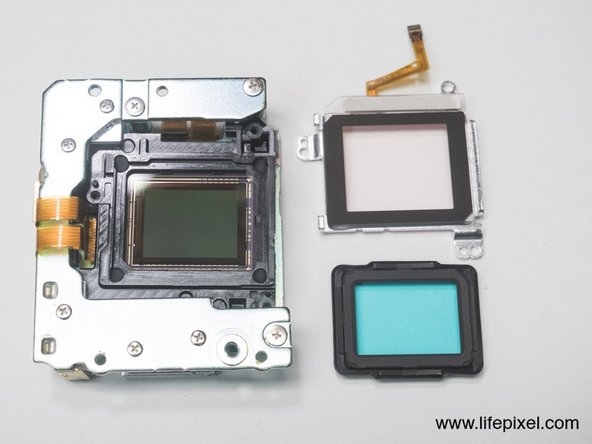
    • I have dust particles underneath the sensor glass, so sensor swabs didn't help me. I will try to get inside and under the glass. Additionally the EVF is overbright after a drop and maybe can be rearranged in the process.

    • You can spot dust marks yourself best if you set the camera to the "A" mode at f/22 and take a picture of the sky

  2. Panasonic Lumix GX80/85 Teardown: 步骤 2 中的图像 1,1
    • Start with these two screws. Remember screw sizes and position, there are many different lengths used!

  3. Panasonic Lumix GX80/85 Teardown: 步骤 3 中的图像 1,3 Panasonic Lumix GX80/85 Teardown: 步骤 3 中的图像 2,3 Panasonic Lumix GX80/85 Teardown: 步骤 3 中的图像 3,3
    • remove the flash spring as shown and the four screws

  4. Panasonic Lumix GX80/85 Teardown: 步骤 4 中的图像 1,1
    • Remove this screw

  5. Panasonic Lumix GX80/85 Teardown: 步骤 5 中的图像 1,1
    • remove the bottom screws

  6. Panasonic Lumix GX80/85 Teardown: 步骤 6 中的图像 1,2 Panasonic Lumix GX80/85 Teardown: 步骤 6 中的图像 2,2
    • remove the backplate and remove the ribbon cables

  7. Panasonic Lumix GX80/85 Teardown: 步骤 7 中的图像 1,1
    • remove the 3 screws

  8. Panasonic Lumix GX80/85 Teardown: 步骤 8 中的图像 1,3 Panasonic Lumix GX80/85 Teardown: 步骤 8 中的图像 2,3 Panasonic Lumix GX80/85 Teardown: 步骤 8 中的图像 3,3
    • to remove the sensor more easily you can remove the top bar before

  9. Panasonic Lumix GX80/85 Teardown: 步骤 9 中的图像 1,1
    • Flash E.Capacitor removal

  10. Panasonic Lumix GX80/85 Teardown: 步骤 10 中的图像 1,2 Panasonic Lumix GX80/85 Teardown: 步骤 10 中的图像 2,2
    • Remove the 3 screws to get the sensor cover glass off. Be Careful not to let them fall inside the housing. There are extremely strong magnets!

Andi

于01/21/17注册

271 声望

撰写一个指南

15条评论

Hello,

and what about Flange back adjustment? Did you solve it somehow?

Štěpán Karásek - 回复

Hi, what exactly do you mean? I managed to wipe the sensor clean, but correct reassembly is difficult. I might have missaligned the magnets holding the sensor and now the camera sometimes seems to focus very slow.

Andi -

How do you remove the top case unit or top bar?

Nigel - 回复

I need to access the SD card slot, as I am afraid something is stuck in the slot. The camera is giving messages “insert the card again”

vibishika - 回复

SD card is known as “delicate” one. Use MicroSD adapter with 2-3 plies of adhesive tape on “title side” over contacts. Plus two 5mm stripes near MicroSD slot. Insert adapter and use two stripes to secure your adapter to battery compartment walls. Never move adapter until you need to replace it. Then only use MicroSD cards with some adhesive tape stripe to pull the card from your new slot. Once properly contacted, adapter will avoid “insert SD card back” message on screen.

c64club - 回复

添加评论

浏览统计数据:

过去 24 小时: 1

过去 7 天: 12

过去 30 天: 119

总计 5,487