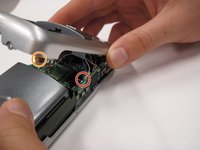
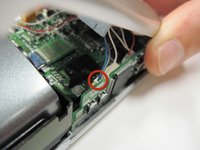
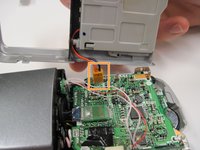
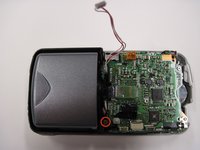
拆解
A teardown of the Nikon Coolpix 3500.
本篇指南是分解流程而非维修指南。 如果您要维修您的Nikon Coolpix 3500,应参考我们的维修指南。
Remove the battery cover.
Remove the battery.
Remove two 4.5 mm screws next to the battery slot.
Remove one 3 mm screw above the CF memory card slot.
Remove one 4.5 mm screw next to the CF memory card slot.
Remove two 4.5 mm screws from inside the battery slot.
Remove two 5 mm screws from the opposite end of the battery slot.
Remove the plastic cap and the 5 mm screw underneath.
Remove the five 3.5 mm screws from the bottom of the camera.
Gently pry off the grey faceplate.
Do not pull hard; there are two wires connecting the faceplate to the motherboard.
Use a spudger to disconnect the white-capped wire at the bottom of the camera.
Use a spudger to disconnect the orange-capped wire at the bottom of the camera and set the faceplate aside.
Disconnect the grey-capped wires from the motherboard.
Disconnect the blue wire attached to the green chip from the center of the motherboard.
Remove the 3.5 mm screw from the motherboard next to the rotating lens.
Flip the motherboard and lens over to access the three wires on the back that connect to the LED screen.
Disconnect the blue wire connecting the motherboard to the LED screen.
Disconnect the orange wire using a spudger while pushing out horizontally.
Disconnect the red capped wire from the motherboard.
Lift the motherboard and lens (still connected) out of the back case.
Lift up on the black covering and remove the orange wire connecting the lens to the motherboard.
Remove the 2.5 mm screw next to the red capped wire.
Remove the two 3.4 mm screws on the back of the directional buttons.
Remove the two 4.4 mm screws in the metal plate across from the orange wire.
Gently lift the LED screen out of the remaining casing and set it aside.
Be careful not to let the rubber backing of the buttons fall out of place.
与10其他贡献者
于04/19/10注册
183 声望
创作了6篇指南
徽章: 6
+ 3更多徽章
CPSU-GARNER-S10S30G38
5 名成员
创作了11篇指南
选择一个尺寸并复制下面的代码,将本指南作为一个小插件嵌入到你的网站/论坛中。
过去 24 小时: 2
过去 7 天: 22
过去 30 天: 29
总计 7,848